Being a museum courier, COVID style

Fig. 1 – Screenshot of curator Susanne Lambooy and the author talking during a virtual courier trip to the Kunstmuseum in The Hague

International courier trips are often seen as one of the benefits of a museum career. When objects are lent to museums overseas, they are usually accompanied by a member of the collections team to oversee their safe transport, handling, and installation at the venue. It’s an amazing chance to go behind the scenes at some fantastic museums in lovely locations, and you might just squeeze in a few hours’ sightseeing somewhere exotic… Of course, it’s not all glamour! You can just as easily be spending long hours in a cargo shed at an airport, driving long distances in a lorry, or get stuck in customs, without many opportunities for a break or a meal, while making sure your precious artefacts are supervised at all times. But COVID has changed all that; and that is why in June I completed my first ever ‘virtual courier trip’, to the Kunstmuseum in The Hague.
The Fitzwilliam has loaned 15 pieces of English Delftware pottery to the Kunstmuseum for a show called ‘Royal Blue: William and Mary’s Finest Delftware’. The objects were sent out to The Hague in early March, accompanied by Tim Matthews from the Applied Arts department at the Fitz. They had just arrived at the museum when the whole of the Netherlands went into lockdown and Tim had to rush back to the UK to avoid becoming stranded. All plans to install the exhibition were abandoned and the ceramics were placed in store in their travelling crates without being unpacked.
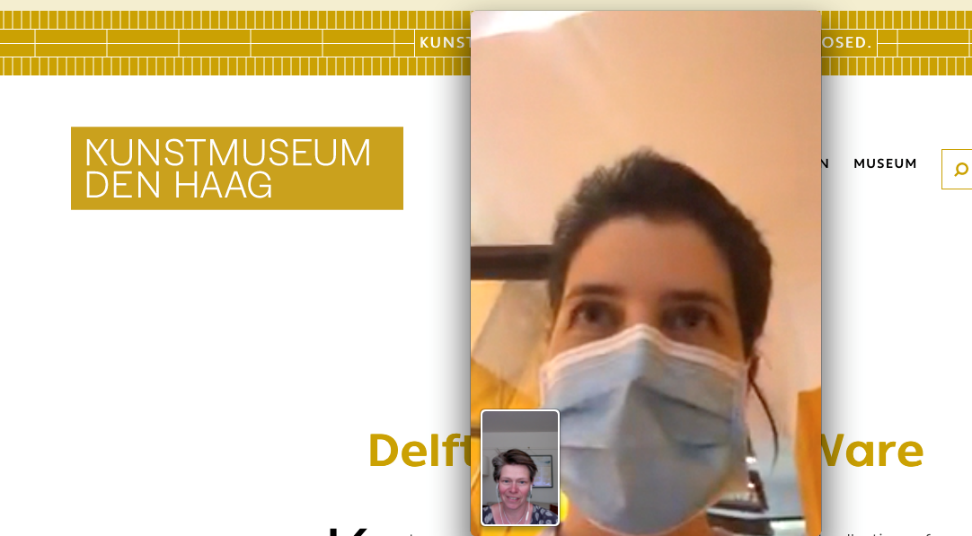
Ten weeks later, the Kunstmuseum was planning to reopen and install the exhibition. But many institutions have lent objects for the display, sometimes from countries which, like the UK, were still in lockdown, and sometimes from museums with staff on furlough. For the exhibition to be possible, we all had to adapt our usual procedures. In this case, we decided to do the courier trip via a video call.
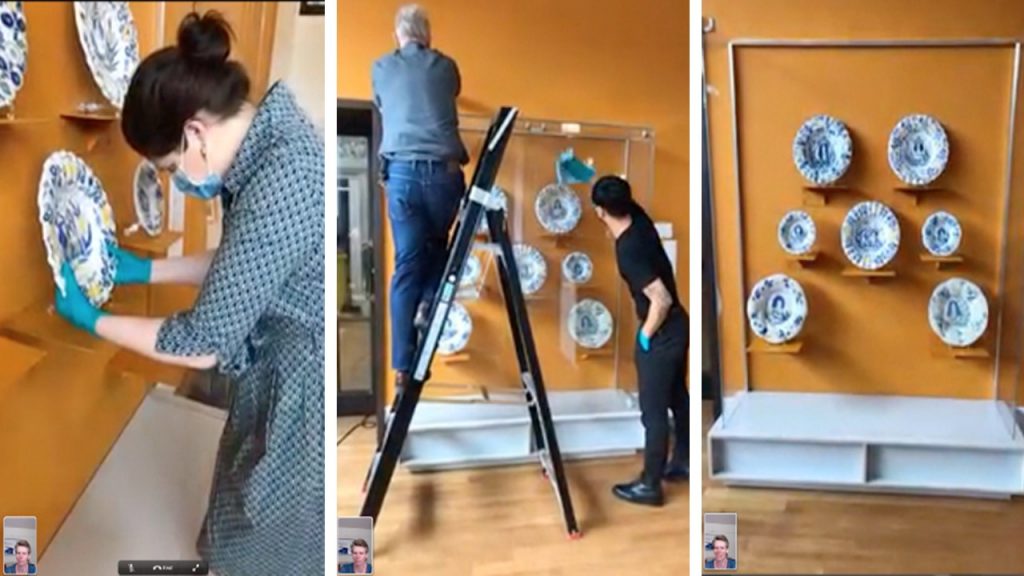
We used FaceTime, which meant I could follow what was happening in The Hague and also look at the loan documents I needed on the computer. (Other platforms could have worked in the same way for a PC.) At the other end, curator Suzanne Lambooy, conservator-restorer Maud Schermer, and the conservation assistant team used phones to video every moment of the process in a live session.
After introducing ourselves, we got on with unpacking the objects. The conservation assistants opened the crates and started to unpack, photographing every stage to make repacking easier at the end of the exhibition, and to have a record of anything untoward that might have happened during the journey. Luckily everything was in perfect order.

Fig.2 – Opening the crates and unpacking the ceramics

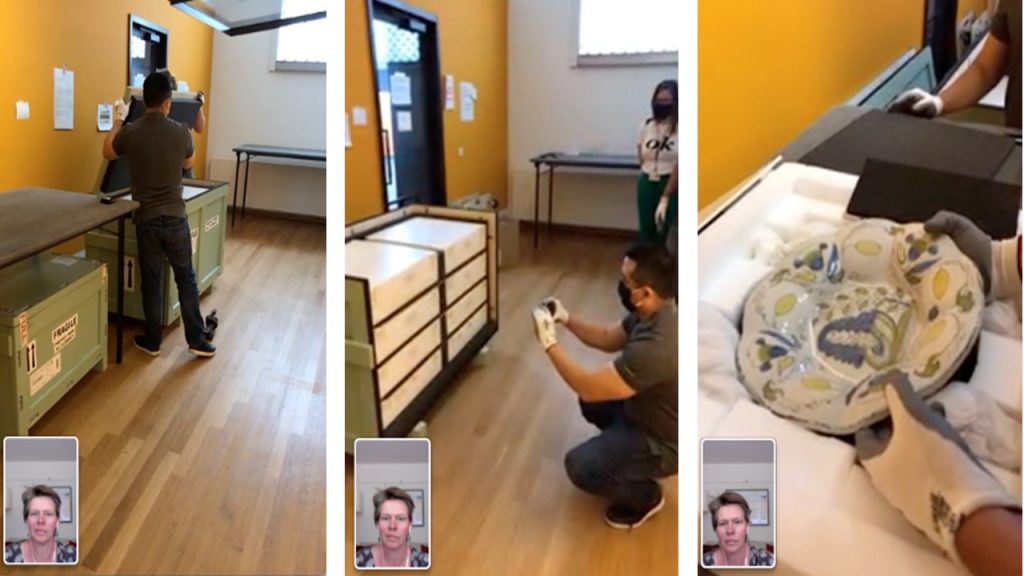
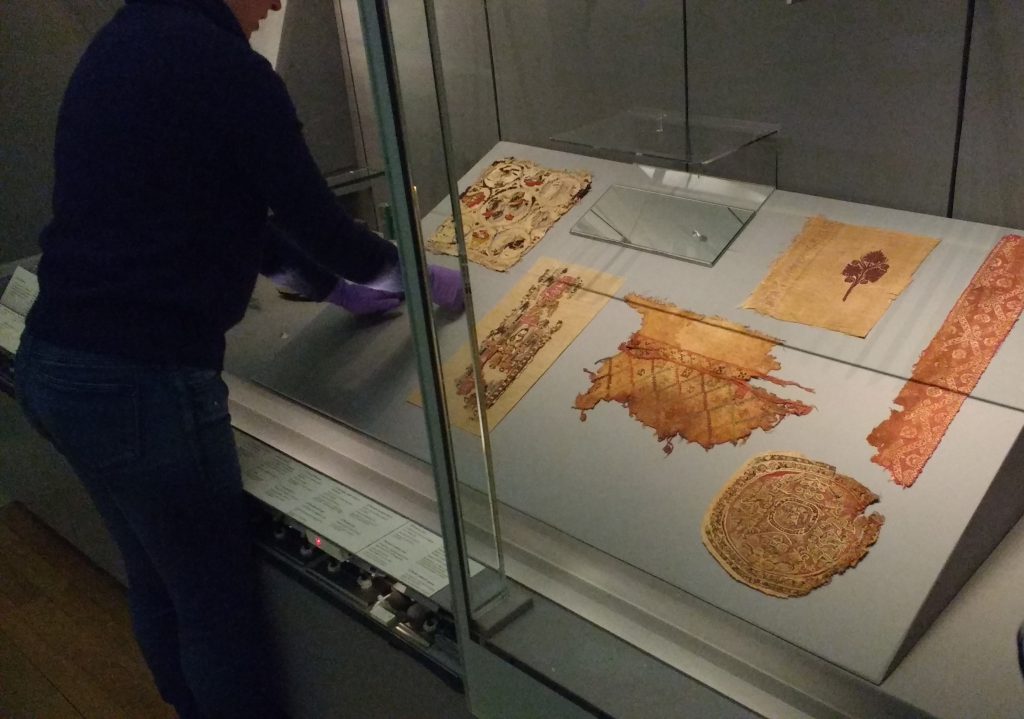
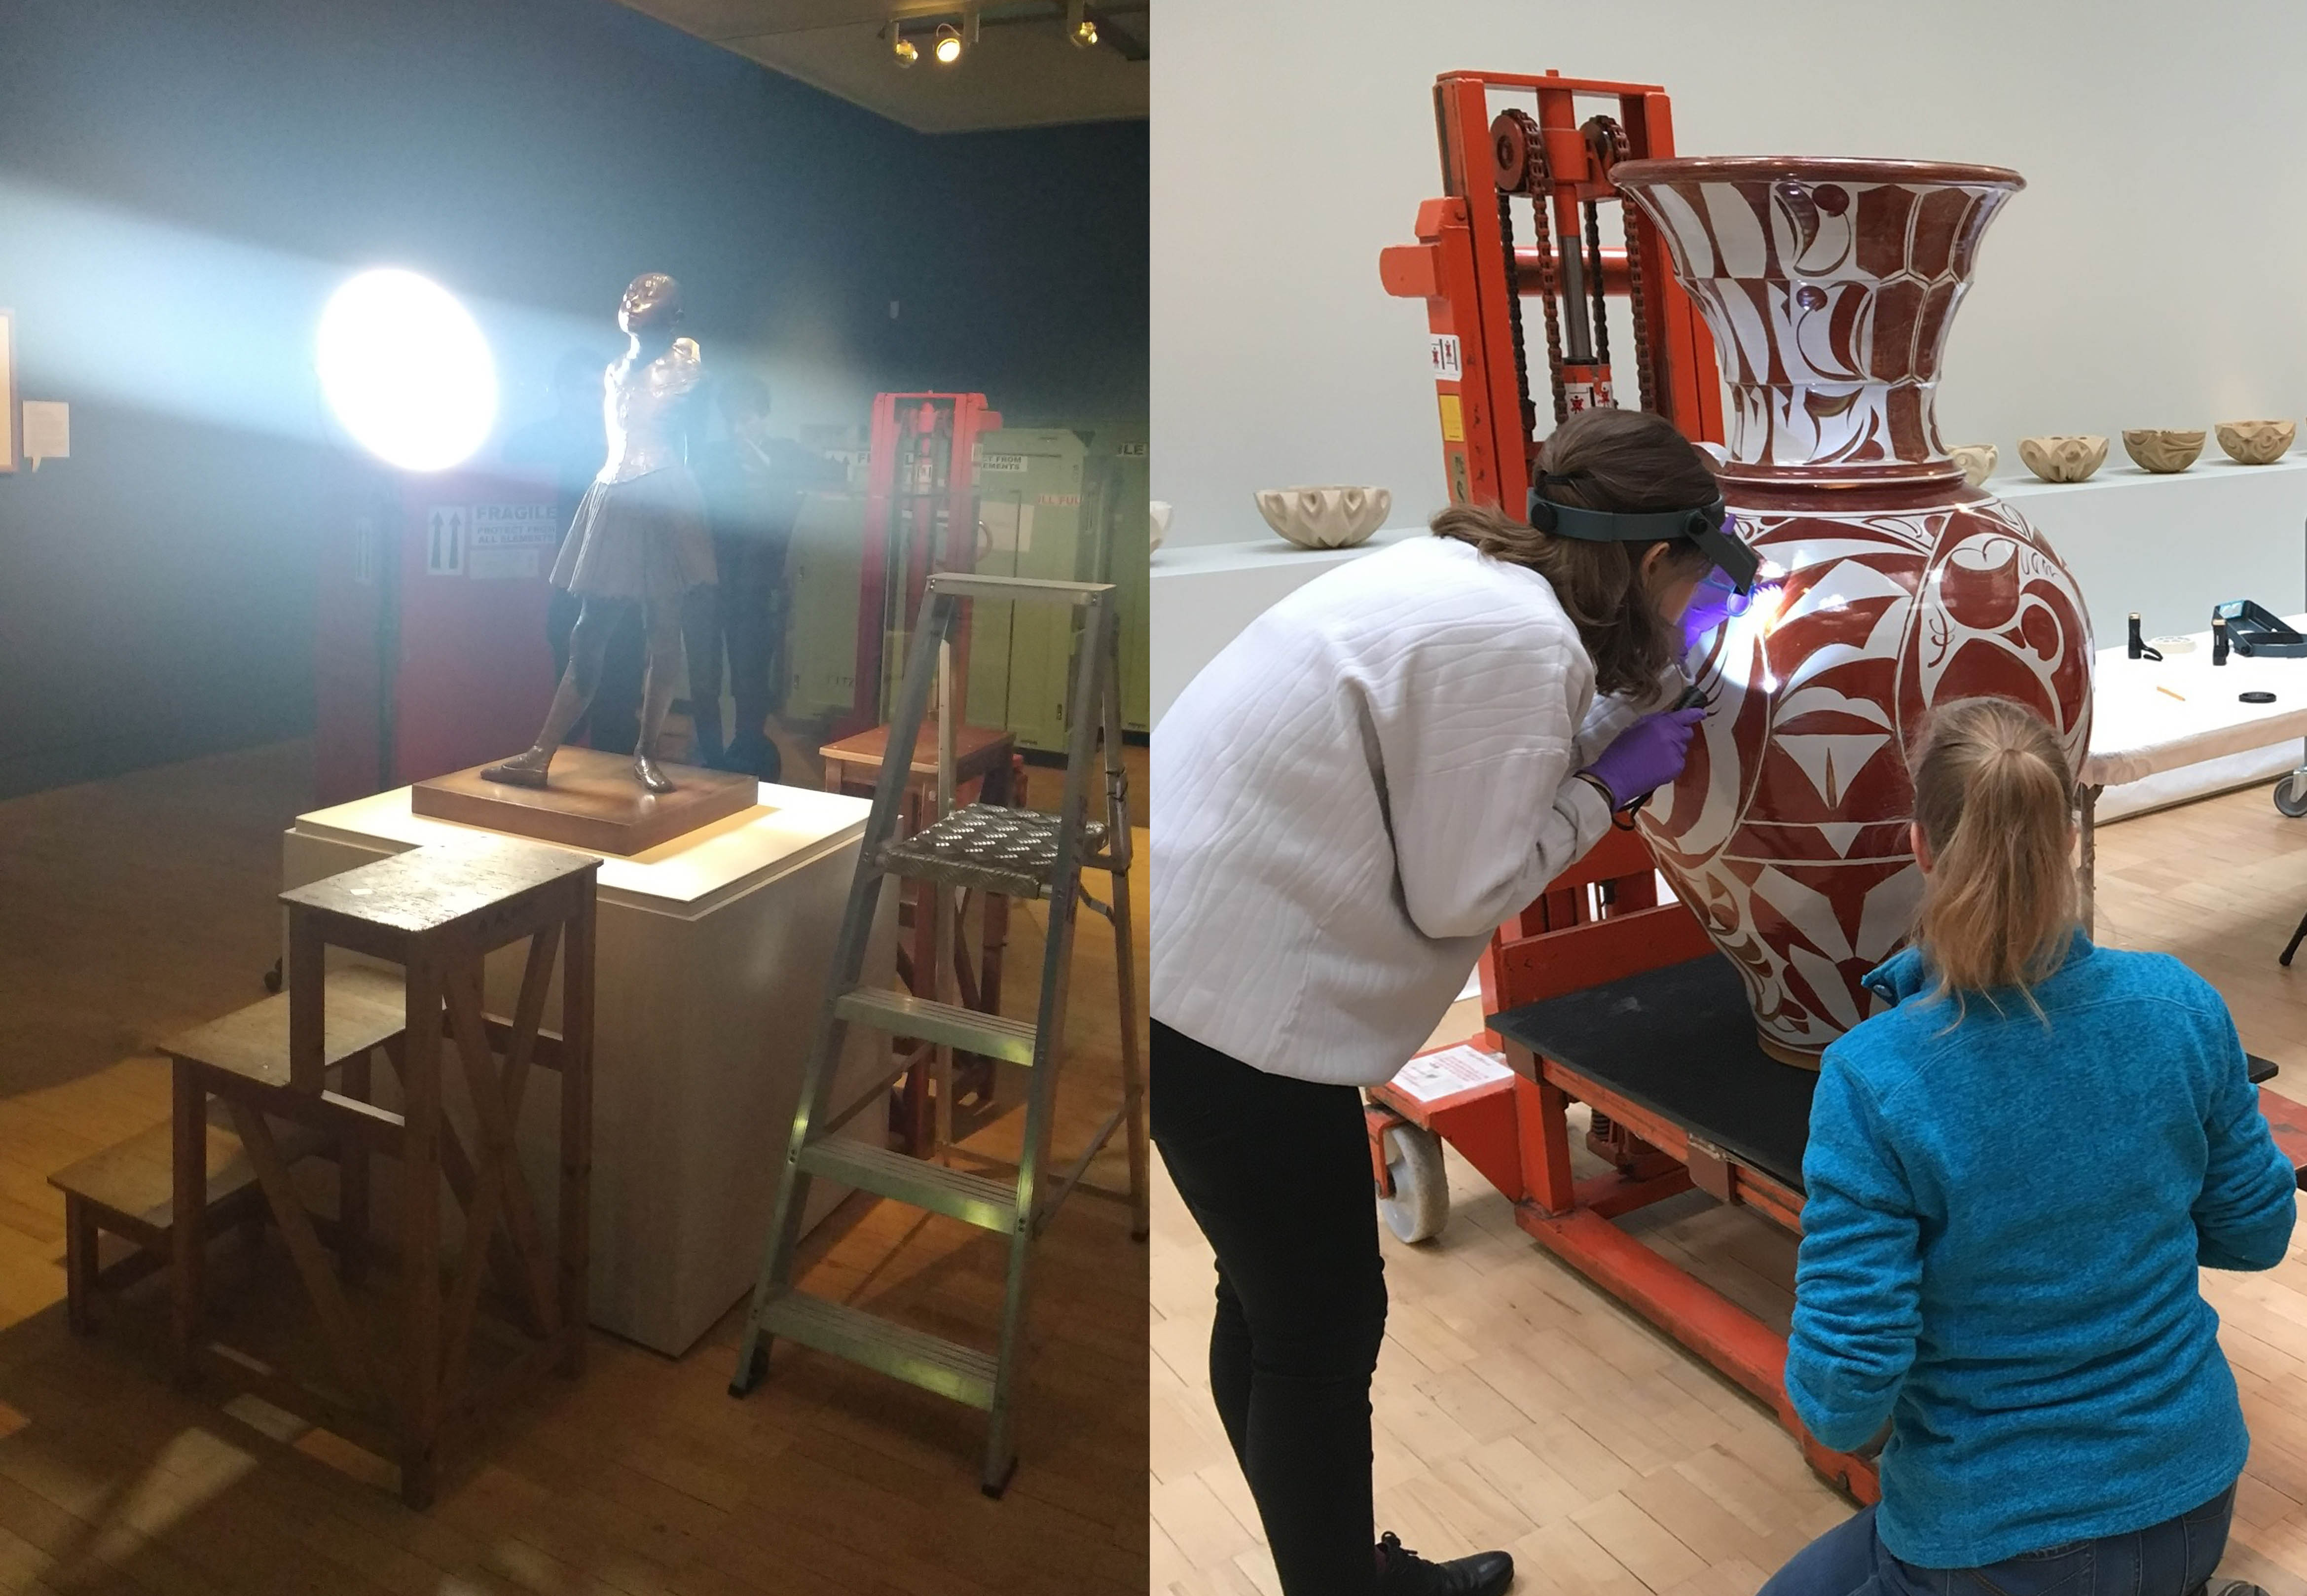
All the ceramics were laid out on padded tables next to the display cases and Maud started to check them over. The condition of objects when they leave the Fitzwilliam is documented thoroughly in condition reports and photographs, so Maud and I checked each piece carefully against the records to make sure that there was no new damage. Delftware is very fragile and even well-preserved examples almost always have lots of cracks and chips. Delftware needs to be handled very carefully because it is so easy to damage. Happily, all the staff at the Kunstmuseum are very familiar with this material, and everything they did was exemplary! Maud is a specialist ceramics conservator so was also the ideal person to be doing the real-life condition checking.
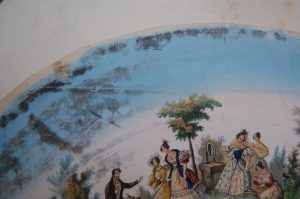
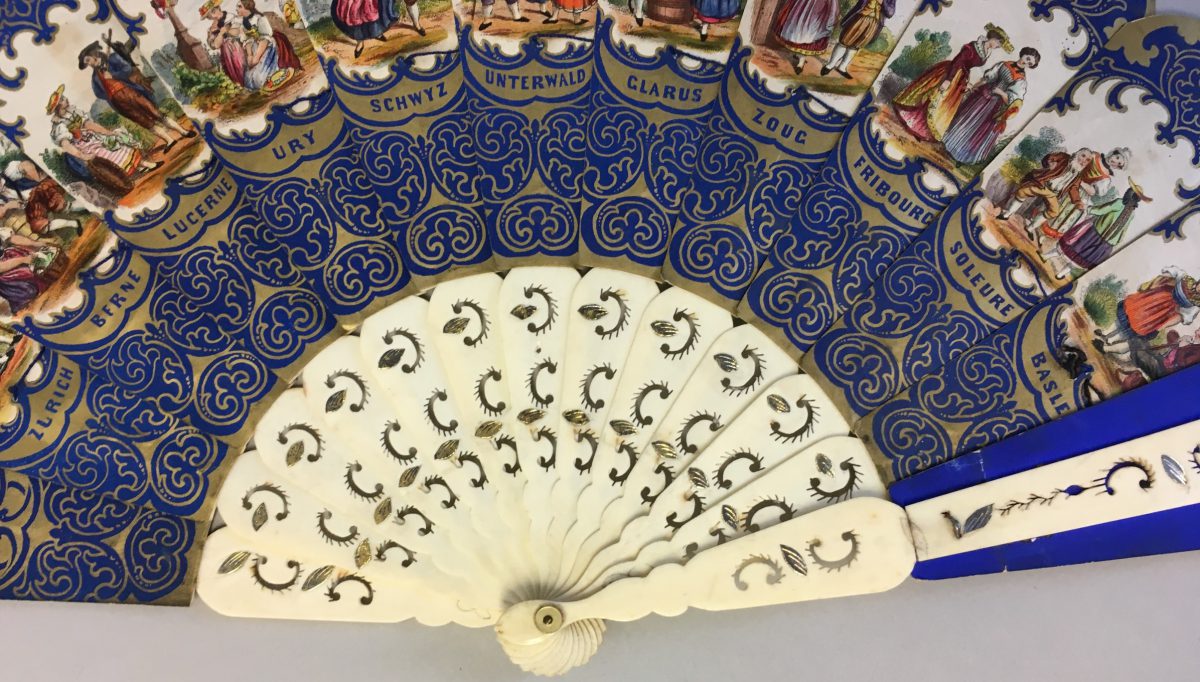
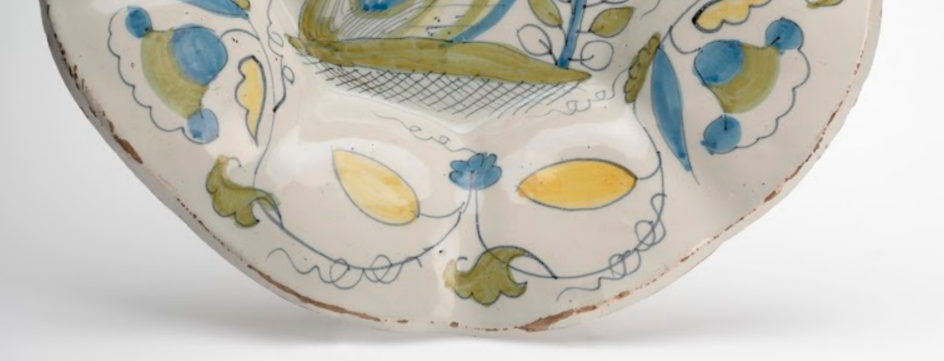
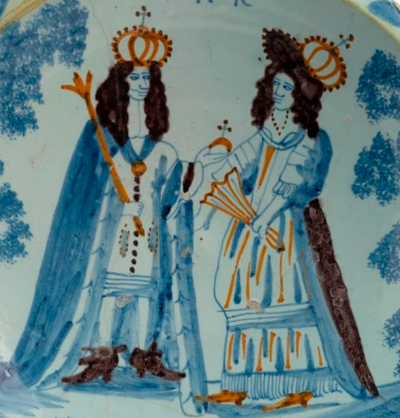
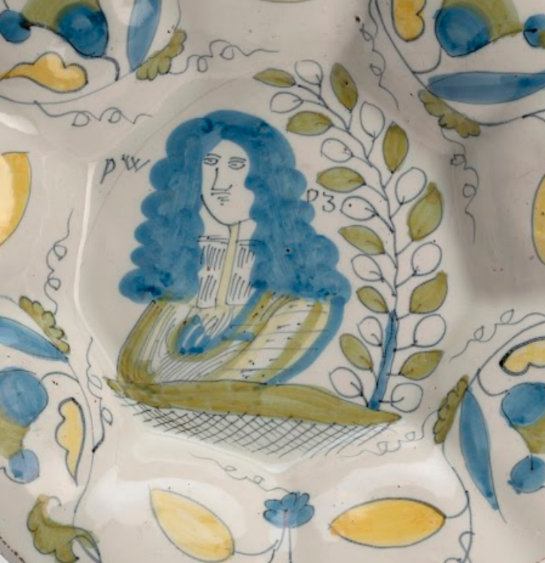
Looking at the objects in detail was one of the highlights of the experience for me. All of them are decorated with images of William and Mary, who ruled both England and Holland from 1689 to 1702. The pieces are hand-painted and have quite stylised motifs – for example, the things which to me look a bit like lemons are actually intended to be tulips:

Fig. 3 – Detail of C.2633-1928, a delftware dish, late 17th century, showing stylised yellow tulips

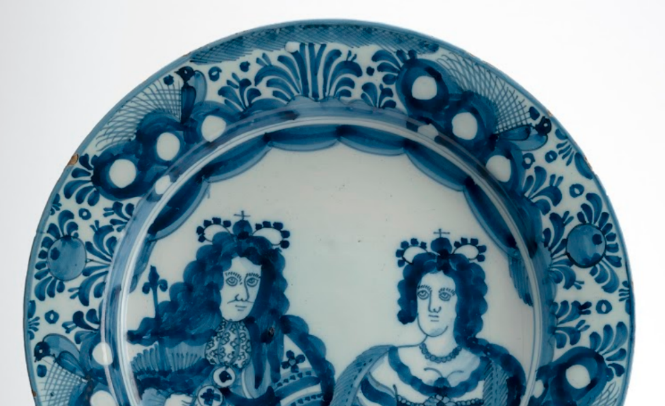
Similarly, the heavy blue clusters of circles topped with birds on this plate are actually a very stylised version of the rock-and-bird motifs found on some Chinese ceramics which were popular in the same period.

Fig. 4 – Detail of C.2483-1928, a delftware dish, late 17th century, showing the stylised imitation of the Chinese rock-and-bird motif on the rim

It was also fun to compare the images of the king and queen, which varied from the frankly jaded…

Fig. 5 – C.2482-1928, a delftware dish, late 17th century, detail

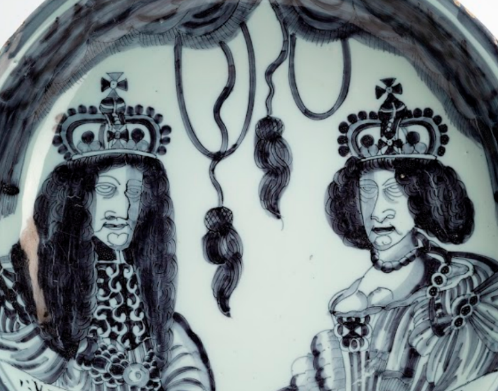
to the quite frisky…

Fig. 6 – C.1633-1928, a delftware dish, late 17th century, detail

and, in this case, reminded us rather unfortunately of Jabba the Hutt!

Fig. 7 – C.2633-1928, a delftware dish, late 17th century, detail

All the designs are unique and quirky, and I could have spent a lot longer enjoying their different characters; but we had to get on with installing the objects in the displays. Curator Suzanne and conservation assistant Bao worked on arranging the dishes and jugs in the display cases, which were painted in William and Mary’s signature orange colour. The blue-and-white ceramics, with their dashes of yellow, really sing out against this background.

Fig. 8 – The Kunstmuseum team installing the ceramics in a display case. Here the plates are arranged in an ‘M’-shape for Mary, and the case next door is arranged in a ‘W’-shape for William.

Soon the displays were finished and the cases could be closed down and locked: they won’t be reopened now until the exhibition closes and it is time to pack everything for transport home.
This adventure in ‘video-couriering’ went amazingly well, not least because the members of the Kunstmuseum team were very experienced and professional, and also lovely people to work with. We had a few challenges with the signal dropping out and batteries going flat – video calls use masses of power so the phone used for the session needed to be on charge for quite a lot of the time. (A portable battery charger would be a big help here!) The video quality is never brilliant so it is also crucial to have good photos of the objects when doing the condition assessments: the main benefit of the video at the condition-checking stage is to help make sure we are all talking about the same thing.
Typically, exhibition installations can get pretty hectic, with precision timing needed to install pieces from multiple lenders in a short space of time. The scene at the Kunstmuseum was almost eerily quiet by comparison. This was partly because only about 15% of their staff were on site, to maintain social distancing as the museum gradually returned to work. Naturally everyone was also wearing a mask and gloves at all times. I asked how they were finding using video to work with ‘couriers’. On the plus side, the exhibition space itself does not get too crowded, and if more than one lender needs to supervise a particular display case being closed for the exhibition, they can attend virtually at a time to suit all. This makes some of the logistics easier to arrange, and reduces time pressure. The logistics of organising even virtual installations were tricky at the time because so many museums were closed and had their staff on furlough, but this has now eased.
This experience has challenged my assumptions about couriering objects on loan in a very positive way. It is encouraging to realise that by being flexible we can develop safer (at the moment) and also more environmentally and financially sustainable procedures, without compromising the safety of objects travelling on loan. And collaborating with the lovely Kunstmuseum team online was almost as refreshing as actually going to The Hague after so many weeks of working from home!

Sophie Rowe, ACR
Conservator of Applied Arts
Fitzwilliam Museum

The Shrine Project

Discussion about replacing the old, worn plinth beneath the Egyptian Shrine (E.40.1902) in the Gayer Anderson Gallery began in 2017 (Fig. 1). We wanted to bring it into line with the other two plinths supporting the largest pieces of sculpture in this gallery.  Plinths provide an important protective function. In addition, they help to create a clearly defined, dedicated space which can offer visual emphasis to objects, like frames around paintings.

Fig. 1 The Egyptian shrine, E.40.1902

People had been observed passing this sculpture too closely, accidentally brushing against it. On one occasion, a boy had climbed up onto the front of the shrine and reversed himself neatly into the niche. Although this was an isolated incident, it increased the urgency to make the necessary improvements. Preservation of this ancient sculpture is vital: in widening the footprint of the plinth, a safer distance could be created between the sculpture and visitors.

I contacted the company who had built the two previous plinths, forwarding them a rough sketch to save time (Fig. 2). In follow-up communications, I included static label holders, required for each of the three main sculptures. To achieve design consistency, they were to match the material and design of those in our Greek gallery. For the plinth itself, we chose Corian, a hardwearing and versatile stone-like material, which was also used for the other main plinths.

Fig. 2 Initial sketch of the shrine and the plinth

The contractors visited to make a plywood template in four sections which needed to follow the meandering edges of the base very closely. The aim was to provide a snug fit but avoid contact with the surface of the object. They were confident that they had all the information they needed to proceed, but to ensure accuracy, I asked for a detailed, scale drawing – to quote an inherited mantra, ‘Measure twice, cut once!’.  After some tweaking, relating specifically to the angle and height of the label holders and how they connected to the plinth, we were able to agree on the plan and set a date for installation.

Work and time spent on the practical, planning stage of a project is mostly unseen and therefore largely unappreciated. Success, however, is apparent in a job well done. Mistakes can prove costly and exceed time limits, so clear, detailed communication with contractors is key. This technical drawing (Fig. 3), showing various angles, views, and elevations, illustrates the result of this process, which took several weeks.

Fig. 3 Detailed drawings of the final design

A structural restoration had been made on the reverse of the shrine using bricks and poorly applied cement mortar (Fig. 4). This was to enable safe, upright display and it continues to serve this purpose. The shrine was previously displayed up against a wall, so no consideration had been given to the appearance of this practical fix.

Fig. 4 Old structural restoration to the back of the shrine

When the Egyptian galleries were refurbished and reopened in 2006, the shrine was moved into the Gayer Anderson gallery and placed in a central space where it could be viewed from all sides. During this busy project, the decision was made to hide the unsightly restoration from view temporarily behind a white shadow board, set vertically into the base.

As technicians, our priorities regularly shift around to provide vital support to our rolling exhibitions and departmental needs. Projects can overlap or happen simultaneously so temporary measures are adopted when time is short. This can sometimes move into semi-permanent status, which is perfectly acceptable if the safety and condition of an object is uncompromised.

However, ten years on, with the imminent installation of a new plinth, it was time to remove the painted board from the shrine, and improve upon the ugly restoration beneath. Minimal intervention is always preferable and, as removing the cement would almost certainly have incurred risk to the shrine itself, the plan was to work with what was already there, making the best possible improvements. I estimated the project would take a couple of months to complete as this was gallery-based work and I was restricted to Mondays, when the Museum is closed to the public.

I enjoyed the opportunity and challenge presented and began to plan how I could achieve the best result. I reviewed all existing documentation on the shrine to see if I could find information that might reveal less obvious areas of fragility or cracks. I also needed to establish exactly where the actual object ended and where the restoration began. This would enable me to take the new infill just up to the edge of the object without creating too obvious a divide, but make the dividing line apparent on closer inspection. This was to keep in line with a general museum conservation rule-of-thumb that infills and repairs should be imperceptible from a distance of six feet, but clearly distinguishable from a distance of six inches.

After thorough examination and consideration, I collected the equipment and materials I would need.  These included:

  • A good task light and extension lead – essential for fine work in our darkened galleries
  • Dust masks and gloves, and something comfortable to sit on
  • Lots of sandpaper, an old chisel, blunt scraping tools, and various brushes (ranging from wide DIY types to thin fine bristle)
  • An inert, conservation-grade filler, called ‘Flugger’ (https://www.flugger.com/en
  • Paint, both acrylic and pigment, and a vessel for water
  • a Henry vacuum-cleaner
  • …and my personal playlist!

On removal of the painted backboard, it was a nice surprise to discover a more modern piece of history – a handwritten note by  my retired colleague, Bob, on the underside (Fig. 5).  I posted a photo of it to him, but we are still wondering what he had meant by ‘No 50 pm’!

Fig. 5 A message from Bob

My first job was to cut away a random, brittle piece of Formica, protruding from the base of the object (Fig. 6). Use of a Stanley knife proved futile, but a quick trip to our friendly Maintenance team produced an essential, sharp, electrical cutting tool. The Formica had been filing a small void at the base of the object, so I made a new fill from pieces of card (Fig. 7).

Next came the use of the filler. The crude surface of the old bricks and cement needed to be covered evenly to reintegrate the area with the sculpture visually, so it was important to make the texture match well with the original surface.

Flugger can shrink a little on drying so needed to be applied quite thinly in stages. It was important to allow it to dry fully before applying the next layer. This fitted well with the rhythm of access that framed the job. At the end of the day, I would re-attach the white board back over my work and have little choice but to allow it the entire week to set before adding another layer.

Regular sanding back of rough, crusty edges (Figs. 8 and 9) and the repeated application of Flugger continued for some time. This resulted in a lot of fine white dust and the regular need to vacuum. Although smoother than the surface of the object, the end goal was not to disguise or confuse but to create a subtle distinction between the object and the new fill.

Once I had completed this stage, I needed to decide on a suitable colour match. I took time to examine the  landscape of textures and differing earth tones on the shrine (Figs. 10 and 11). This  was a tricky decision, particularly because, when viewed from the side, several different colours and tones were apparent. I made colour tests with a mixture of acrylics and  earth pigments, adding a matting solution to prevent surface shine. On comparison of the results, I decided on a muddy combination of them all.

I applied a base coat to the entire area and then began building up layers, stippling with a wide brush to create depth and texture. Challenges arose with the difference in colour of wet, freshly applied paint in comparison to its appearance when dry. This is a common issue, especially with pigments. In order to check on progress with the colour I had to switch off my task light regularly and stand back to judge the effect of how my work would normally be seen by visitors, under the controlled light of the gallery during open hours.

Mixing up a big enough batch of paint and covering it with clingfilm to use at the next weekly application became a helpful time-saver. Although enjoyable, colour matching can sometimes seem never-ending, with a constant potential for improvement; but the fast-approaching date for the plinth installation provided me with a deadline.

Having completed my part of the project, it was great to see the four sections of Corian arrive and fit neatly, jigsaw-style, around the object (Figs. 12 and 13). The contractor made small adjustments where needed and filled the joins, sanding back the filler to an impressive invisible finish.

Now standing on its smart new plinth, complete with a built-in label holder, the shrine has an improved, balanced aesthetic and is better protected from general contact (Fig. 14).

Fig. 14 The shrine on its new plinth

Louise Jenkins, Senior Chief Technician, Antiquities Department

Unfolding the Lennox-Boyd Fan Collection – Part 2

The Conservation Project

Fans are complex, three-dimensional objects made of several types of material. Conservation of fans from the recently acquired Lennox-Boyd collection has been a rewarding collaboration between conservators in the Applied Arts department and the Paintings, Drawings and Prints (PDP) department. Phase 1 of the project involved a condition survey, photography and treatment of a small sample of fans. Phase 2 involved a re-housing project, scientific analyses and conservation treatment in preparation for the current display at the Fitzwilliam Museum. A selection of 51 fans was made for the display, reflecting the variety in age, manufacture and condition of the Lennox-Boyd collection. This post discusses the project from a Paper Conservator’s perspective.

Removing dust and dirt with a soft brush

Paper Fans – Condition

Although fan leaves can be made of materials such as vellum, bone and silk, the predominant material used is paper. The Lennox-Boyd collection contains over 400 paper–based folding fans and flat paper leaves. Of all the components that make up a fan, it is the leaf which suffers the most damage and deterioration. The quality and condition of fans in the Lennox-Boyd collection reflects their wide-ranging variety, age and history. Many fans show signs of ownership and long use: accumulated dirt and assorted tears and splitting along the pleats are the most common types of damage. Additionally, fans can be harmed by exposure to light, fluctuating temperature and humidity, pollution, biological attack from mould and insects, and contact with other, frequently inferior quality, materials. These affect the paper as well as the applied, painted or printed media which decorate the leaves.

Detail of the flaking paint layer on a fan pleat which needed consolidation (M.343-2015)

Early European papers used for fans were hand-made from plant fibres, which were strong and long-lasting. There are many fine examples of these beautiful papers in the collection. With the advent of machine-made papers from around 1860, paper quality became more variable. Around this time, less durable, mass-produced papers started to appear in fans. Over time, these poorer-quality papers become acidic and weak, tearing easily and losing their ability to endure opening and closing. Other materials used in fan manufacture have also developed and changed, often affecting the stability and permanence of the fan overall: adhesives may discolour and fail as they age; paints and printing inks become less permanent. Other fan components may affect the stability of the paper: the wooden or card ‘ribs’ which hold the fan leaf in place sometimes cause staining and degradation, as do corrosive or degrading paints and inks. The collection also exhibits a wide range of old repairs using materials such as stamp hinges, paper, thread, and pressure-sensitive tapes. Many of these repairs are unsightly and have caused further deterioration.

Localised darkening of lead white paint on a fan leaf

Conservation of Paper Folding Fans and Fan Leaves

Treatments undertaken on the Lennox-Boyd fans in preparation for display ranged from minimal cleaning to more interventive, labour-intensive repairs. Treatment of the folding fans was limited to actions such as gentle surface cleaning and physical repairs which could be carried out safely without taking the fans apart. The fans were supported underneath during treatment with tapering pieces of polyethylene foam and care was taken to apply as little pressure as possible to their delicate surfaces.

Surface cleaning using a wedge of vinyl eraser

Dirt and dust were removed using soft brushes, accretions were carefully picked off using the tip of a scalpel blade, and the more ingrained dirt was reduced using either dry cleaning sponges or small wedges of vinyl eraser. Cleaning was avoided in areas with fragile media. Where possible, flaking or cracked paints were consolidated with a cellulose-based adhesive. Mould spores were safely removed using a brush and suction. Many flat fan leaves were detached from unsuitable acidic boards. Several discoloured and stained leaves were dry-cleaned, then washed in buffered de-ionised water. Before pressing they were given a coat of dilute gelatine to replace degraded sizing and gently re-adhere the sheets together where they had separated. They were then lightly humidified and pressed between blotters and weighted boards. Some disfiguring stains on the fan leaves were locally treated with a weak bleach solution and then rinsed.

Re-sizing a fan leaf with a dilute gelatine solution after washing

Splits and tears were mended with starch paste and/or a cellulose-based adhesive and narrow strips of cut or torn Japanese tissue tinted with dilute washes of acrylic paint. Where possible, the two paper sheets making up many fan leaves was gently prized apart in order to insert the mend between the layers. The sheets were then pasted closed again to make the repair invisible. If this wasn’t possible, a small strip of tinted tissue paper was pasted along the reverse side of the damaged seam. Repairs were held in place to dry under small weights, using clamps or by hand, depending on the location of the damage and the strength of the paper. Losses were filled with Japanese paper of a matching weight, texture and colour. Disfiguring or damaging old repairs were removed and replaced.

A telescopic (sliding) fan (M.220-2015) before treatment, showing splits, tears and exposed sticks and ribs

Detail of the reverse of the telescopic fan, showing tinted paper repairs to losses (M.220-2015)

Telescopic (sliding) fan after treatment (M.220-2015)

Conservation procedures followed strict professional protocol, using conservation-grade materials, testing prior to treatments, and thorough documentation throughout.

Carrying out paper repairs on a fan leaf

Display and Storage of the Fan Collection

After treatment, a customized acrylic stand was made for each fan by technicians in the Applied Arts department. The stands can be tilted at different angles by means of a ball-joint mounting and are sensitively designed to support the open fan safely whilst on display. Flat fan leaves were hinged onto acid-free museum board with Japanese paper and starch paste, and given fan-shaped window mounts. Other fan leaves will be stored in polyester sleeves with acid-free card support. The majority of folding fans will be stored closed and wrapped in acid-free tissue. All the fans will be stored in museum Solander boxes on racks of dedicated shelving. It is hoped that the conservation of the Lennox-Boyd collection will continue, enabling more of these intriguing objects to be available for study and display in the future.

Fan leaves being hinged onto a bespoke acid-free mount for display

Acknowledgements

Thank you to the curatorial and conservation staff in the Applied Arts department and the Paintings, Drawings and Prints department of the Fitzwilliam Museum. The fan collection of the late Hon. Christopher Lennox-Boyd (1941–2012) was accepted in lieu of Inheritance Tax by H M Government and allocated to the Fitzwilliam Museum in 2015. This conservation project was generously funded by the Marlay Group.

Rosie Macdonald

Paper Conservator, Lennox-Boyd Fan Project


Unfolding the Lennox-Boyd Collection – Part 1

The Applied Arts team has been working with the Paintings, Drawings and Prints (PDP) Department on the recently acquired Lennox-Boyd fan collection. The collection is comprised of 435 folding fans, 10 screen fans, 178 unmounted paper fan leaves, and 4 miscellaneous items. Some folding fans and leaves are mounted within frames, and many are accompanied by their original boxes. The table below shows the variety of fan types and materials. The graph shows their geographical distribution.

The project began with a condition survey. Paper Conservator Rosie Macdonald and I examined a sample of the collection, identifying materials and deterioration problems, and estimating the time required for conservation.

Condition data was collected in a spreadsheet

We photographed each fan in the sample, entered the condition data into a spreadsheet, and analysed statistics in order to better understand the condition of the entire collection. Conservators from both departments also went on a research trip to visit other fan collections in London.

In the second phase of the project we have been rehousing the collection and conserving some of the fans in preparation for a new display, opening on March 5th 2019.

Over the course of this project I conserved three types of fan: folded, brisé and screen fans.

Folded fans

Folded fans have a leaf made of paper, animal skin or textile, which is decorated in a variety of ways and folded into peaks and troughs. I cleaned the textile leaves by dusting with a soft brush and consolidated any loose elements.

Guards are the exterior, rigid elements that protect the fan when closed. In this collection I encountered guards which are made of bone, ivory, wood, mother-of-pearl and plastic. Cleaning was carried out using a soft brush and a vulcanised rubber sponge. If further cleaning was necessary, I applied a solvent with a cotton swab, removing dirt carefully under the microscope.

Sometimes the guards are heavily worked with carved and pierced decoration. On porous surfaces, such as bone or ivory, dirt was extracted using a gel applied over a barrier layer of tissue paper. The guards were then rinsed with de-ionised water to remove any trace of the gel from the surface.

The top image shows half of the bone elements of this brisé fan being cleaned with a gel treatment. The bottom image is how it appears afterwards.

Brisé fans

Brisé fans open and close much like a folding fan, but do not have a leaf. They are made of individual blades (sticks) held together by a ribbon or string.

I repaired broken sticks and guards with a conservation adhesive, securing the repairs with a paper backing (as shown above). On one occasion, the breaks on the guards had caused losses. I experimented with different methods and materials to fill in this loss so that the fan could once again have protective guards. I moulded and casted a clear, resinous material that I inserted into these areas.

The left image shows how I applied a protective layer to the painted parchment before adhering the film to the remainder of the guard. The image on the right shows the completed treatment.

The sticks are attached at the bottom point of the fan by a rivet, spacer, and/or a rivet cap. These elements are often made of metal, with the rivet cap containing a resin, glass, or precious stone inlay. Loose inlays were secured to the surface and cleaned where necessary.

Within the left of the highlighted box are gold and silver overlays which have not been cleaned, on the right are ones in the process of being cleaned. This work is done under the microscope with each stick taking up to half an hour to clean.

Metal overlays were stabilised with a conservation adhesive where loose elements were visible. Tarnish and corrosion were cleaned with an enzyme applied under magnification with a cotton swab. A protective layer was applied over some pigments so that the opening and closing of the fan no longer removed the decoration.

Screen fans

Screen fans have a fixed leaf that can be made of a wide variety of materials. The screen fan I conserved is made of various types of feathers, with a taxidermy hummingbird at its centre, and a wooden handle inlaid with ivory. The feathers were humidified, reshaped and cleaned. Some of the unstable feathers were re-adhered to the surface of the fan. Three areas of loss were filled with a paper patch made to resemble feather down.

On the left is an image of the fan before conservation. Note the mis-shaped feathers and losses to the body of the hummingbird. On the right is how the fan now appears and a detail of a paper down fill is highlighted.

For more on the conservation of these wonderful objects, watch this space for Rosie’s blog-post on the treatment of the paper elements. I hope those who can will visit the new display opening next Tuesday, March 5th 2019!

Rebeca Suarez Ferreira, MA

Objects Conservator

Applied Arts Department

The Fitzwilliam Museum

An Ethnography of Object Conservators at the Fitzwilliam

For the past three years I have been working towards a PhD with the Department of Archaeology at Durham University. My research is all about the everyday working lives of object conservators. I am interested in how conservators approach the objects they work on, what knowledge they use to do so, and how this type of work is established within heritage institutions. I am also interested in all the other work that conservators do, from preventive conservation to training new conservators, and to outreach work for the public, blog-writing included!

A photograph of me conducting my first interview for my PhD research. At this point I was asking questions relating to the records conservators keep. After that first year, I sought out a field site within which to conduct my ethnography and was grateful to partner with the University of Cambridge Museums.

I decided I would investigate these interests by conducting an ethnography. This is a methodology which anthropologists use to observe human behaviour in various settings. In anthropological terms, my study is multi-sited: I have conducted my ethnography in many different sites, with many different types of practitioners. This has given me a broad, holistic view of what conservators do in practice, how they feel about their work, what  issues  they face, and what experiences they bring to and gain from their work.


I created this diagram to explain how I structured my study. I investigate the way in which conservators come into the profession by including students, volunteers, and practitioners working with a variety of objects in diverse heritage institutions. By observing these participants in their work context, I learn about how different contexts affect conservation practice. When I interview participants, I learn about them as individuals and about their opinions regarding their practice. I also ask conservators about their knowledge production as part of my research.

One of the field sites where I conducted my ethnography was the Fitzwilliam Museum. I spent two months working with the conservators, conservation technicians, conservation interns and students of the Antiquities department. During this time, I did what anthropologists call participant observation. I am also a qualified conservator, so I was able to help with the conservation of an Ancient Egyptian sandal whilst I observed what the other conservators were up to throughout their working day.

EGA.1461.1947. On the left, a detail of the sandal before conservation. On the right, the same area post-conservation. I cleaned the surface dirt and used Japanese tissue links to hold loose material in place.

I also helped with the display of a case in the Egyptian gallery that houses textiles and other organic materials. Sometimes I shadowed the conservators as they attended meetings; at other times I asked questions about the objects they were working on. I also conducted an interview with each of the conservation members of that department.

An Antiquities conservator carefully adjusts the textiles selected for the display. I helped with the selection, the design of the display, and its installation.

I then repeated this process with the Applied Arts department. This time, instead of taking part in the treatment of objects, I helped with a project which focused on preventive conservation. Along with a conservator from the Paper, Drawings and Prints (PDP) department I carried out a large-scale condition assessment of the newly acquired Lennox-Boyd fans collection. During my time with Applied Arts I also shadowed the conservation technicians, conducted interviews, and lent a helping hand with temporary exhibitions taking place throughout the museum.

From left to right: de-installation of Degas: A Passion for Perfection; installation of Things of Beauty Growing: In these images I hope to show that I am participating as a conservator in the exhibitions of the museum, as well as observing other conservation professionals at work.

I also spent time in the other University of Cambridge Museums (UCM). I wanted to see how other types of museums work and was attempting to reach as many conservators as possible. To do this, I led forums through the UCM 4C group, which brings together conservators and care of collections professionals throughout the museum consortium.

I led three forums throughout the past year and treated them like group interviews for the purpose of my research. This allowed me listen to different conservation practitioners discuss all kinds of topics. These included the practical side of conservation, the risk of loss of practical skills, working with unfamiliar objects or sensitive materials, gender and class in conservation, responsibility in conservation, experiences with objects, and difficulties in becoming a conservator. Again, this list is not exhaustive but I hope it gives an idea of the range of these conversations and how useful they were to me as a researcher.

I am still working on the Lennox-Boyd fans collection and a related display focused on the conservation work carried out on the fans. I am also in the midst of writing my PhD which I hope to finish within the next year. I would like to take this opportunity to thank the Fitzwilliam Museum, University of Cambridge Museums, and all those who kindly participated in my doctoral research. It was, and continues to be, a great pleasure to work with you.

Just a sneak peek of what is to come on my blog post about the conservation of some of the fans from the Lennox-Boyd collection! Can you guess what I was trying to achieve with this element of a fan?

I will return to write about my conservation work on the Lennox-Boyd fans collection in due course!

Until then…

Rebeca Suarez Ferreira, MA

PhD Candidate

Department of Archaeology, Durham University

Objects Conservator

Applied Arts Department, The Fitzwilliam Museum

Conservation at the Fitz: an intern’s perspective

I have recently started a 9-month internship at the Fitzwilliam Museum as part of my MSc in Conservation for Archaeology and Museums at University College London. Working with both the Applied Arts and Antiquities teams I will contribute to the preservation needs of the departments’ collections. Having spent just under 2 months in this placement, I have already learned a great deal, not only about objects and materials but also about general museum practice. My placement supervisor, Antiquities conservator Jennifer Marchant, identified a number of projects for me to work on. They are varied and I get to participate in a range of activities within the Museum, including preventive and remedial conservation, collections care and management, and material analysis using specialized techniques. This work plan is not set in stone and can be modified if necessary, giving me the opportunity to sign up for new projects that may arise down the line.

My first few weeks were mostly spent in becoming acquainted with the collections and members of staff, as well as helping out wherever an extra pair of hands was needed. Conservation work during this time centred on cleaning glass objects for an exhibition in 2019 and assessing the condition of wooden furniture. This was my first direct experience with glass and I was pleased to discover a new interest in it. The objects served as a fitting introduction to the material as they were in excellent condition. To my surprise some of the items were over 200 years old but I never would have suspected this as they had been cared for so well. The experience of working with furniture was enlightening in terms of the signs of damage that appeared and the relationship between their location and the function of the items during their lifetimes. Photographs were required for the reports and this proved a challenging but edifying exercise since the space lacked proper lighting and I had to rely on natural light.

Jelly glass from the Applied Arts collection.

Korean wine bottle from the 12th Century.


Aside from cleaning a small group of twelfth- and thirteenth-century Korean ceramics that is going on loan to the National Museum of Korea, I have had the chance to treat an ancient ceramic from Cyprus. This earthenware, categorized as a red-polished ware which is specific to the Cypriot Bronze Age, is a ritual vessel with incised decoration that has been inlaid with a white material. The anthropo-zoomorphic symbols of the decoration offer a fascinating glimpse into the beliefs and values of this early community. One of the finials shaped like a bull’s head had broken off and required reattachment. Though this was a straightforward treatment, I found it tremendously gratifying to contribute to the preservation of this ancient ceramic. While investigating the earlier work carried out on this object, I read the conservation file written by the last conservator who had performed an intervention. I could not help feeling a sense of kinship with this colleague, unknown to me, who contributed to the safeguarding of the same artefact over 20 years ago.

Detail of a spoon.

Another memorable project I am working on is also for an upcoming exhibition. This is one of my favourite assignments so far. I was given a collection of spoons that are to be displayed together and tasked with identifying the materials they are made of, as well as choosing appropriate treatments to meet their conservation needs. Some only require light cleaning while others have to be stabilised structurally. In addition to this, I will share recommendations about the display mounts and suitable materials for them. This project is most appealing because it is like a crash course in conservation, requiring me to use a wide range of skills relevant to conservation practice on a variety of materials (ivory/bone, metal, wood, glass, ceramic, and shell).

Spoons for the 2019 exhibit.

Two months have not yet passed since I started my internship at the Fitzwilliam and the experience has already proved to be beyond price in terms of educational value. I have been extremely fortunate to be allowed to experience so many different areas of museum practice. My interests within the heritage sector are broad and varied: with this placement, I certainly feel that I am able to explore different roles and diversify my skills.

I must express my gratitude first to my UCL supervisors, who recommended this internship to me, and to my internship supervisor, for taking my requests and interests into consideration when arranging my work plan. I appreciate its flexibility as well, especially considering that as a student I am eager to experience as many areas as possible to further develop my skills and identify new interests. I am also grateful to all the staff who have been so welcoming and have graciously allowed me to join in tours, conferences, and meetings where I have caught a glimpse of the behind-the-scenes work in the Museum. I am fortunate to have been offered this placement and look forward to the work that is to come.

Maria Melendez, UCL conservation intern