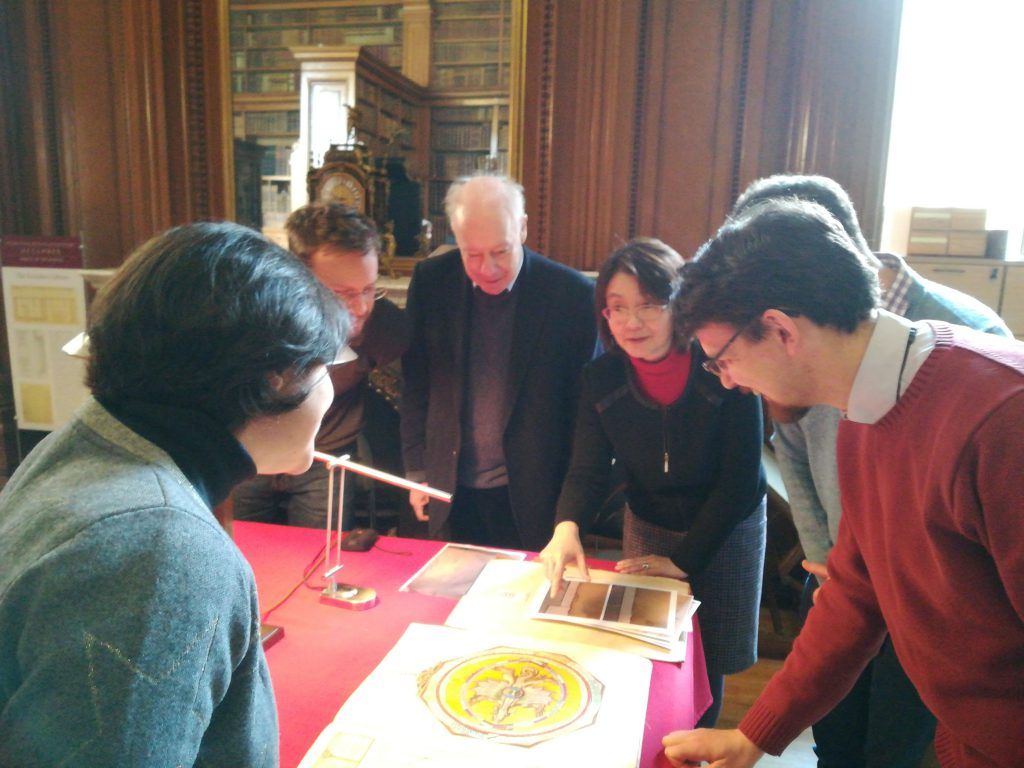
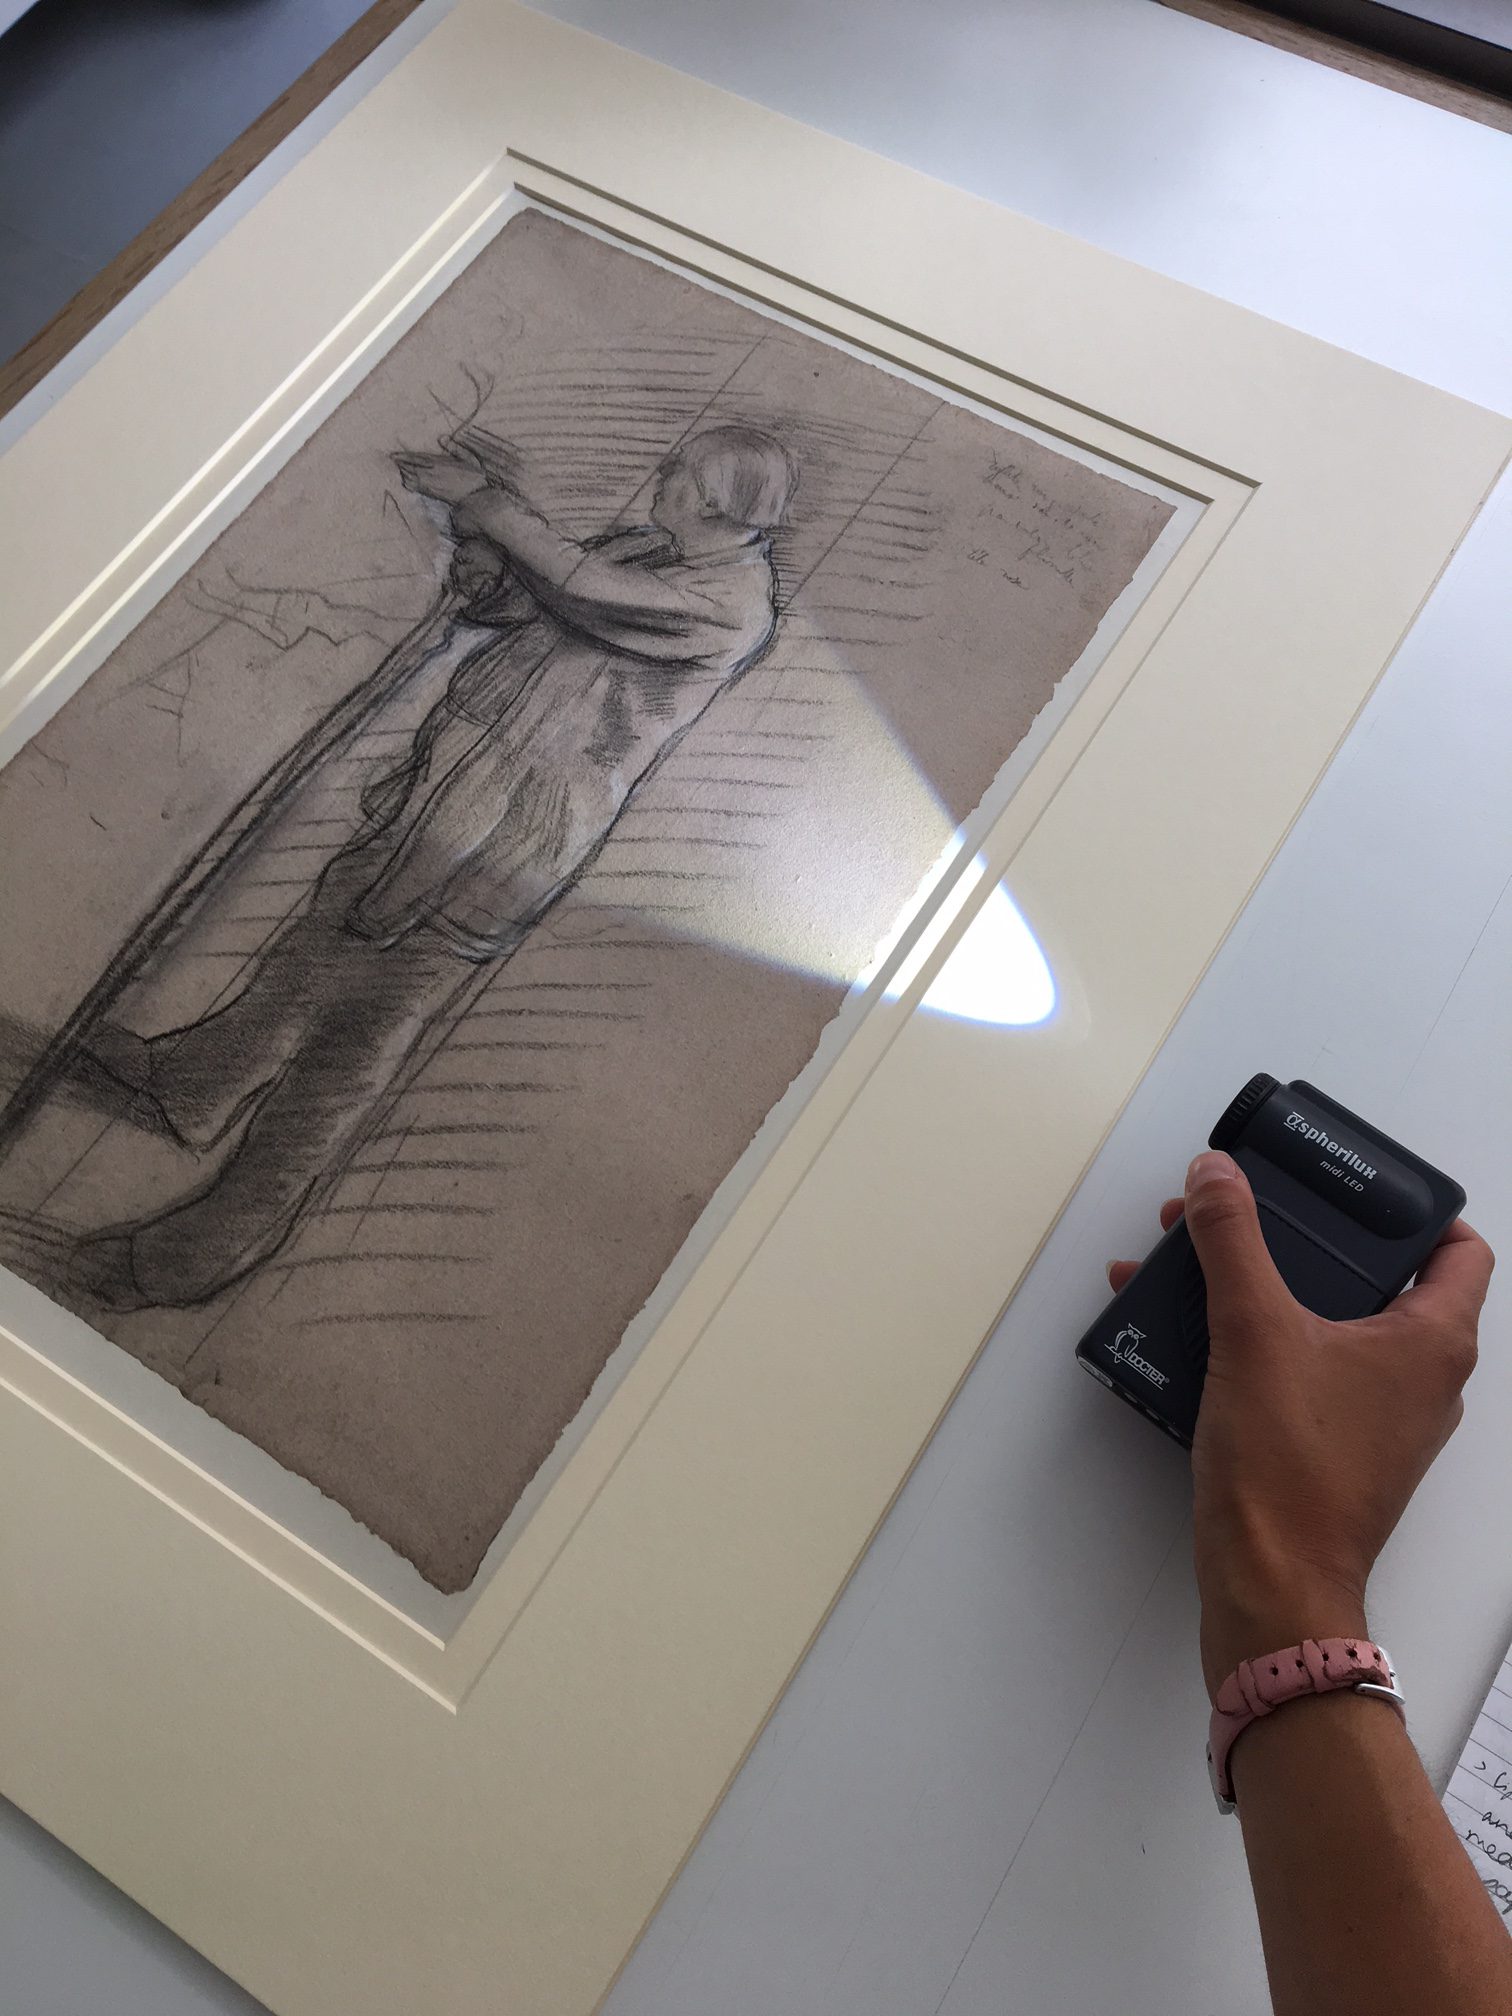
With Harry Metcalf, Conservator of Works of Art on Paper, and Hannah Price, University of Cambridge Museums Programme Coordinator.
For more videos exploring the University of Cambridge Museums, visit the UCM YouTube channel.
With Harry Metcalf, Conservator of Works of Art on Paper, and Hannah Price, University of Cambridge Museums Programme Coordinator.
For more videos exploring the University of Cambridge Museums, visit the UCM YouTube channel.
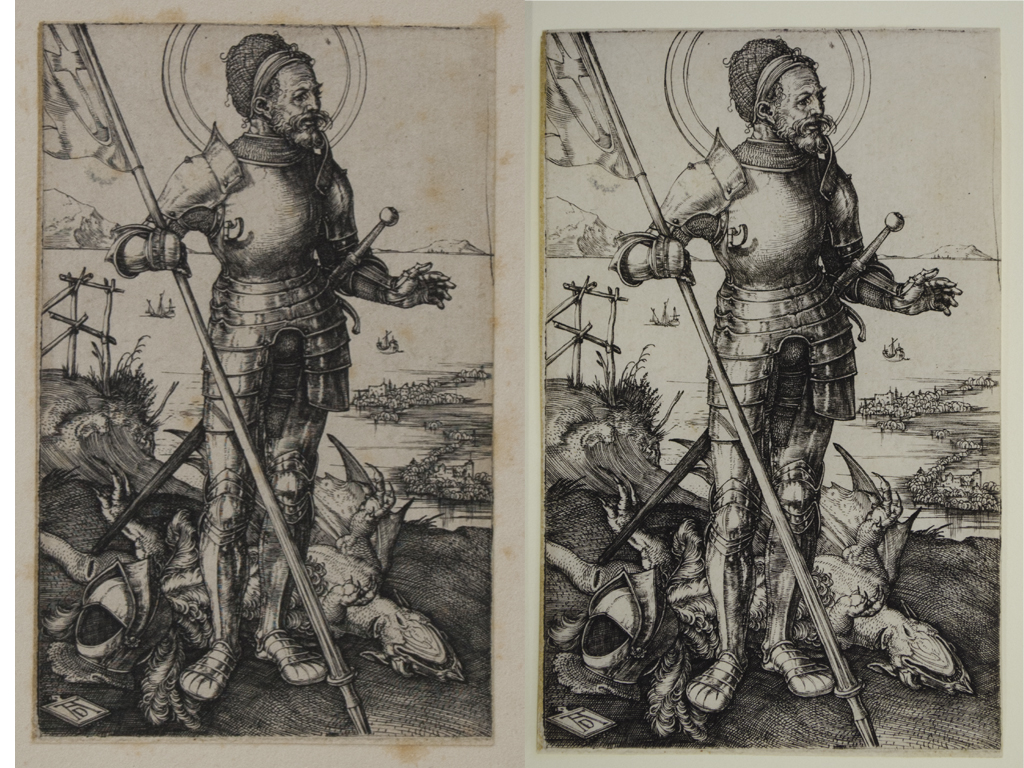
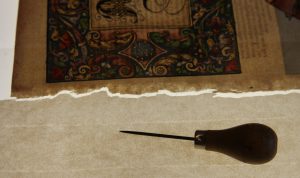
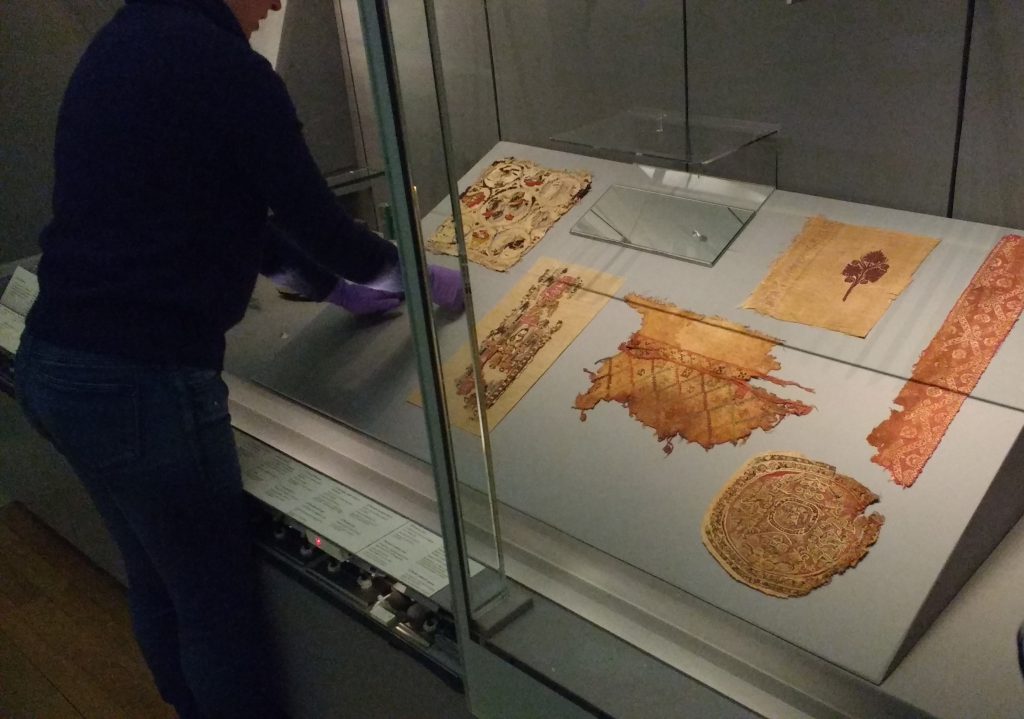
There are 374 prints by Albrecht Dürer (1471-1528) in the Fitzwilliam Museum, many of which are fine and rich impressions, and a further 251 sheets attributed to followers of Dürer. I have recently enjoyed the opportunity to look closely at some of these prints as part of an ongoing project to conserve and remount them.
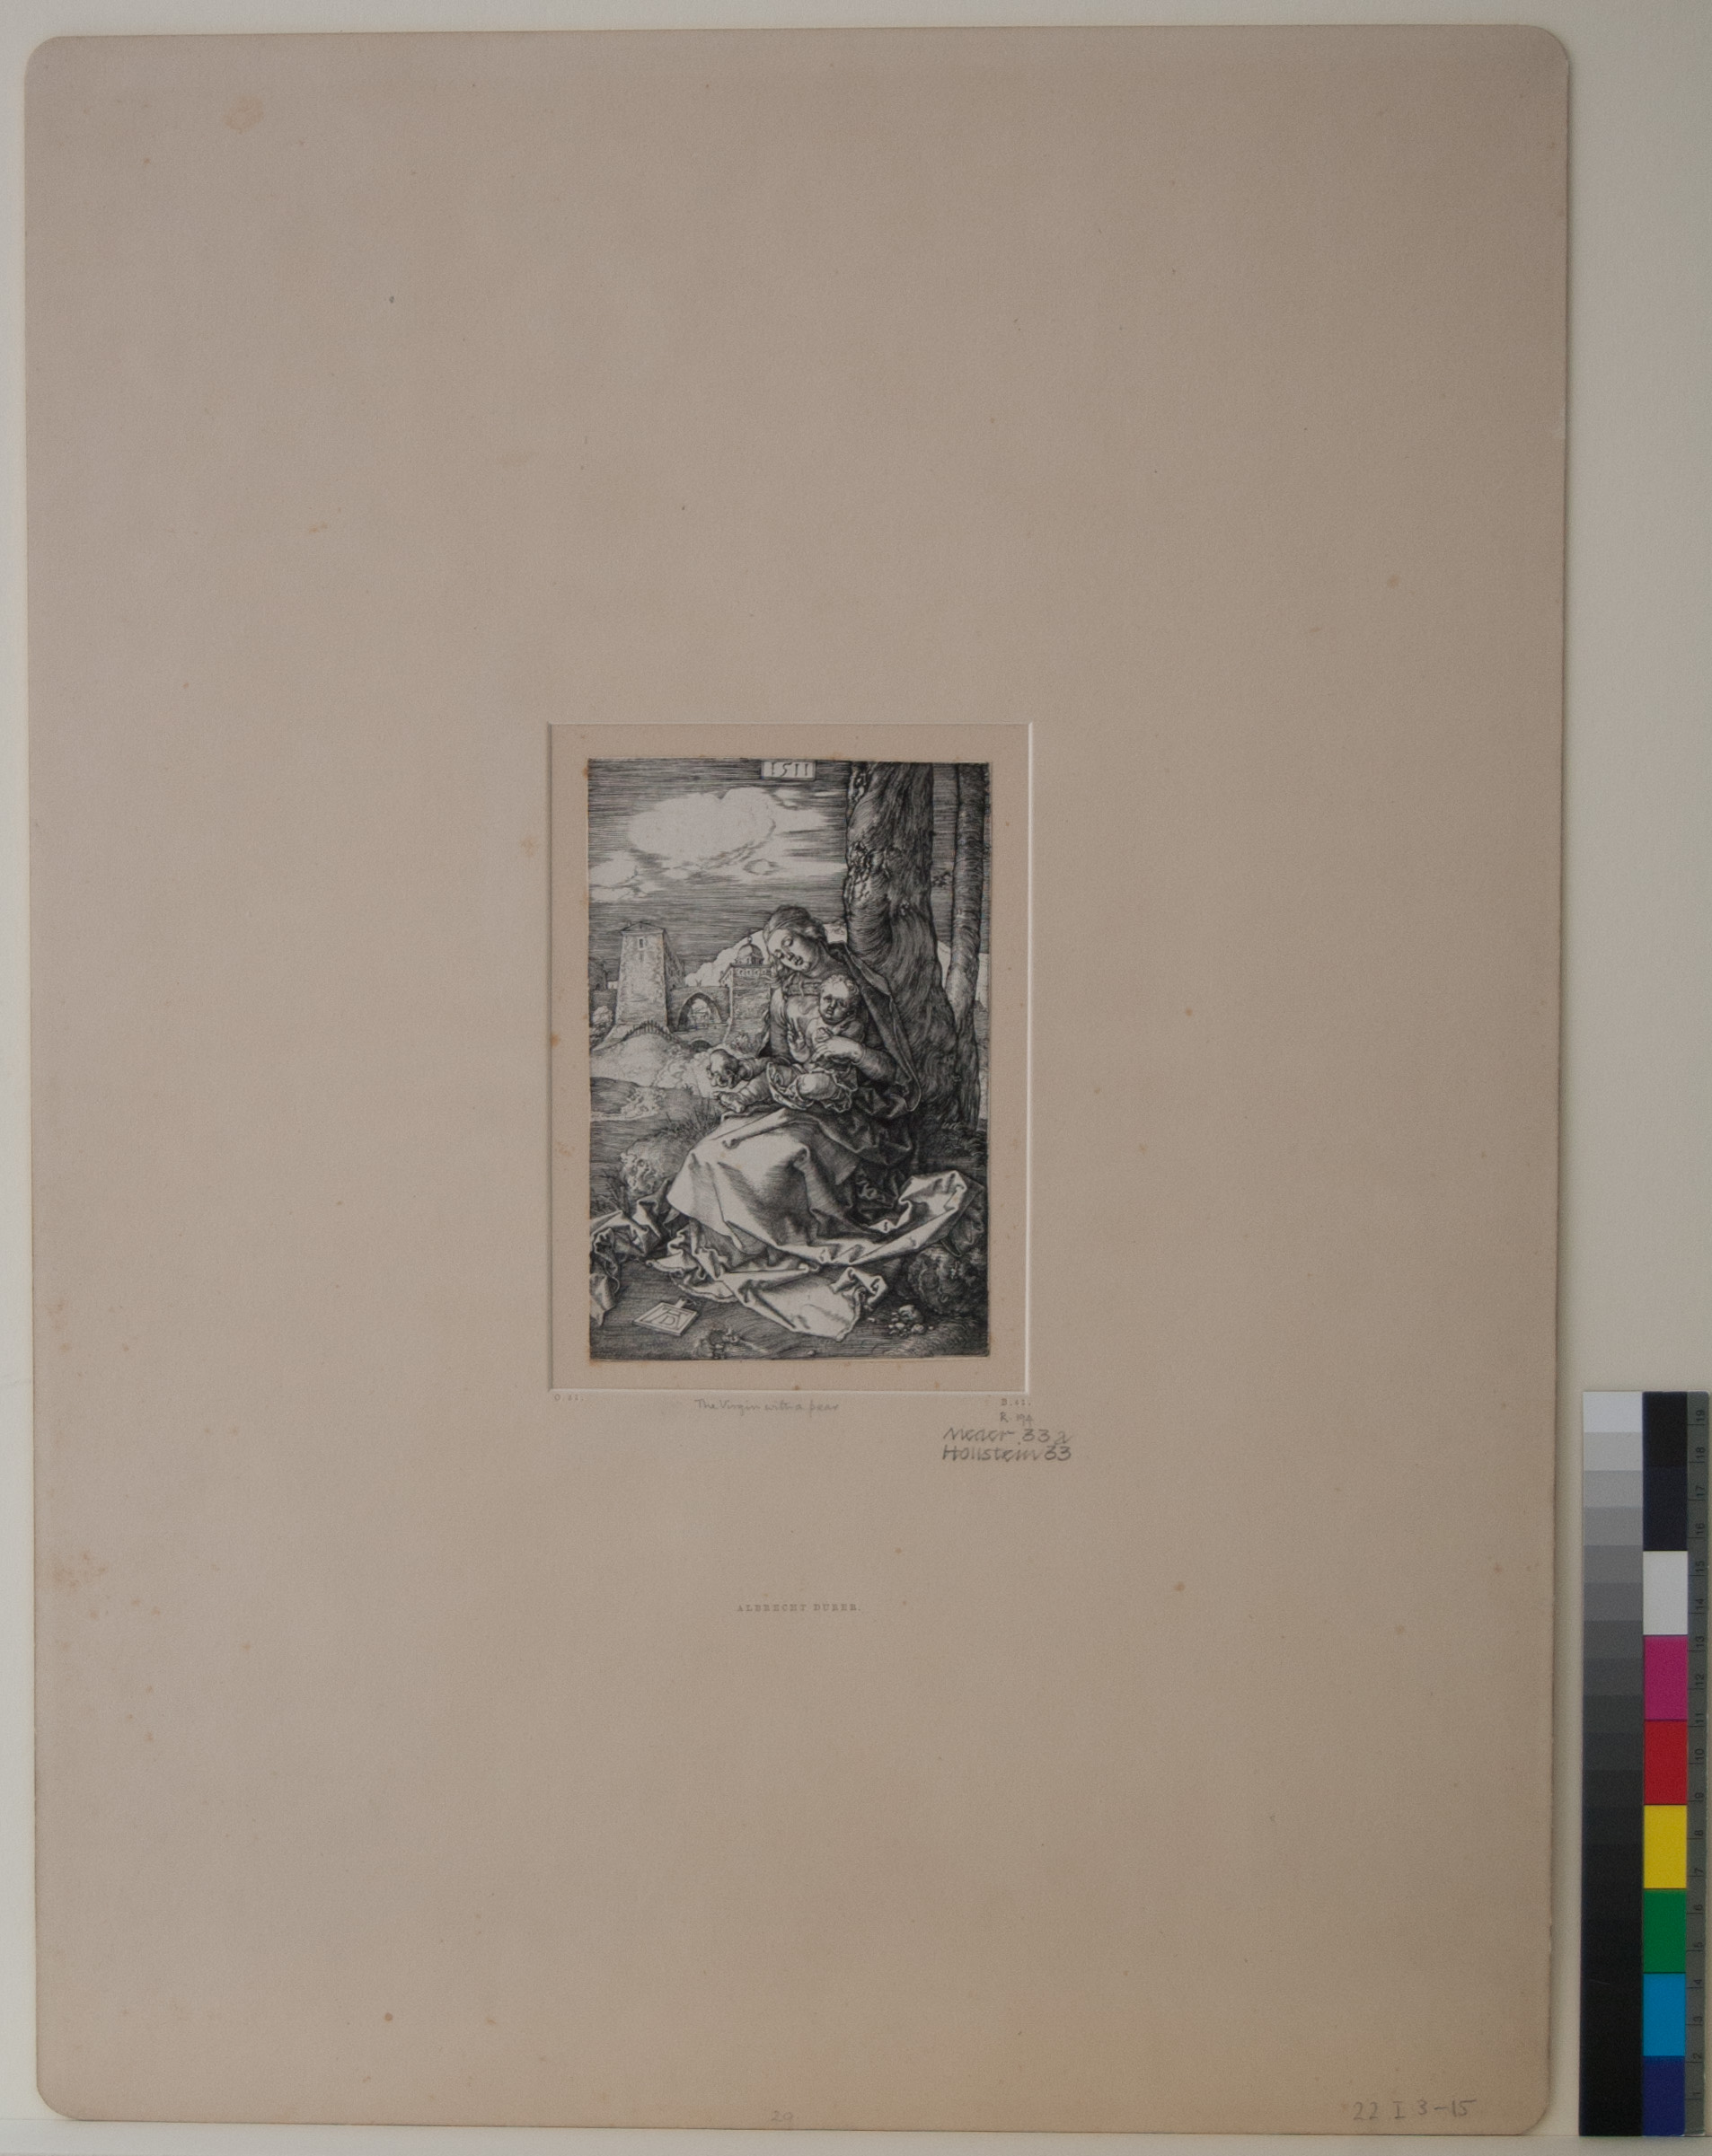
The prints come from a number of sources, including a core group of 127 engravings owned by Lord Fitzwilliam. These were bound together in an album (22.I.3) by Henry Woodburn in 1811, with Lord Fitzwilliam’s inscription on the fly-leaf title sheet, ‘Oeuvres / d’Albert Durer’. In 1876 the prints from this album, along with etchings, engravings and woodcuts from five others including Rembrandt and Martin Schöngauer, were sent to the British Museum for conservation and re-mounting. The sheets were mounted individually in ‘sunk mounts’ of a standard Royal size (559mm 406mm), with gilded edges, and stamped with the lettering ‘Albrecht Dürer’ and a number corresponding to catalogue raisonnés of Dürer’s prints (Ottley and Bartsch) (Fig. 1). This type of mount was devised by the Department of Prints & Drawings at the British Museum around the middle of the 19th century in an effort to limit unnecessary handling of the sheets and reduce abrasion to the surface of works of art on paper that were previously stored loose in portfolios. A bevelled opening was cut in a piece of cardboard slightly larger than the print, a second ‘backboard’ was pasted to it and the print mounted in the aperture. The surface of the print sits below the surrounding board thus protecting it from wear.
‘Today, the availability of paper board is taken for granted, but until the beginning of the 19th century it had been neither a widely used nor a readily procurable commodity […] In the British Museum, pure quality, stiff rag cream-coloured board from J M Whatman had been utilized from the 1840s. The high quality of this board is certainly a major factor in the fine condition of the Museum’s collections today.’1
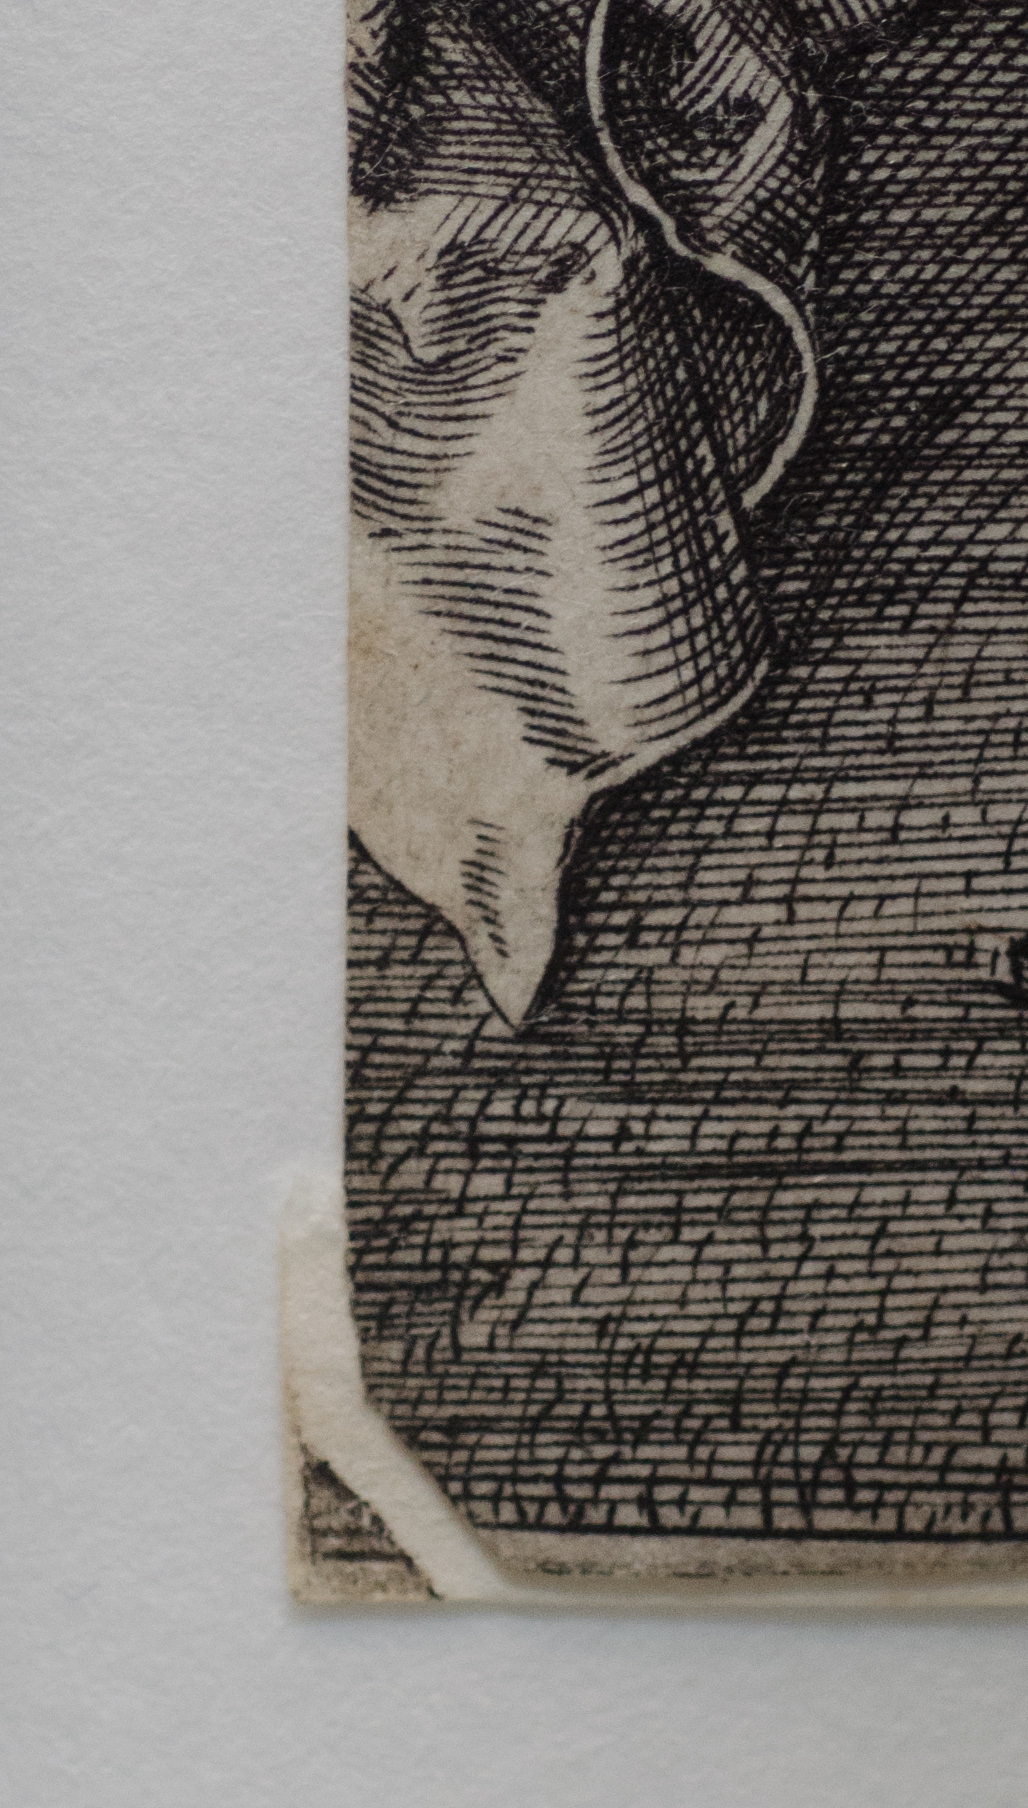
The opportunity to look very closely at these prints has revealed other work that appears to have been undertaken at the British Museum during remounting. It was common practice to adhere the prints to a thin machine-made paper; this lining supported torn or weak areas of the print and made it easier to attach the print to the mount without causing distortion. I have discovered examples where small losses to the original engravings have been very skilfully recreated, hand-drawn in ink on the lining paper (Fig. 2).
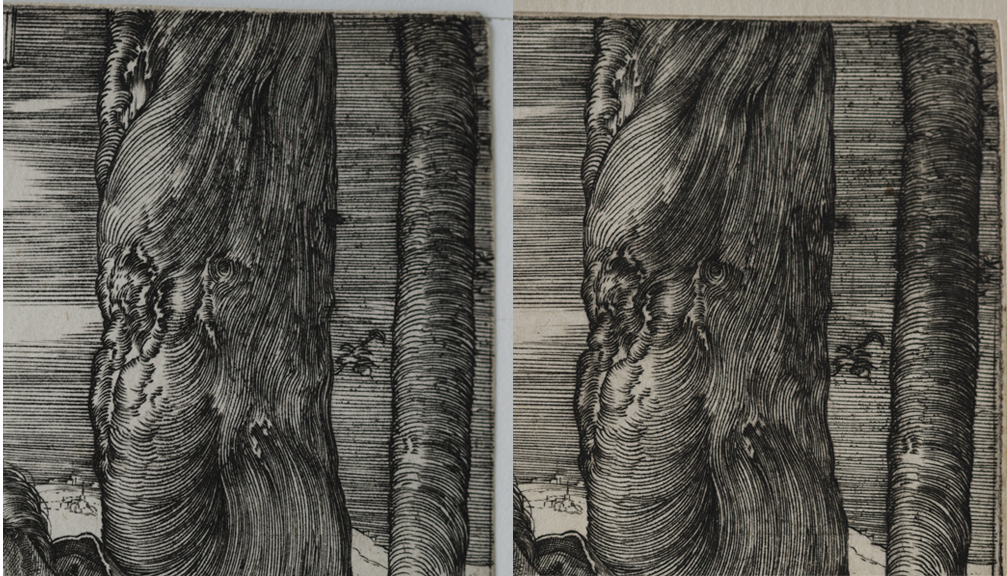
It is not uncommon for intaglio prints such as etchings and engravings, especially those by Old Masters, to be trimmed to the plate-mark (the indentation around the image created by the metal plate being pressed into the dampened paper as it moves through the press). There is often a printed ink line along this indentation created either by the artist as a drawn border to the image, or a result of ink residue not wiped from the extreme edge of the plate. Trimming of the sheets was often surprisingly haphazard with the very edge of the printed image sometimes being removed in the process. As a result, prints with a complete margin, even when very narrow, are highly prized. The recent study of the Fitzwilliam’s Dürers has revealed some instances where missing sections of platemarks have been re-touched in ink, either on the primary support or the lining paper. We can be fairly confident that this was carried out when the objects were re-mounted as there is an example where the line has slipped slightly onto the mount (Fig. 3).


There are also examples of prints that have a curious pink line at the plate-mark (Fig. 4). It is thought that these marks were made with a copying pencil.2 When dry, the marks of a copying pencil resemble graphite, but they contain an aniline dye that is soluble in water and permanently changes colour if it becomes wet. While purple/violet is most common, a range of colours has been noted.3 It is possible that the colour-change occurred due to moisture from the mounting adhesive.
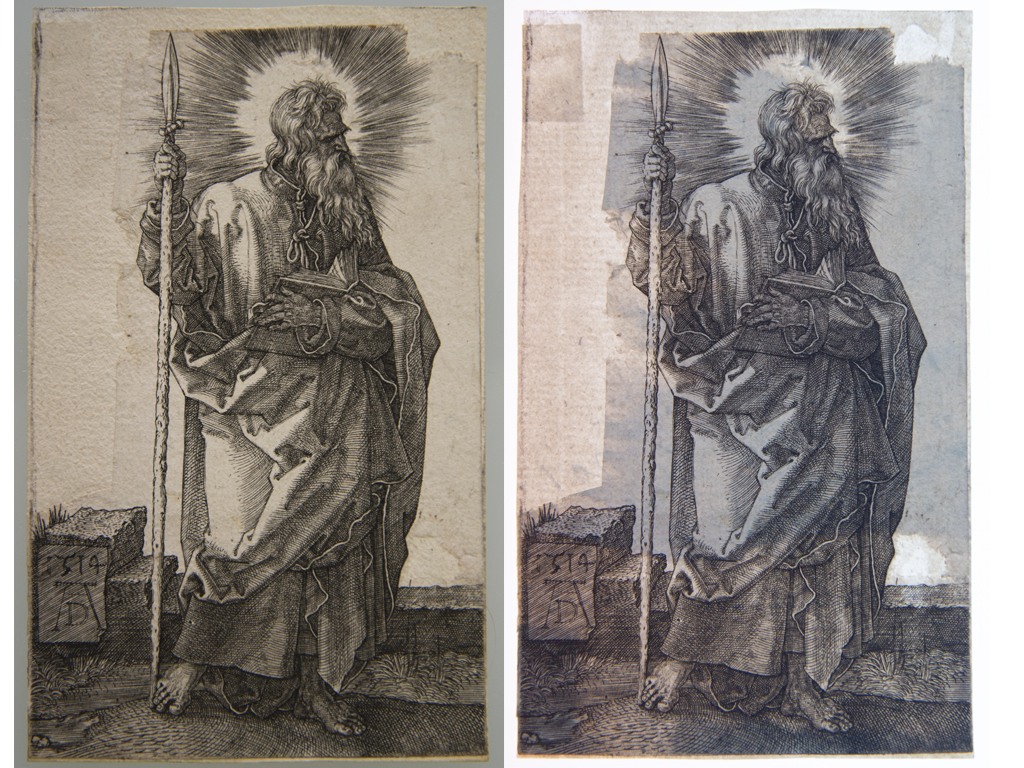
Not all the prints are in good condition. For example, when viewed in transmitted light it becomes apparent that the impression of St Thomas (AD.5.22-201) is only a fragment of the original sheet and very thin in places (Fig. 5). It would have certainly sustained more damage without the support of the lining paper carefully applied at the British Museum.
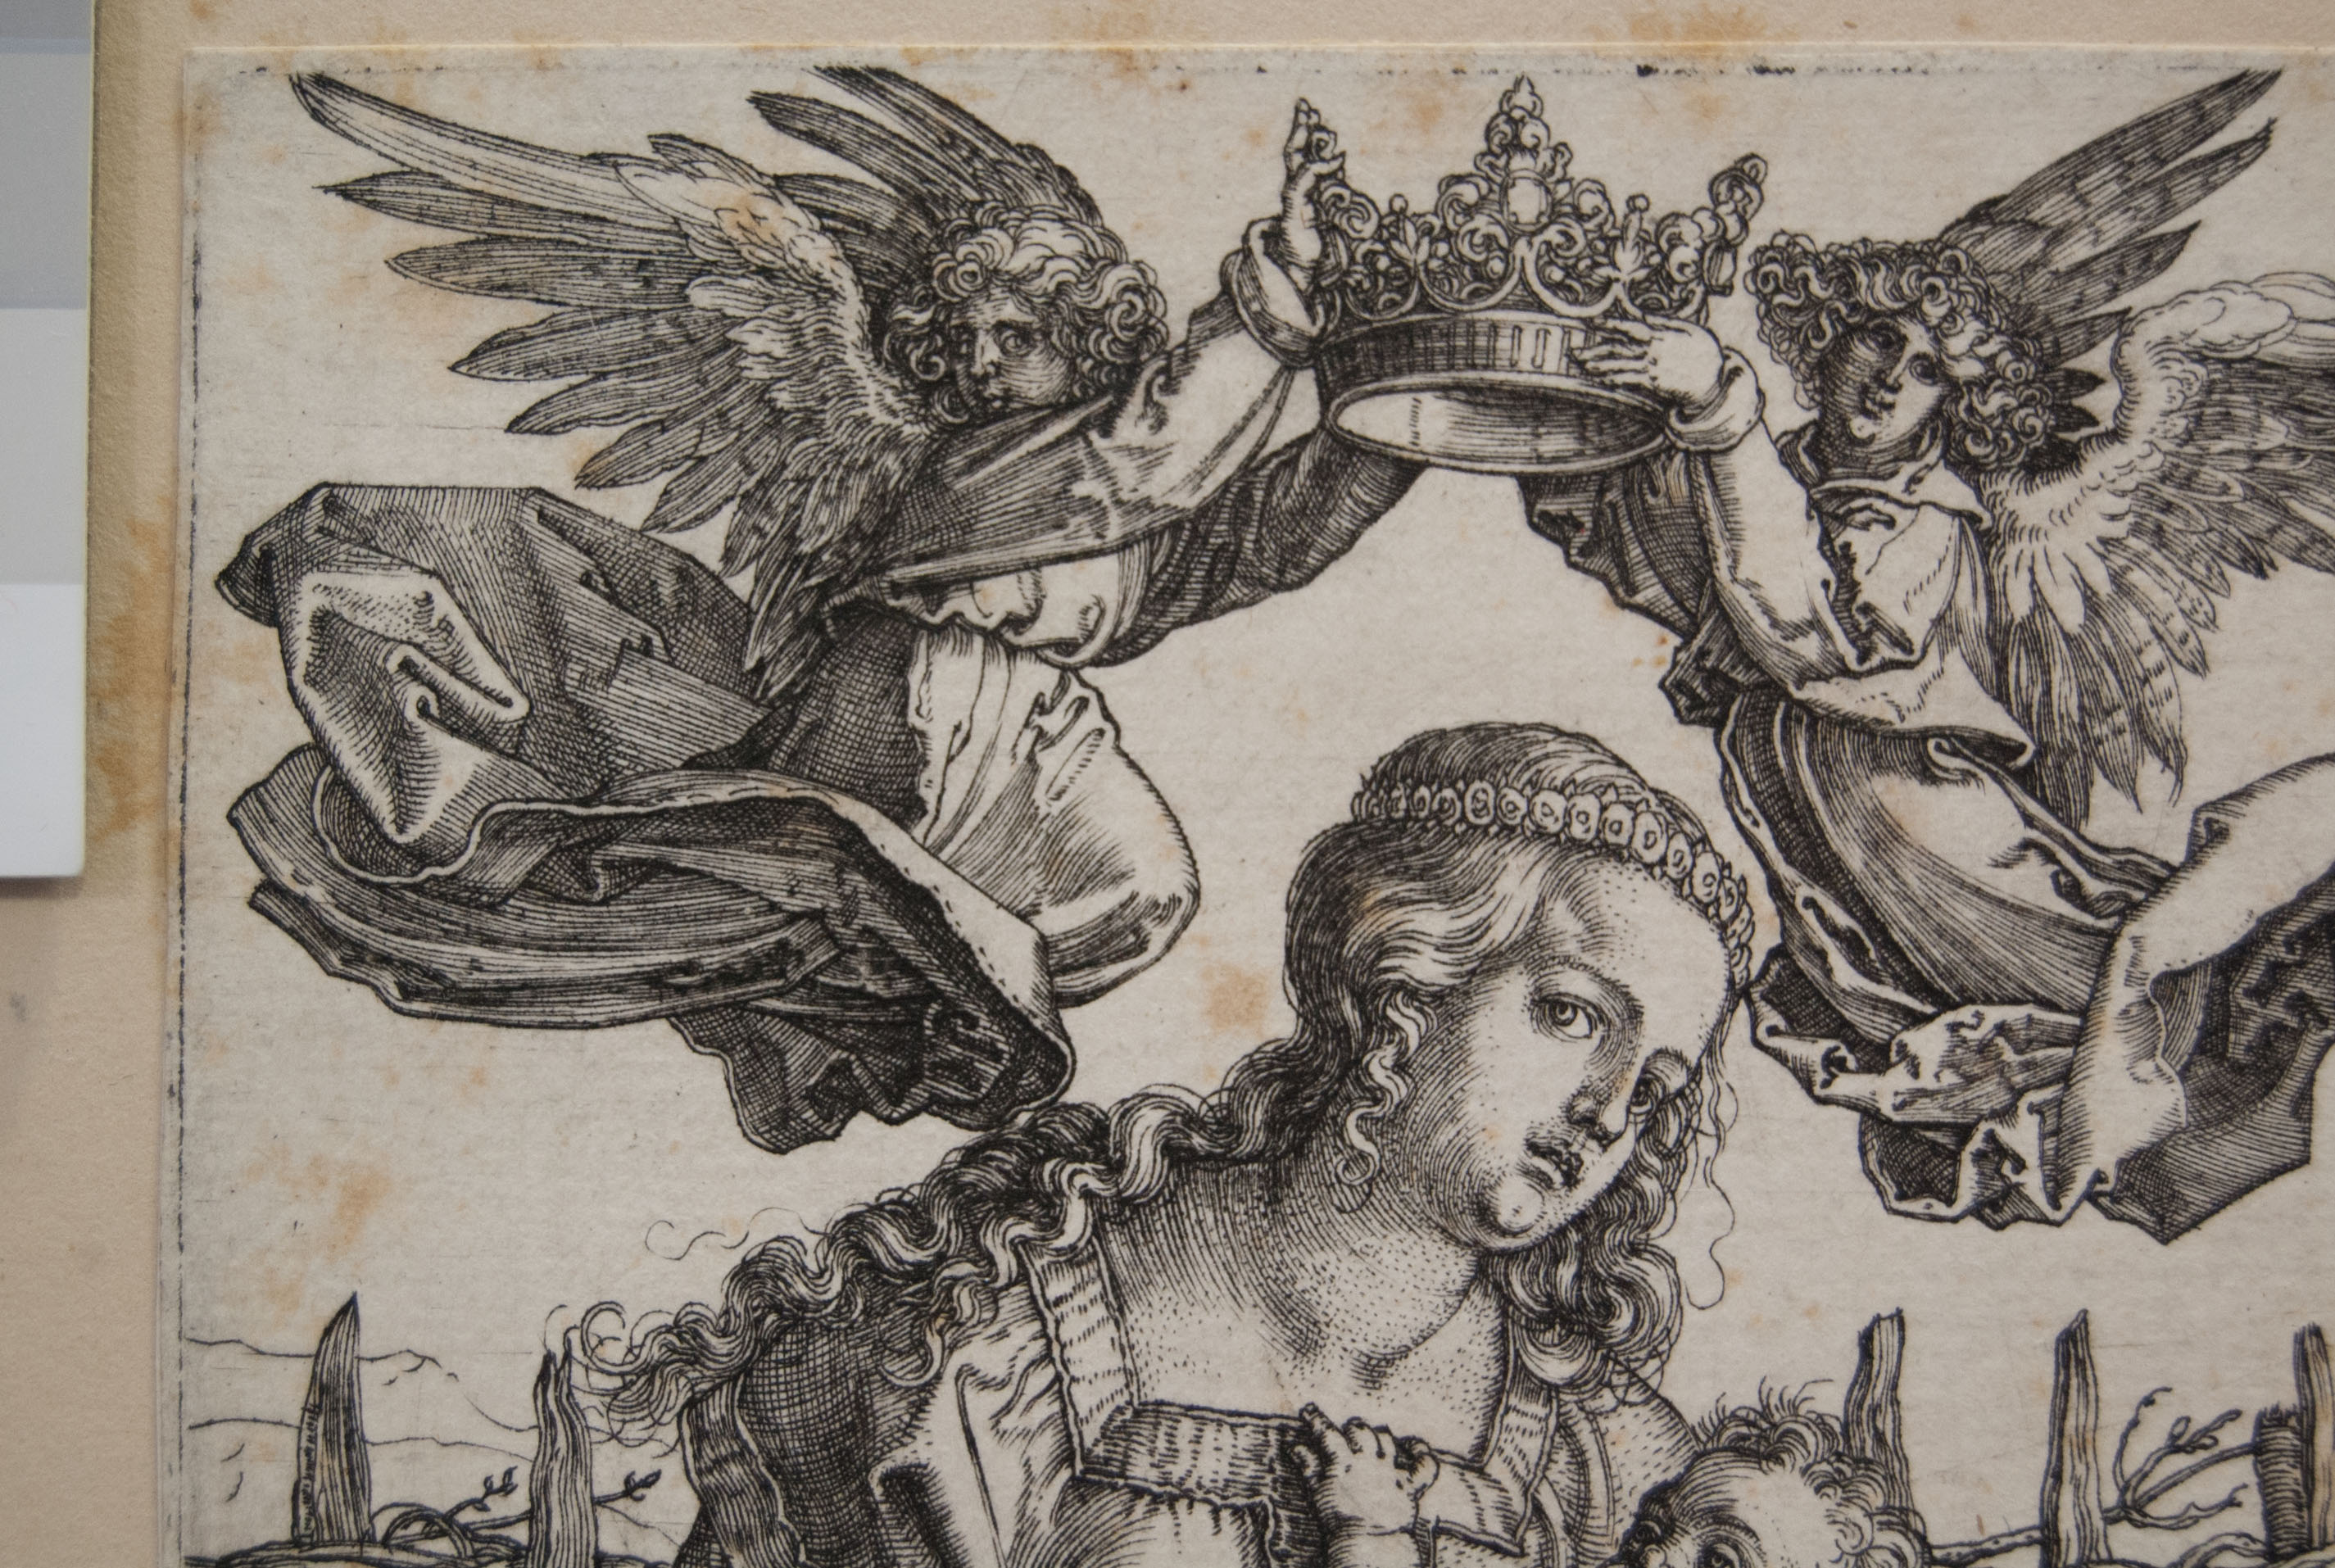
There are fascinating inscriptions on some mounts where scholars have noted the merits or flaws of various impressions. Describing an impression of the engraving Virgin and child with the pear (P.3092-R), given to the Museum by Arthur W. Young in 1934, Thomas Barlow writes, ‘It seems to me an unusually brilliant impression with this mark (anchor in a circle watermark). It is more like a Bull’s Head impression. Your existing impression is excellent and a more pleasing impression, this is rather over inked on the right side. But a very interesting impression. I should be very chary of disposing of it.’4 Campbell Dodgson added his agreement below: ‘It is very fine, shows platemark more completely, and ought to be kept.’5
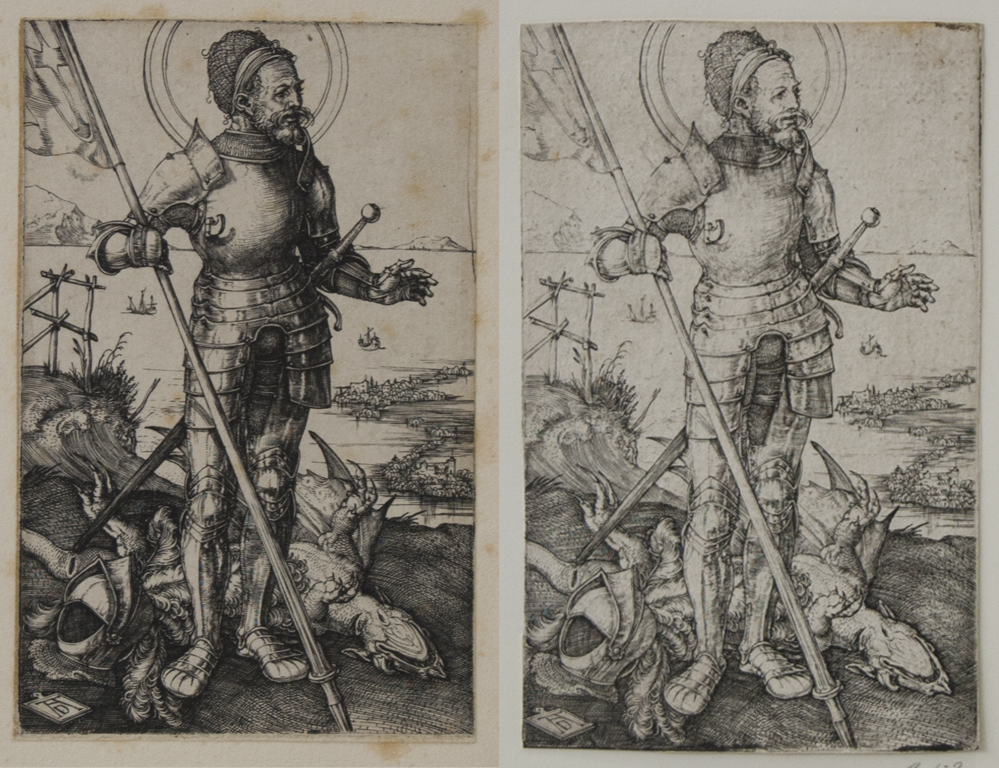
Subtle differences between impressions can be noted within the collection. The ink is a little blurred in places on the impression of the Virgin and Child with the Pear on the right, where the plate was less thoroughly wiped (Fig. 6). The dramatic loss of richness and detail, the result of a worn printing plate, becomes apparent when comparing two impressions of St. George on Foot (Fig. 7).
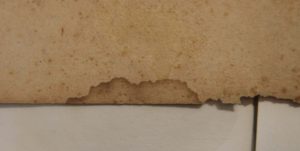
The mounts are now nearly 150 years old and, while the materials used were the best available at the time, they are showing their age. There are handling marks which would be distracting if the works were displayed, and the mounts are also generally much thinner than those we would use today. The linings make the prints look unnaturally flat and prevent access to the back of the sheets, which can often provide valuable information to researchers. A number of pale brown/orange spots have also developed over time. They occur on both the prints and mounts which suggests they are a result of either impurity in the board or in the adhesive used to attach the prints (Fig. 8).
Inevitably with a collection of this size, the documentation and conservation project will take some time to complete and I hope to update this blog with further observations as the work continues. The approach to treatment is dictated by the condition of each print, but in many cases they are being lifted from the old mounts once all the original inscriptions have been recorded.
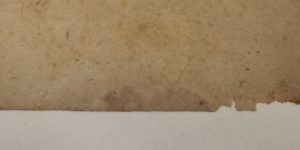
Where possible, the linings are being removed (Fig. 9) and the adhesive used to attach them is reduced or removed. This process has already revealed some interesting inscriptions and collector’s stamps. The papers used to make these prints are beautiful and very good quality: they have responded well to washing treatments and the spotty discolouration has reduced to a point where it is no longer distracting (Fig.10).
Tears and losses are repaired and the original British Museum retouched fills are being retained in-situ where appropriate. Once the prints have been lightly pressed they are inlaid into a slightly larger sheet of paper, a technique that allows access to the back of the sheet, and remounted in 100% cotton Museum-board mounts.
I am hopeful that this work will continue to protect these beautiful prints for another 150 years.
If a friend asked me to sum up in brief my first month at work in the Scientific Laboratory of the Fitzwilliam Museum, I would reply, “It has been a crash course in technical analyses of magnificent artworks!” I kick-started the New Year by moving to Cambridge to begin a fellowship as a Research Assistant of the MINIARE Project – Manuscript Illumination: Non-Invasive Analysis, Research and Expertise. Since 2012, the project has carried out scientific investigation of the materials and techniques used to make medieval and Renaissance illuminated manuscripts, while studying the cultural, historical and art-historical context of production.
During the first two weeks, I had the opportunity to catch a glimpse of the rich and diverse collections that the Fitzwilliam Museum houses, crossing the Art History timeline – from ancient Egyptian coffins to French impressionists – simply by walking through the galleries. Among the collections, I became especially acquainted with the Western illuminated manuscripts, which are the focus of in-depth study and conservation for the Department of Manuscripts and Printed Books. Curators and conservators of this Department introduced me into the world of ancient books, making me aware of the conservation needs of unique and fragile artworks, how to choose appropriate temperature, humidity, and lighting conditions, as well as how best to handle the manuscripts before and during the analyses.
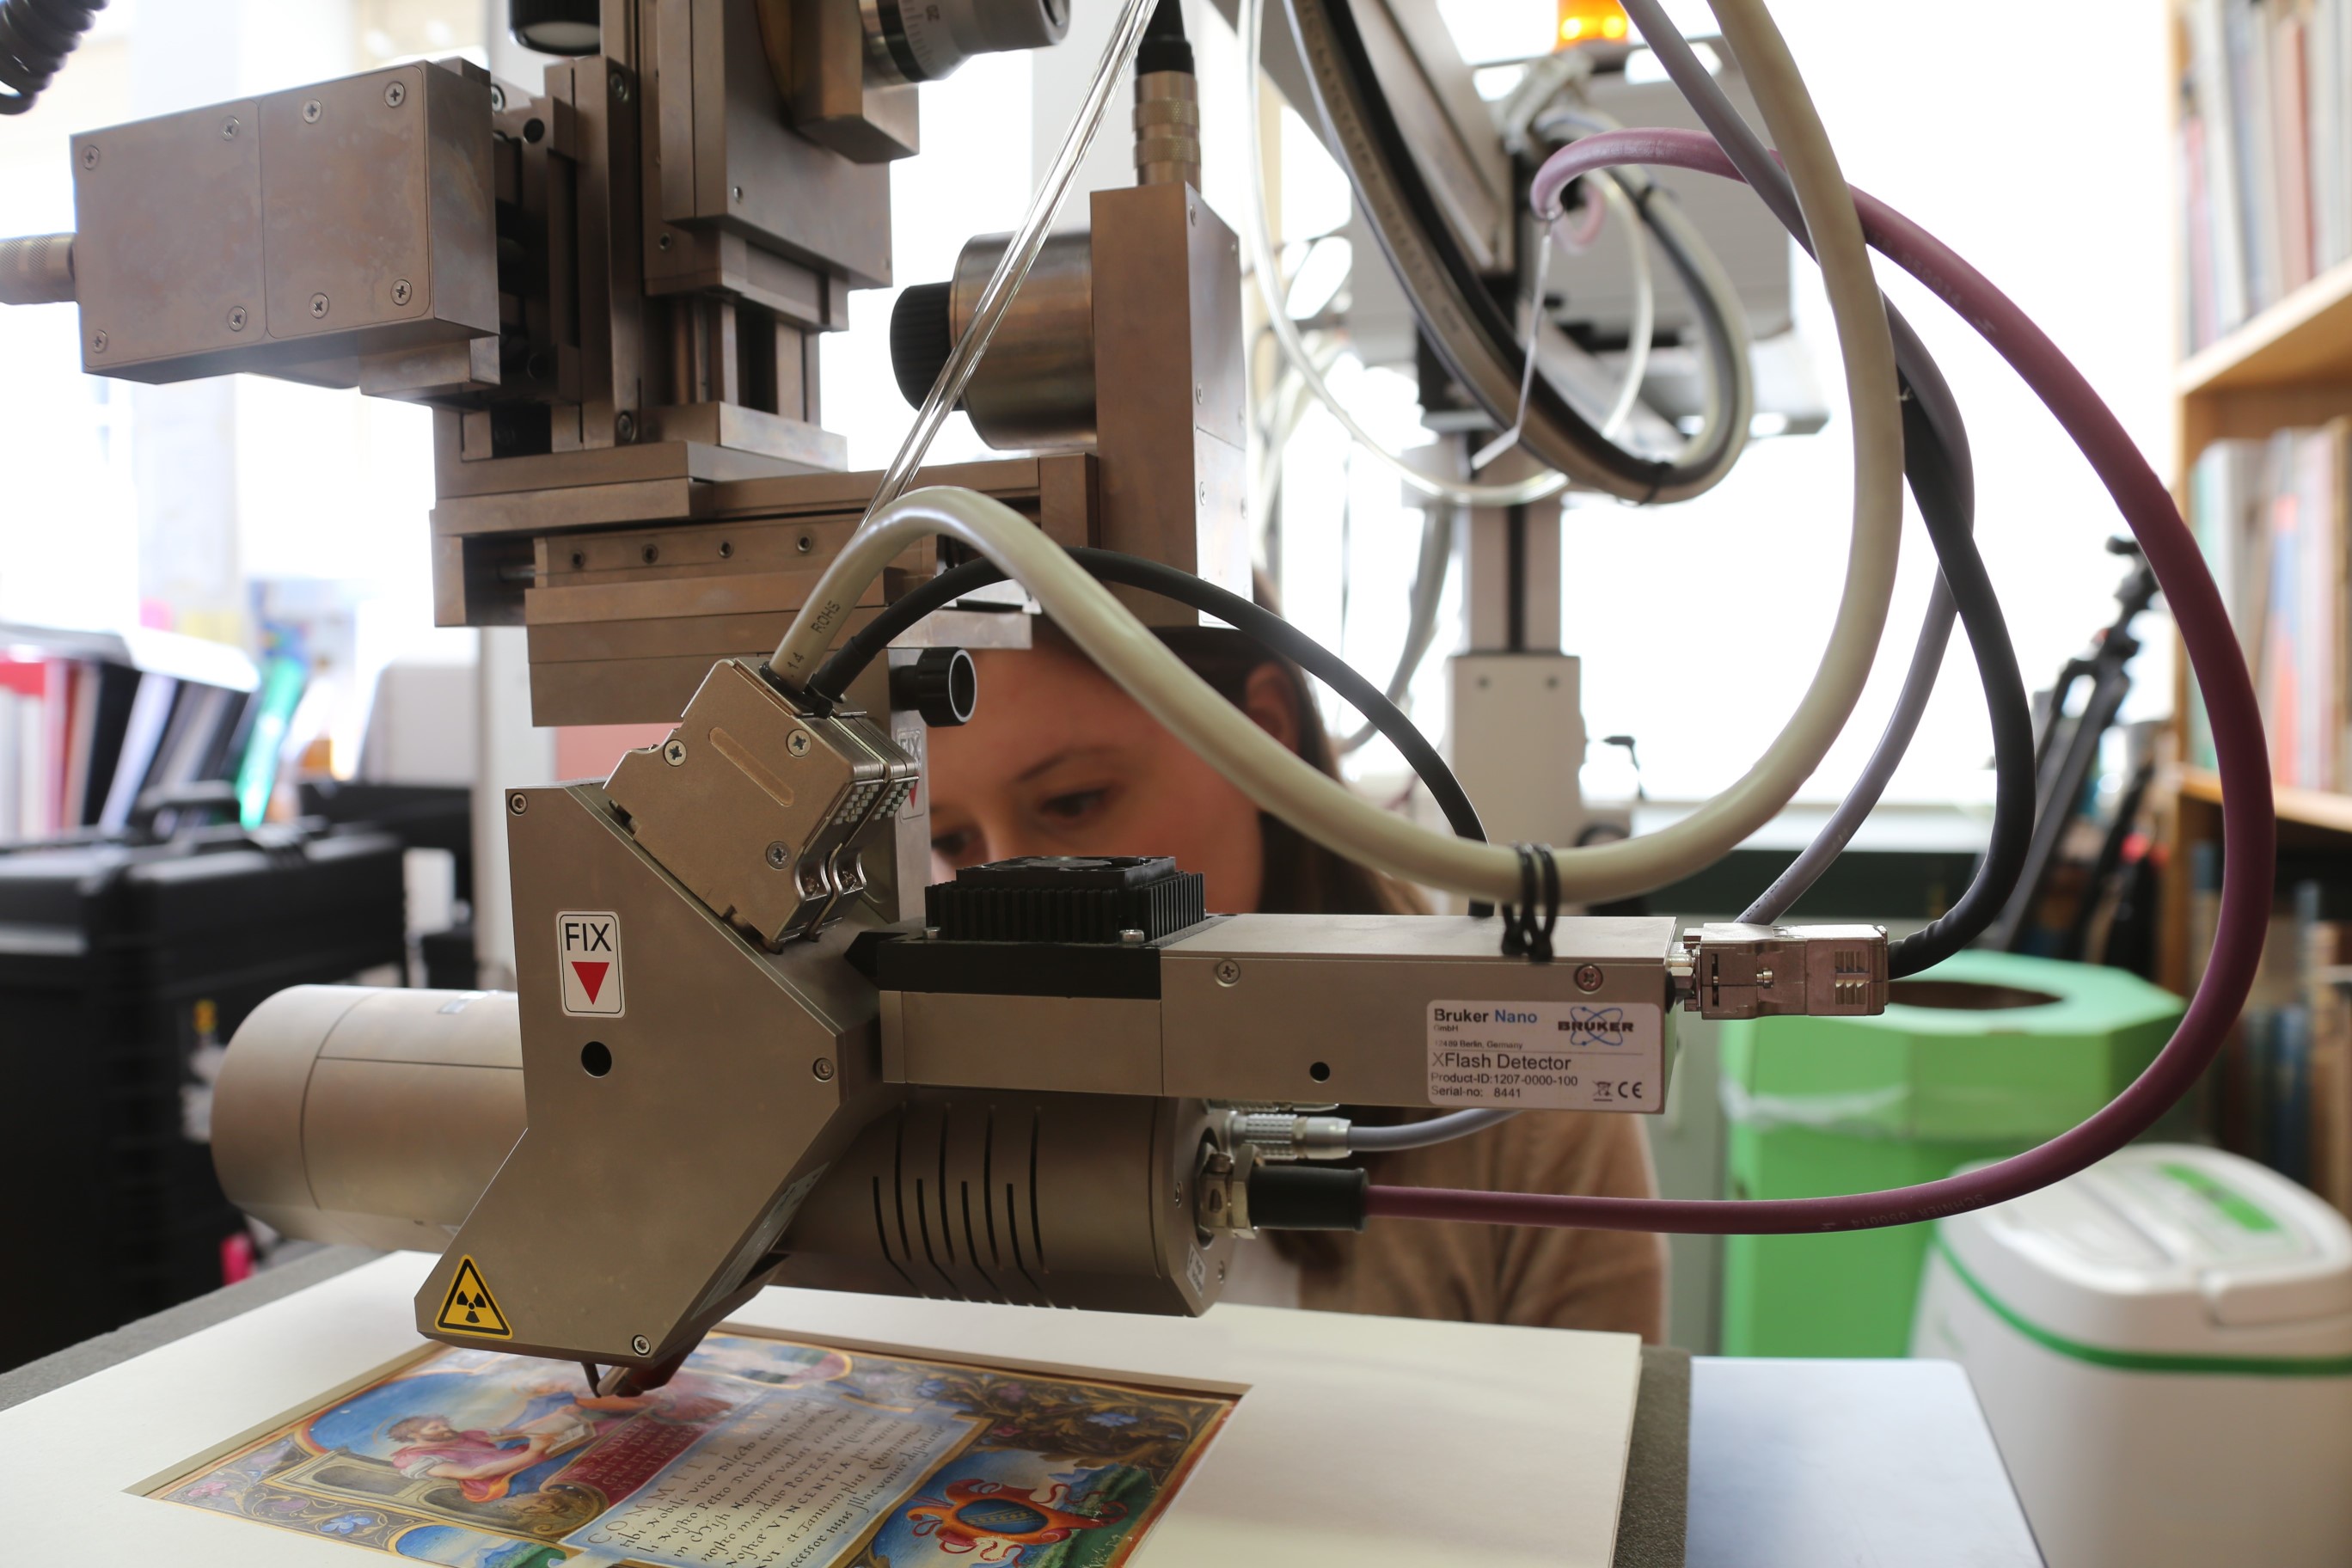
Coincidently, the next three weeks fell at the moment visiting researcher Dr Stefano Legnaioli from ICCOM-CNR of Pisa, Italy, came to the Fitzwilliam Museum to carry out analysis of selected objects through Raman spectroscopy. Among the scientific techniques that can be used to examine artworks non-invasively (i.e. without taking samples or touching the artwork’s surface), Raman spectroscopy is one of the most reliable to identify artists’ materials. To enable precise identification, more information was also collected using additional analysis techniques available in the Museum’s Analytical Lab.
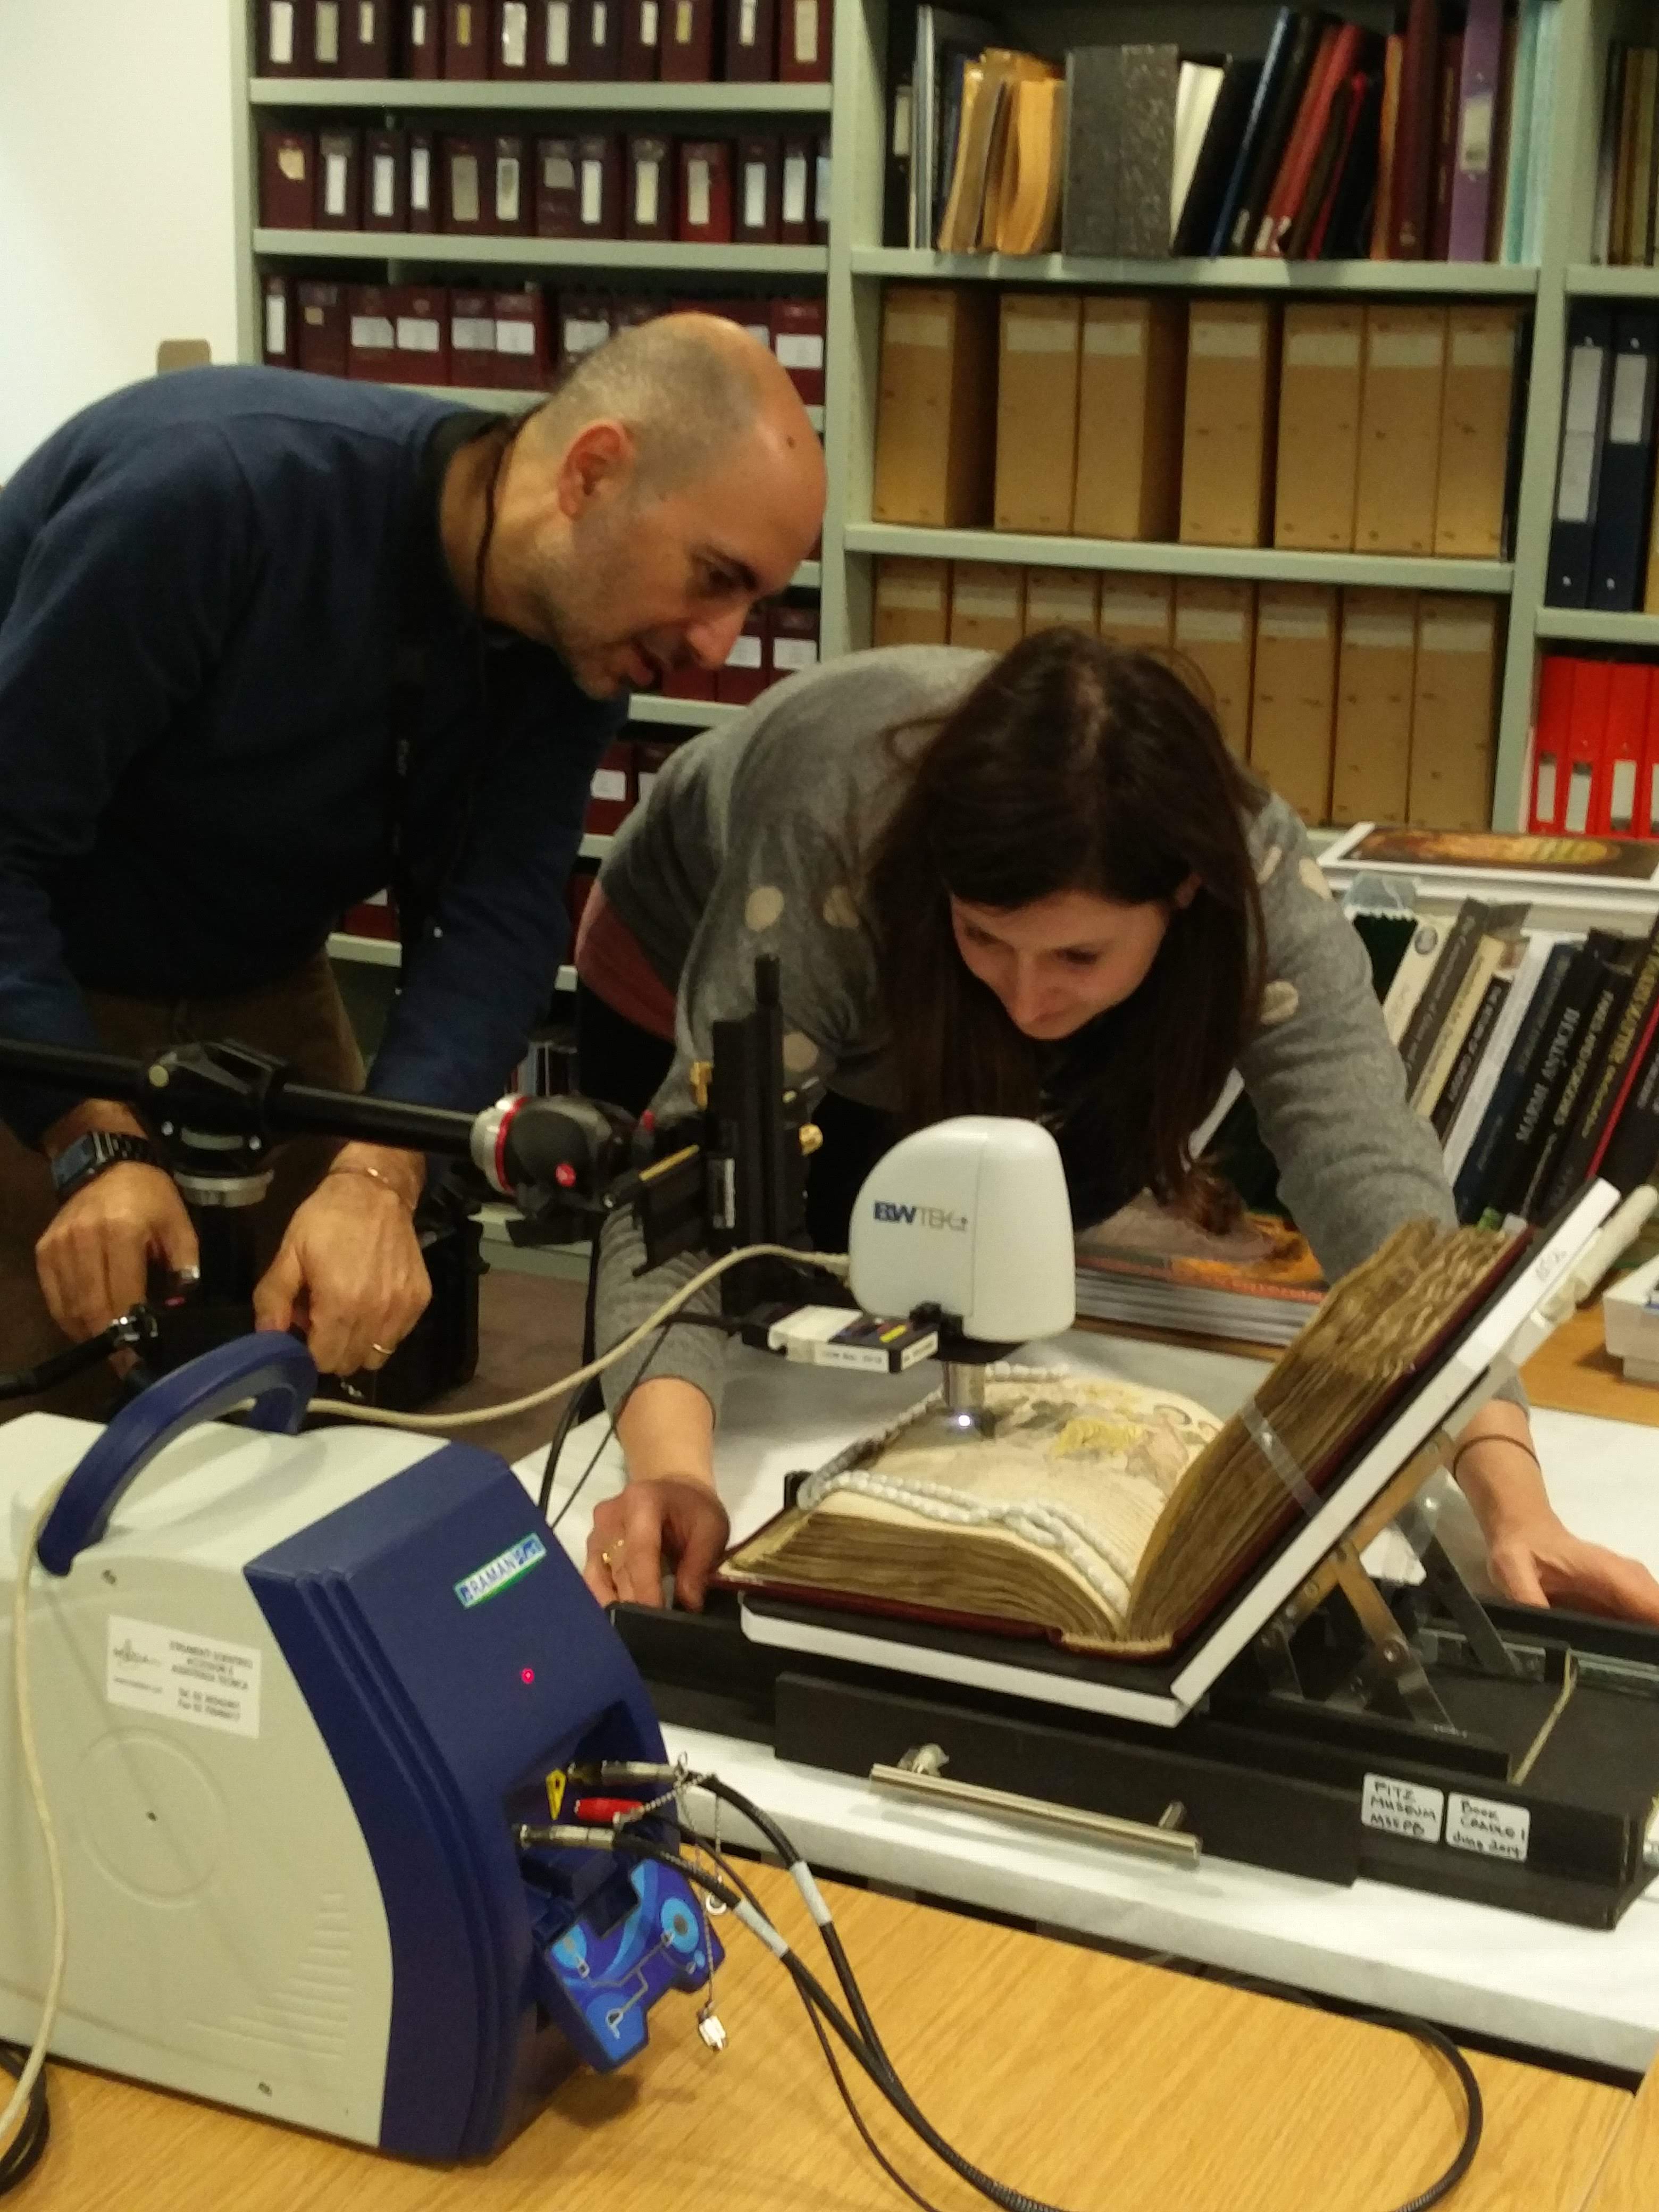
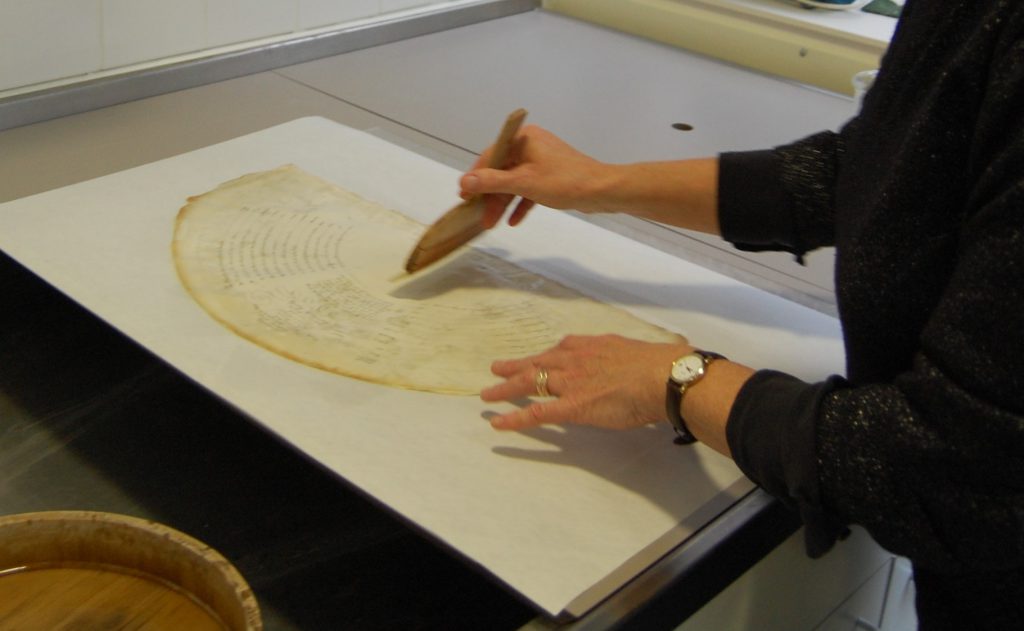
I assisted with the installation of a multi-analytical ‘mobile’ laboratory and helped Dr Legnaioli and the Museum’s Research Scientist, Dr Paola Ricciardi, in performing the analyses. In the brief time available, I was fortunate to be able to work on a ninth-century French manuscript, a lavish copy of the Astronomicum Caesareum printed in the mid-sixteenth century, Corpus Christi College’s Grant of Arms, a group of sixteenth-century Italian Dogali (ducal documents from the Republic of Venice), as well as on some of the Museum’s fan collection.
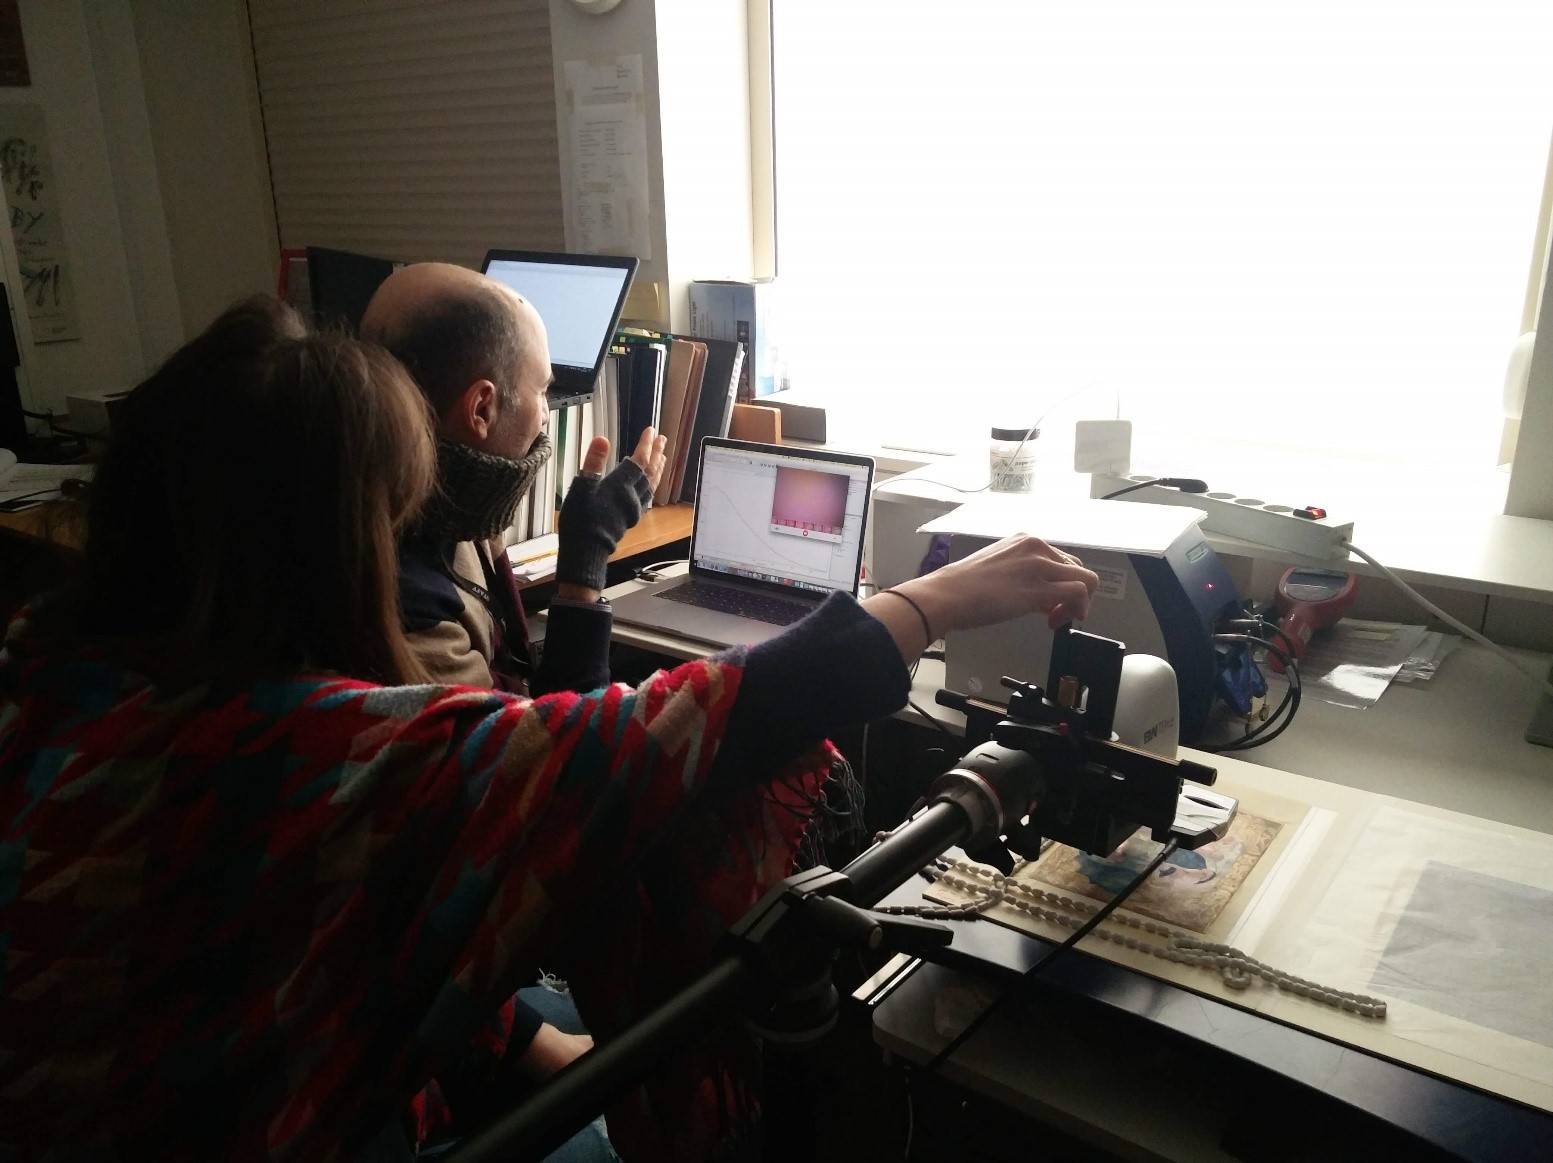
Our daily protocol included multispectral imaging and spectroscopic analyses: X-ray fluorescence (XRF), reflectance spectroscopy in the ultraviolet-visible-shortwave infrared range (FORS) and Raman. The combination of these analyses revealed underdrawing, changes in the composition, retouching and ultimately the nature of the vibrant and rich colour palettes. The scientific data that we have collected can support other researchers to shed light on the objects’ authorship, style and geographic origin, and ultimately to educate the visitors on how the artefacts were made.
This intensive experience enhanced my knowledge of illuminated manuscripts greatly, and above all, it taught me how to study this type of artefact with a scientific approach. I learned that, even if at first glance a colour palette seems to be easy to identify, analysis can reveal unexpected and unusual results. I understood early on that science cannot answer all the questions that arise at the beginning of research; however, this is a challenge rather than a failure. It may be that we need to find or develop a new protocol, perform other analyses, discuss the problem with curators, or even to leave the question open and unanswered. I loved doing this cross-disciplinary research because, like a jigsaw puzzle, all the various chemical, physical and historical information can be put together to resolve the manuscripts’ mysteries.
I have just completed the first month of my fellowship at the Fitzwilliam Museum and I look forward to facing new challenges and studying in-depth the art of illumination. With plenty of work to do this year, I am sure there will be new scientific discoveries to write about in future blog posts! I would like to thank the Zeno Karl Schindler Foundation for supporting and funding the MINIARE fellowship, as a remarkable experience for my professional and personal growth.
The Conservation Project
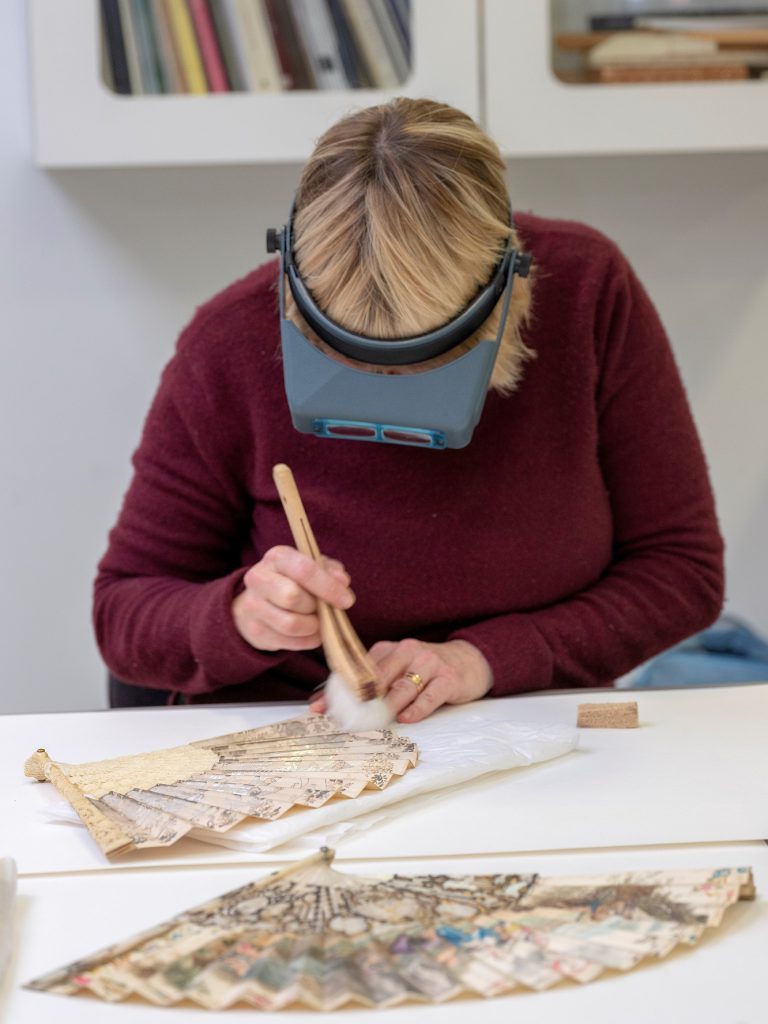
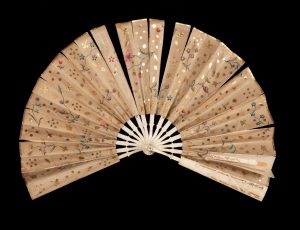
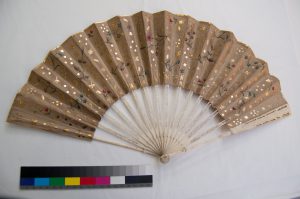
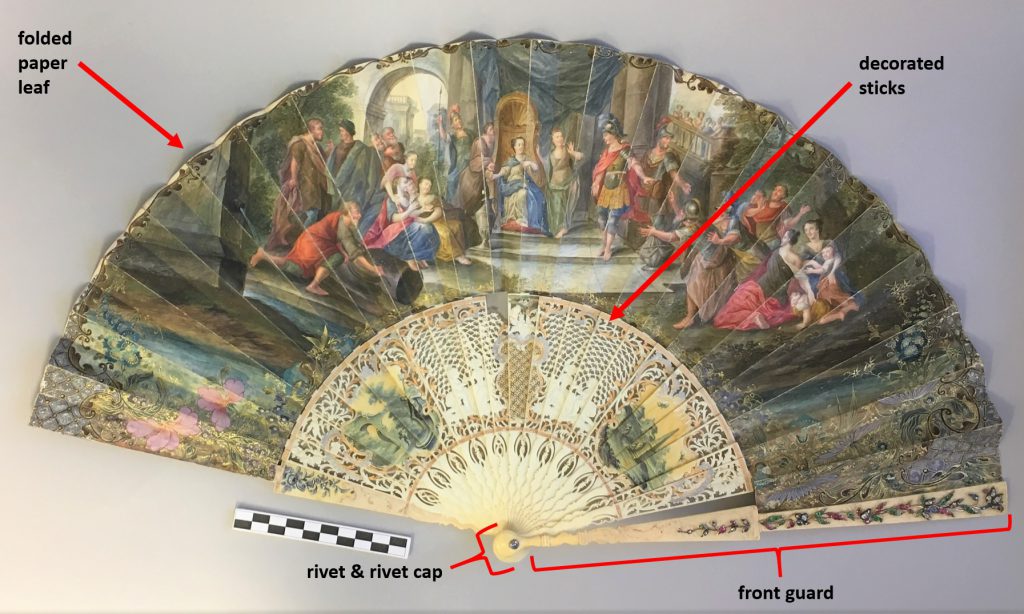
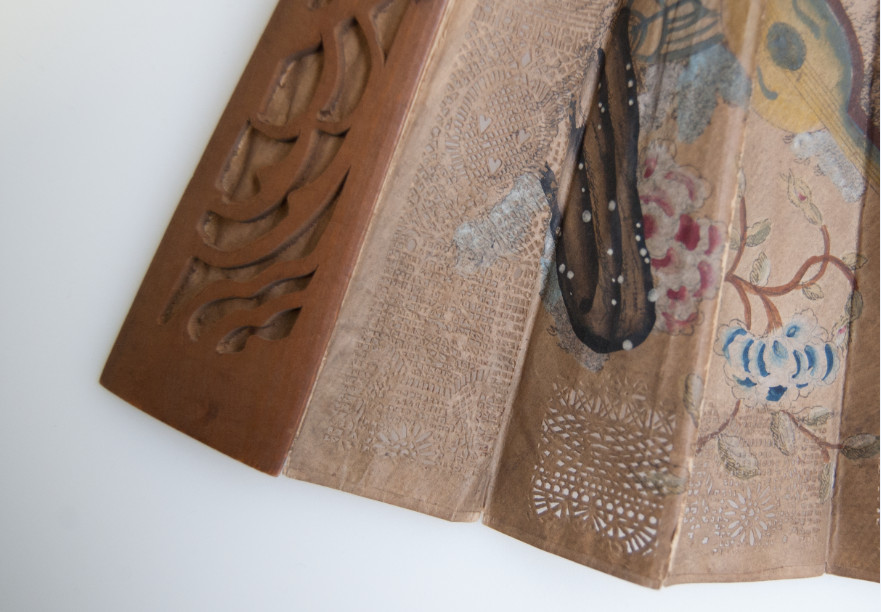
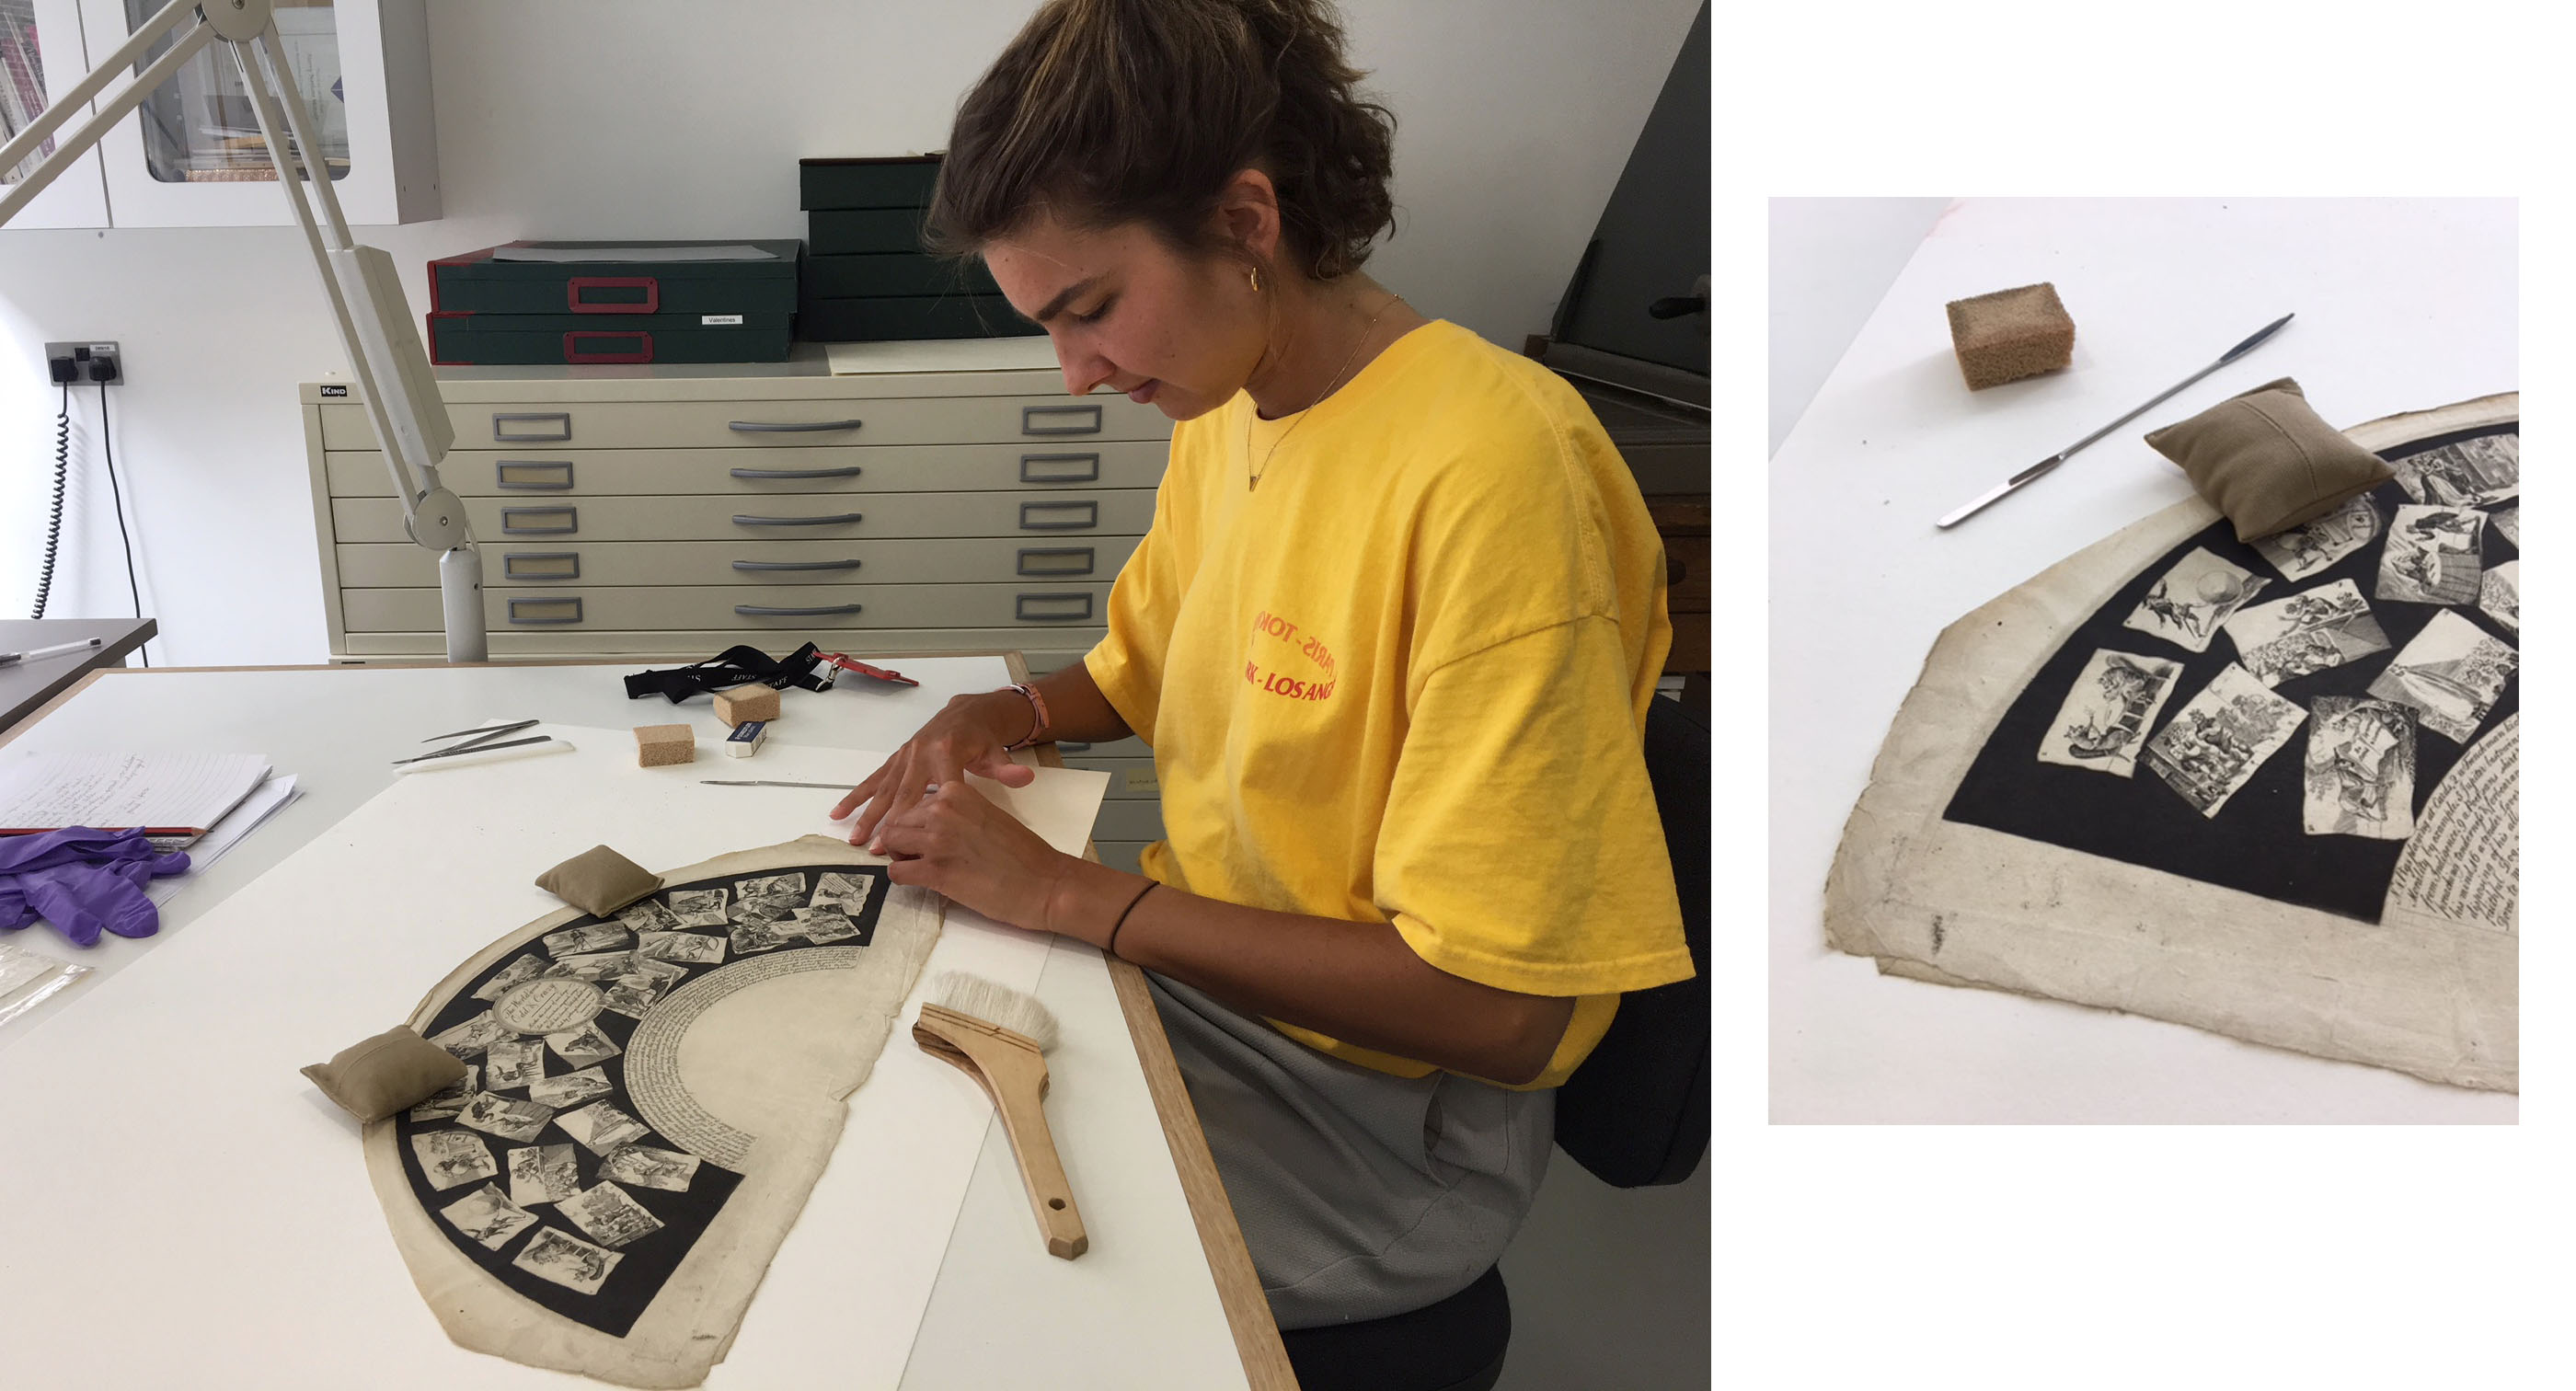
Fans are complex, three-dimensional objects made of several types of material. Conservation of fans from the recently acquired Lennox-Boyd collection has been a rewarding collaboration between conservators in the Applied Arts department and the Paintings, Drawings and Prints (PDP) department. Phase 1 of the project involved a condition survey, photography and treatment of a small sample of fans. Phase 2 involved a re-housing project, scientific analyses and conservation treatment in preparation for the current display at the Fitzwilliam Museum. A selection of 51 fans was made for the display, reflecting the variety in age, manufacture and condition of the Lennox-Boyd collection. This post discusses the project from a Paper Conservator’s perspective.
Paper Fans – Condition
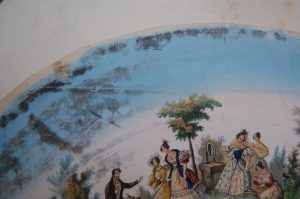
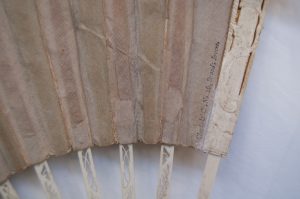
Although fan leaves can be made of materials such as vellum, bone and silk, the predominant material used is paper. The Lennox-Boyd collection contains over 400 paper–based folding fans and flat paper leaves. Of all the components that make up a fan, it is the leaf which suffers the most damage and deterioration. The quality and condition of fans in the Lennox-Boyd collection reflects their wide-ranging variety, age and history. Many fans show signs of ownership and long use: accumulated dirt and assorted tears and splitting along the pleats are the most common types of damage. Additionally, fans can be harmed by exposure to light, fluctuating temperature and humidity, pollution, biological attack from mould and insects, and contact with other, frequently inferior quality, materials. These affect the paper as well as the applied, painted or printed media which decorate the leaves.
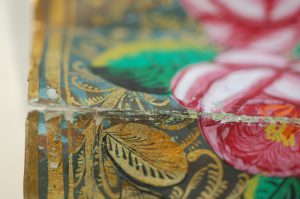
Early European papers used for fans were hand-made from plant fibres, which were strong and long-lasting. There are many fine examples of these beautiful papers in the collection. With the advent of machine-made papers from around 1860, paper quality became more variable. Around this time, less durable, mass-produced papers started to appear in fans. Over time, these poorer-quality papers become acidic and weak, tearing easily and losing their ability to endure opening and closing. Other materials used in fan manufacture have also developed and changed, often affecting the stability and permanence of the fan overall: adhesives may discolour and fail as they age; paints and printing inks become less permanent. Other fan components may affect the stability of the paper: the wooden or card ‘ribs’ which hold the fan leaf in place sometimes cause staining and degradation, as do corrosive or degrading paints and inks. The collection also exhibits a wide range of old repairs using materials such as stamp hinges, paper, thread, and pressure-sensitive tapes. Many of these repairs are unsightly and have caused further deterioration.
Conservation of Paper Folding Fans and Fan Leaves
Treatments undertaken on the Lennox-Boyd fans in preparation for display ranged from minimal cleaning to more interventive, labour-intensive repairs. Treatment of the folding fans was limited to actions such as gentle surface cleaning and physical repairs which could be carried out safely without taking the fans apart. The fans were supported underneath during treatment with tapering pieces of polyethylene foam and care was taken to apply as little pressure as possible to their delicate surfaces.
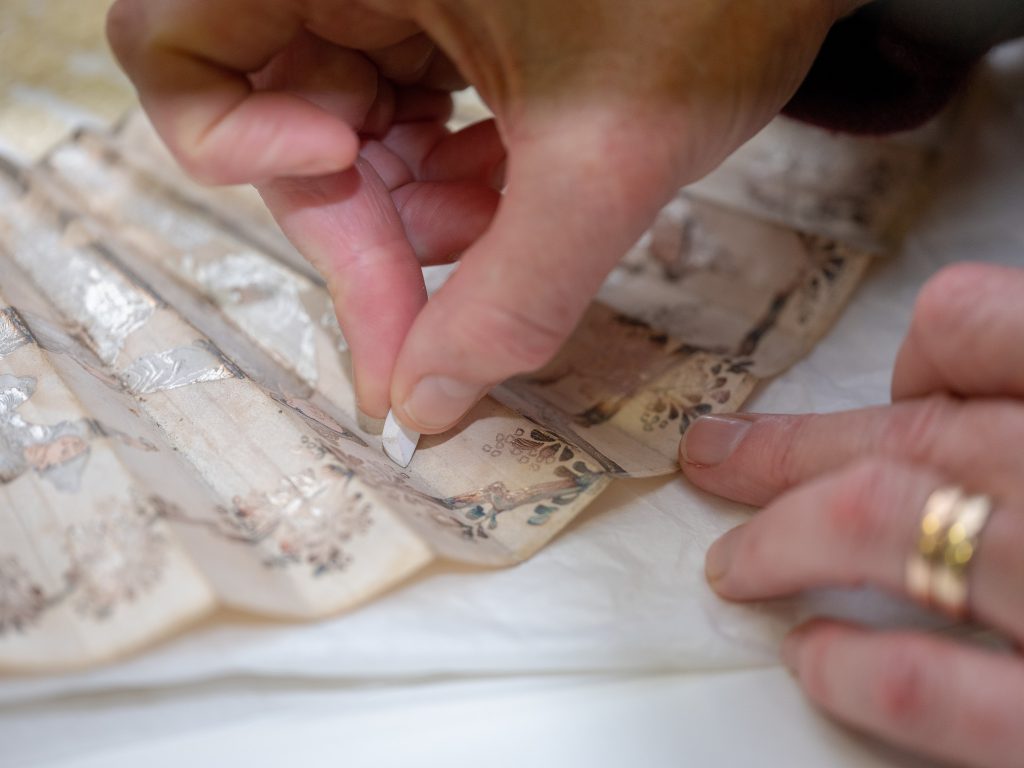
Dirt and dust were removed using soft brushes, accretions were carefully picked off using the tip of a scalpel blade, and the more ingrained dirt was reduced using either dry cleaning sponges or small wedges of vinyl eraser. Cleaning was avoided in areas with fragile media. Where possible, flaking or cracked paints were consolidated with a cellulose-based adhesive. Mould spores were safely removed using a brush and suction. Many flat fan leaves were detached from unsuitable acidic boards. Several discoloured and stained leaves were dry-cleaned, then washed in buffered de-ionised water. Before pressing they were given a coat of dilute gelatine to replace degraded sizing and gently re-adhere the sheets together where they had separated. They were then lightly humidified and pressed between blotters and weighted boards. Some disfiguring stains on the fan leaves were locally treated with a weak bleach solution and then rinsed.
Splits and tears were mended with starch paste and/or a cellulose-based adhesive and narrow strips of cut or torn Japanese tissue tinted with dilute washes of acrylic paint. Where possible, the two paper sheets making up many fan leaves was gently prized apart in order to insert the mend between the layers. The sheets were then pasted closed again to make the repair invisible. If this wasn’t possible, a small strip of tinted tissue paper was pasted along the reverse side of the damaged seam. Repairs were held in place to dry under small weights, using clamps or by hand, depending on the location of the damage and the strength of the paper. Losses were filled with Japanese paper of a matching weight, texture and colour. Disfiguring or damaging old repairs were removed and replaced.
Conservation procedures followed strict professional protocol, using conservation-grade materials, testing prior to treatments, and thorough documentation throughout.
Display and Storage of the Fan Collection
After treatment, a customized acrylic stand was made for each fan by technicians in the Applied Arts department. The stands can be tilted at different angles by means of a ball-joint mounting and are sensitively designed to support the open fan safely whilst on display. Flat fan leaves were hinged onto acid-free museum board with Japanese paper and starch paste, and given fan-shaped window mounts. Other fan leaves will be stored in polyester sleeves with acid-free card support. The majority of folding fans will be stored closed and wrapped in acid-free tissue. All the fans will be stored in museum Solander boxes on racks of dedicated shelving. It is hoped that the conservation of the Lennox-Boyd collection will continue, enabling more of these intriguing objects to be available for study and display in the future.
Acknowledgements
Thank you to the curatorial and conservation staff in the Applied Arts department and the Paintings, Drawings and Prints department of the Fitzwilliam Museum. The fan collection of the late Hon. Christopher Lennox-Boyd (1941–2012) was accepted in lieu of Inheritance Tax by H M Government and allocated to the Fitzwilliam Museum in 2015. This conservation project was generously funded by the Marlay Group.
Rosie Macdonald
Paper Conservator, Lennox-Boyd Fan Project
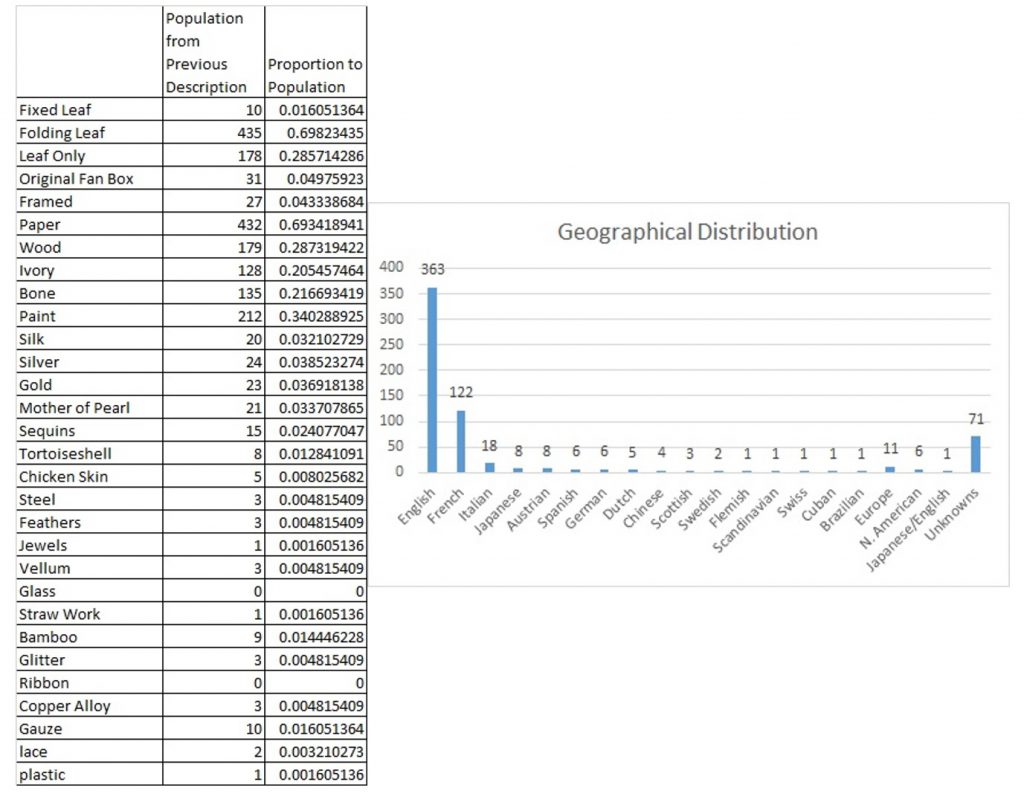
The Applied Arts team has been working with the Paintings, Drawings and Prints (PDP) Department on the recently acquired Lennox-Boyd fan collection. The collection is comprised of 435 folding fans, 10 screen fans, 178 unmounted paper fan leaves, and 4 miscellaneous items. Some folding fans and leaves are mounted within frames, and many are accompanied by their original boxes. The table below shows the variety of fan types and materials. The graph shows their geographical distribution.
The project began with a condition survey. Paper Conservator Rosie Macdonald and I examined a sample of the collection, identifying materials and deterioration problems, and estimating the time required for conservation.
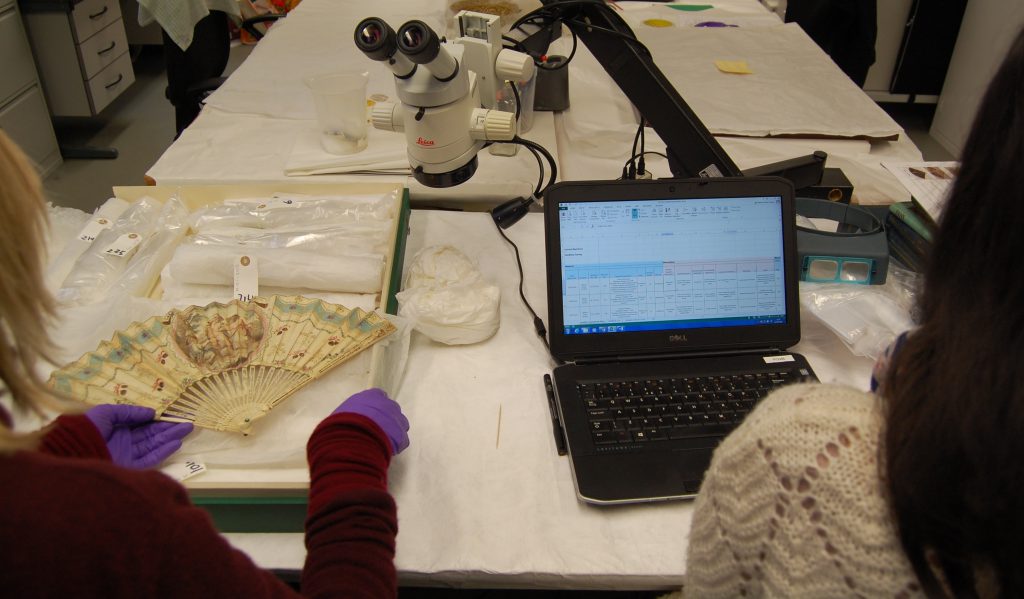
We photographed each fan in the sample, entered the condition data into a spreadsheet, and analysed statistics in order to better understand the condition of the entire collection. Conservators from both departments also went on a research trip to visit other fan collections in London.
In the second phase of the project we have been rehousing the collection and conserving some of the fans in preparation for a new display, opening on March 5th 2019.
Over the course of this project I conserved three types of fan: folded, brisé and screen fans.
Folded fans
Folded fans have a leaf made of paper, animal skin or textile, which is decorated in a variety of ways and folded into peaks and troughs. I cleaned the textile leaves by dusting with a soft brush and consolidated any loose elements.
Guards are the exterior, rigid elements that protect the fan when closed. In this collection I encountered guards which are made of bone, ivory, wood, mother-of-pearl and plastic. Cleaning was carried out using a soft brush and a vulcanised rubber sponge. If further cleaning was necessary, I applied a solvent with a cotton swab, removing dirt carefully under the microscope.
Sometimes the guards are heavily worked with carved and pierced decoration. On porous surfaces, such as bone or ivory, dirt was extracted using a gel applied over a barrier layer of tissue paper. The guards were then rinsed with de-ionised water to remove any trace of the gel from the surface.

Brisé fans
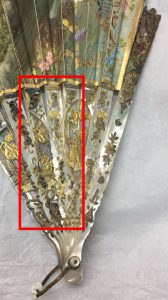
Brisé fans open and close much like a folding fan, but do not have a leaf. They are made of individual blades (sticks) held together by a ribbon or string.
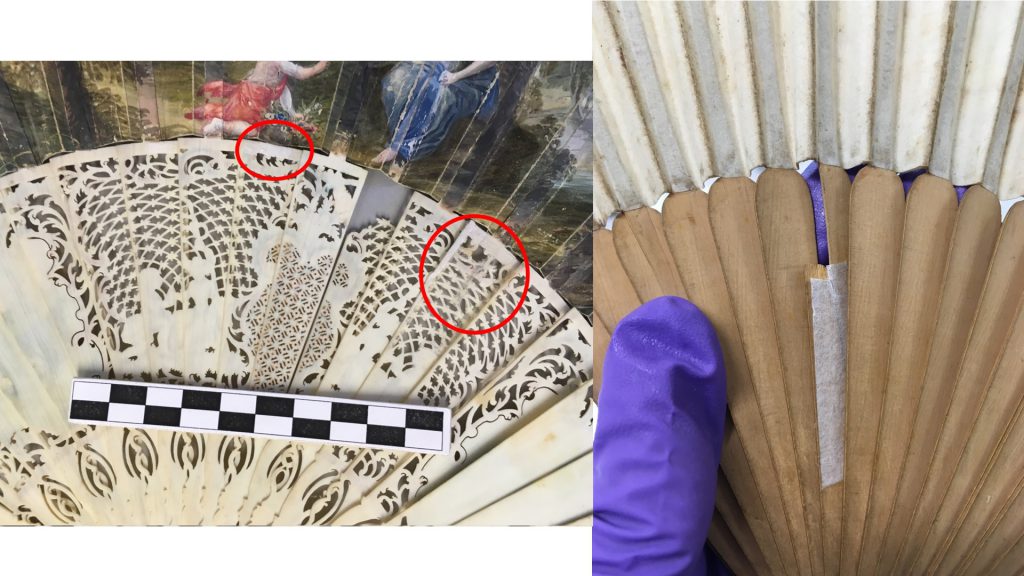
I repaired broken sticks and guards with a conservation adhesive, securing the repairs with a paper backing (as shown above). On one occasion, the breaks on the guards had caused losses. I experimented with different methods and materials to fill in this loss so that the fan could once again have protective guards. I moulded and casted a clear, resinous material that I inserted into these areas.
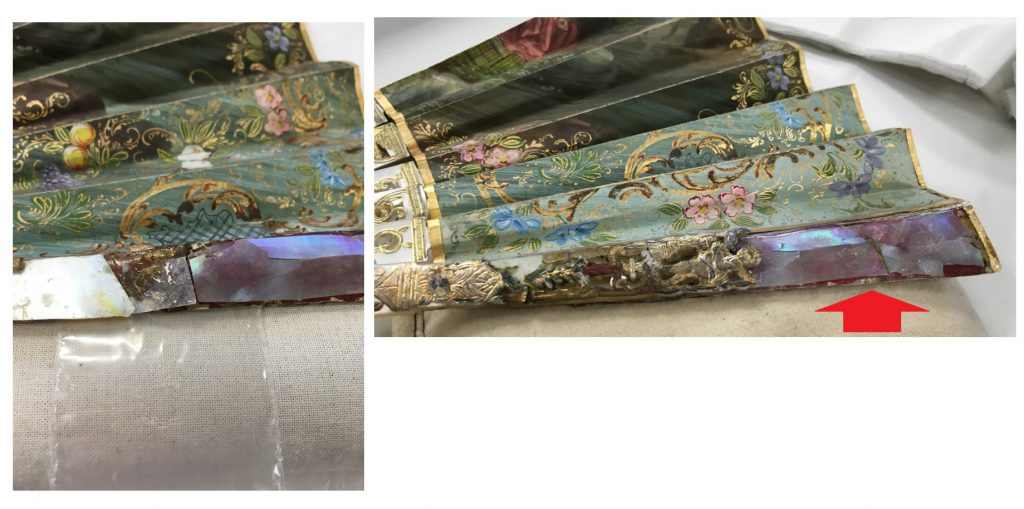
The sticks are attached at the bottom point of the fan by a rivet, spacer, and/or a rivet cap. These elements are often made of metal, with the rivet cap containing a resin, glass, or precious stone inlay. Loose inlays were secured to the surface and cleaned where necessary.
Metal overlays were stabilised with a conservation adhesive where loose elements were visible. Tarnish and corrosion were cleaned with an enzyme applied under magnification with a cotton swab. A protective layer was applied over some pigments so that the opening and closing of the fan no longer removed the decoration.
Screen fans
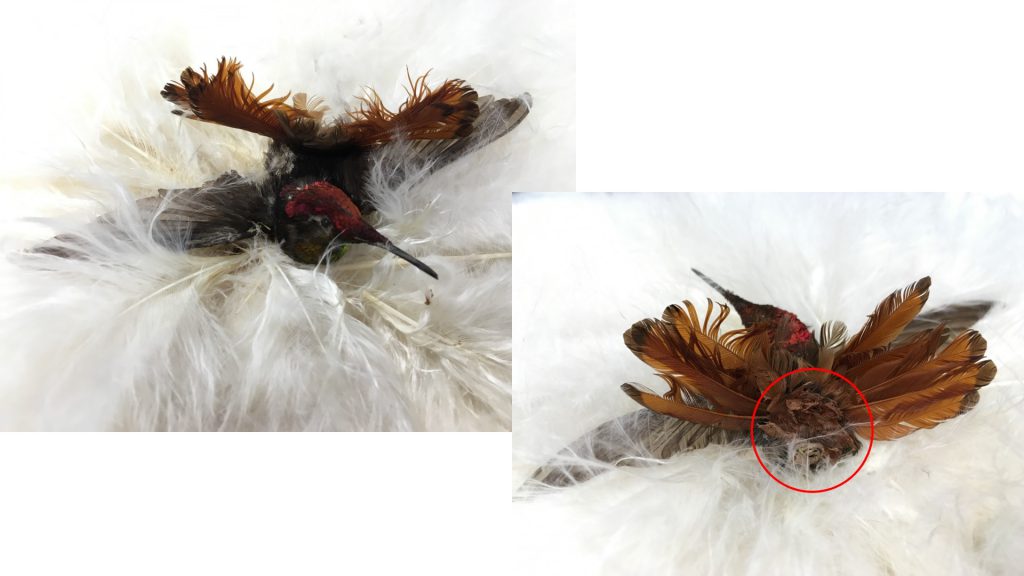
Screen fans have a fixed leaf that can be made of a wide variety of materials. The screen fan I conserved is made of various types of feathers, with a taxidermy hummingbird at its centre, and a wooden handle inlaid with ivory. The feathers were humidified, reshaped and cleaned. Some of the unstable feathers were re-adhered to the surface of the fan. Three areas of loss were filled with a paper patch made to resemble feather down.
For more on the conservation of these wonderful objects, watch this space for Rosie’s blog-post on the treatment of the paper elements. I hope those who can will visit the new display opening next Tuesday, March 5th 2019!
Rebeca Suarez Ferreira, MA
Objects Conservator
Applied Arts Department
The Fitzwilliam Museum
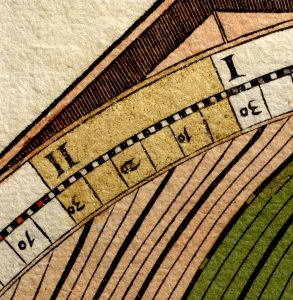
The Founder’s Library at the Fitzwilliam Museum houses an extraordinary collection. It charts the history of the printed book, from the first days of printing in the mid fifteenth century to artists’ books and productions of the private presses today. We are fortunate to have a copy of the Astronomicum Caesareum, one of the high points of sixteenth-century printing, as part of the collection. Printed in 1540 in Ingolstadt at the press of the author, Peter Apian (1495-1552), this magnificent book was dedicated to the Holy Roman Emperor Charles V and his brother, Ferdinand. It was designed to make astronomy accessible to those who did not have a high level of mathematical education. The reader is provided with volvelles – moving dials of paper attached to the leaves – throughout the book, the paper instruments allowing astronomical phenomena to be calculated.
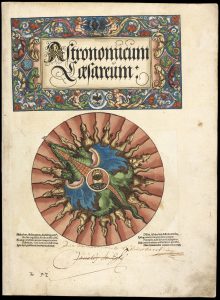

Apianus’s work is based on the Ptolomaic system of astronomy, where the earth is assumed to be at the centre of the universe. However, within three years of publication, Copernicus (1473-1543) revolutionised thinking about the universe by suggesting that the planets orbit the sun. By the seventeenth century, Kepler (1571-1630) described the Astronomicum Caesareum as an elaborate waste of effort! Although scientific thinking has moved on, the book remains a superb artistic achievement: the typography includes a mirror-image font and decorative lay outs, the volvelles and decorative woodcut initials glow with rich hand colouring, and some of the pastel shades of paint are embellished with tiny golden particles, which sparkle in the light as the leaves are turned.
The book had suffered from damp and insect attack in the past and was repaired and rebound, probably in the early nineteenth century. Repair patches added at that time were very stiff and had caused the original leaves to crack along the edges of the old repairs. Over-large patches also obscured text. The binding was also breaking down, with the thin leather on the spine crumbling and the sewing threads either breaking or tearing holes in the spinefolds.
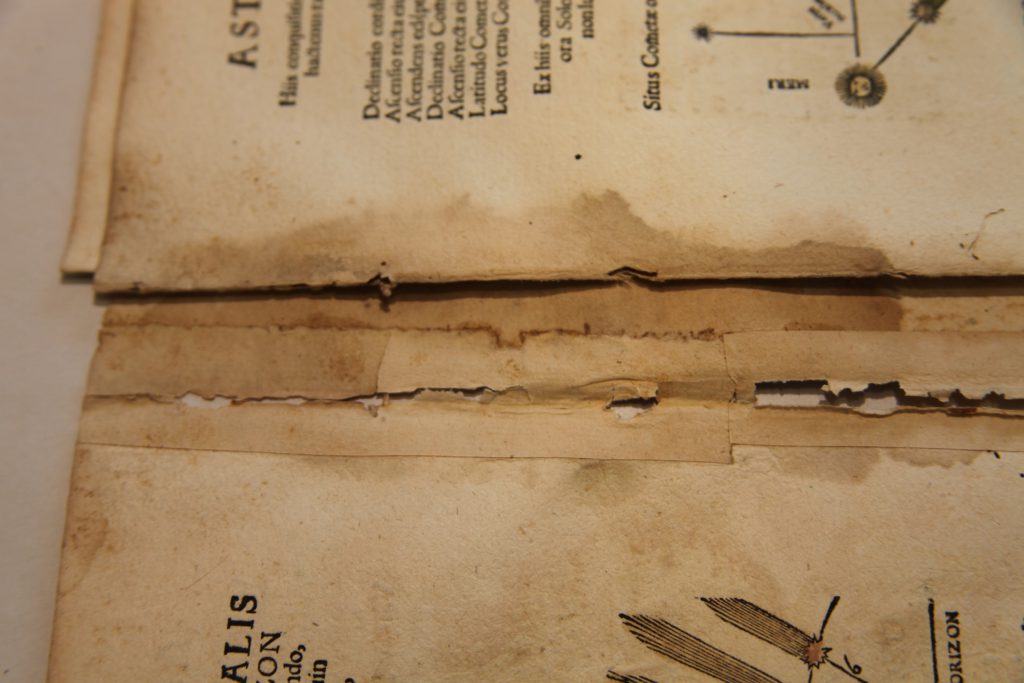
Over the course of the last year, the leaves of our copy of the Astronomicum have undergone extensive conservation work. This involved the careful removal of the old binding and heavy repair patches, the reduction of disfiguring water stains, and the repair of damage using Japanese handmade papers to make sympathetic infills.
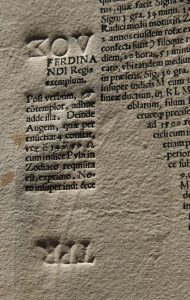
Our copy is one of the deluxe versions printed on very high quality paper made from rags and is remarkably well preserved. It is still possible to see the marks of the rope over which the wet paper was hung to dry, as well as blind impressions of type in blank areas, added to control pressure on the paper during the printing process. These un-inked letters are known as ‘bearer’ type.
Recently, a team of historians of science joined us in the library to examine and discuss the book, as well as future possibilities for interpretation and digital access. Our scientists are also analysing the pigments in the colouring, and we hope to build up a more detailed picture of the materials and techniques used to make an extraordinary book.
Each leaf has now been digitised and we hope to be able to present the book and our research work on it in digital form in the future for new audiences to enjoy. The next stage of the project is to make a new binding for the book – keep a look out for a further blog post when the work is finished.
Edward Cheese
Conservator of Manuscripts and Printed Books
Fitzwilliam Museum
For the past three years I have been working towards a PhD with the Department of Archaeology at Durham University. My research is all about the everyday working lives of object conservators. I am interested in how conservators approach the objects they work on, what knowledge they use to do so, and how this type of work is established within heritage institutions. I am also interested in all the other work that conservators do, from preventive conservation to training new conservators, and to outreach work for the public, blog-writing included!
I decided I would investigate these interests by conducting an ethnography. This is a methodology which anthropologists use to observe human behaviour in various settings. In anthropological terms, my study is multi-sited: I have conducted my ethnography in many different sites, with many different types of practitioners. This has given me a broad, holistic view of what conservators do in practice, how they feel about their work, what issues they face, and what experiences they bring to and gain from their work.
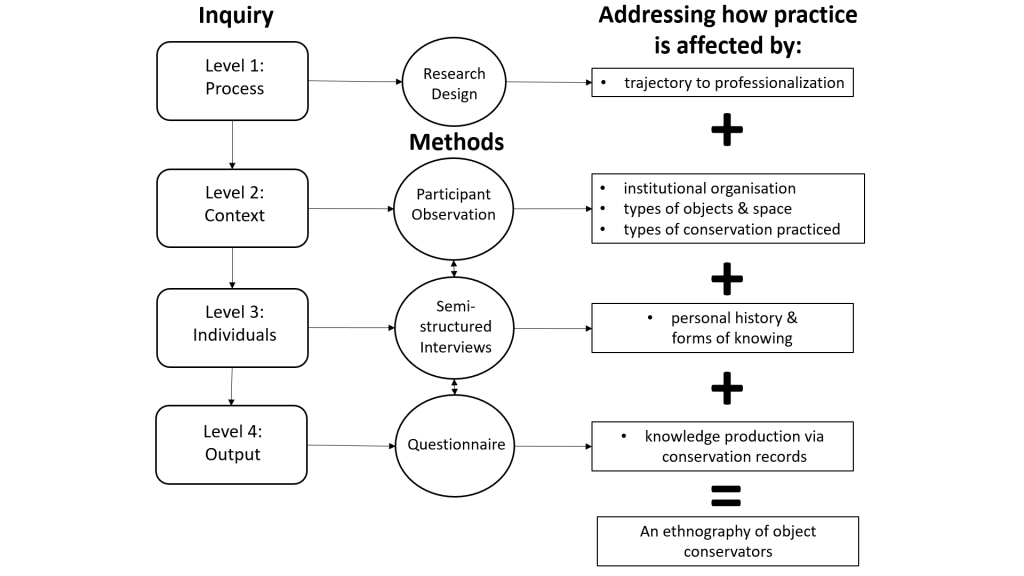
One of the field sites where I conducted my ethnography was the Fitzwilliam Museum. I spent two months working with the conservators, conservation technicians, conservation interns and students of the Antiquities department. During this time, I did what anthropologists call participant observation. I am also a qualified conservator, so I was able to help with the conservation of an Ancient Egyptian sandal whilst I observed what the other conservators were up to throughout their working day.
I also helped with the display of a case in the Egyptian gallery that houses textiles and other organic materials. Sometimes I shadowed the conservators as they attended meetings; at other times I asked questions about the objects they were working on. I also conducted an interview with each of the conservation members of that department.
I then repeated this process with the Applied Arts department. This time, instead of taking part in the treatment of objects, I helped with a project which focused on preventive conservation. Along with a conservator from the Paper, Drawings and Prints (PDP) department I carried out a large-scale condition assessment of the newly acquired Lennox-Boyd fans collection. During my time with Applied Arts I also shadowed the conservation technicians, conducted interviews, and lent a helping hand with temporary exhibitions taking place throughout the museum.
I also spent time in the other University of Cambridge Museums (UCM). I wanted to see how other types of museums work and was attempting to reach as many conservators as possible. To do this, I led forums through the UCM 4C group, which brings together conservators and care of collections professionals throughout the museum consortium.
I led three forums throughout the past year and treated them like group interviews for the purpose of my research. This allowed me listen to different conservation practitioners discuss all kinds of topics. These included the practical side of conservation, the risk of loss of practical skills, working with unfamiliar objects or sensitive materials, gender and class in conservation, responsibility in conservation, experiences with objects, and difficulties in becoming a conservator. Again, this list is not exhaustive but I hope it gives an idea of the range of these conversations and how useful they were to me as a researcher.
I am still working on the Lennox-Boyd fans collection and a related display focused on the conservation work carried out on the fans. I am also in the midst of writing my PhD which I hope to finish within the next year. I would like to take this opportunity to thank the Fitzwilliam Museum, University of Cambridge Museums, and all those who kindly participated in my doctoral research. It was, and continues to be, a great pleasure to work with you.
I will return to write about my conservation work on the Lennox-Boyd fans collection in due course!
Until then…
Rebeca Suarez Ferreira, MA
PhD Candidate
Department of Archaeology, Durham University
Objects Conservator
Applied Arts Department, The Fitzwilliam Museum
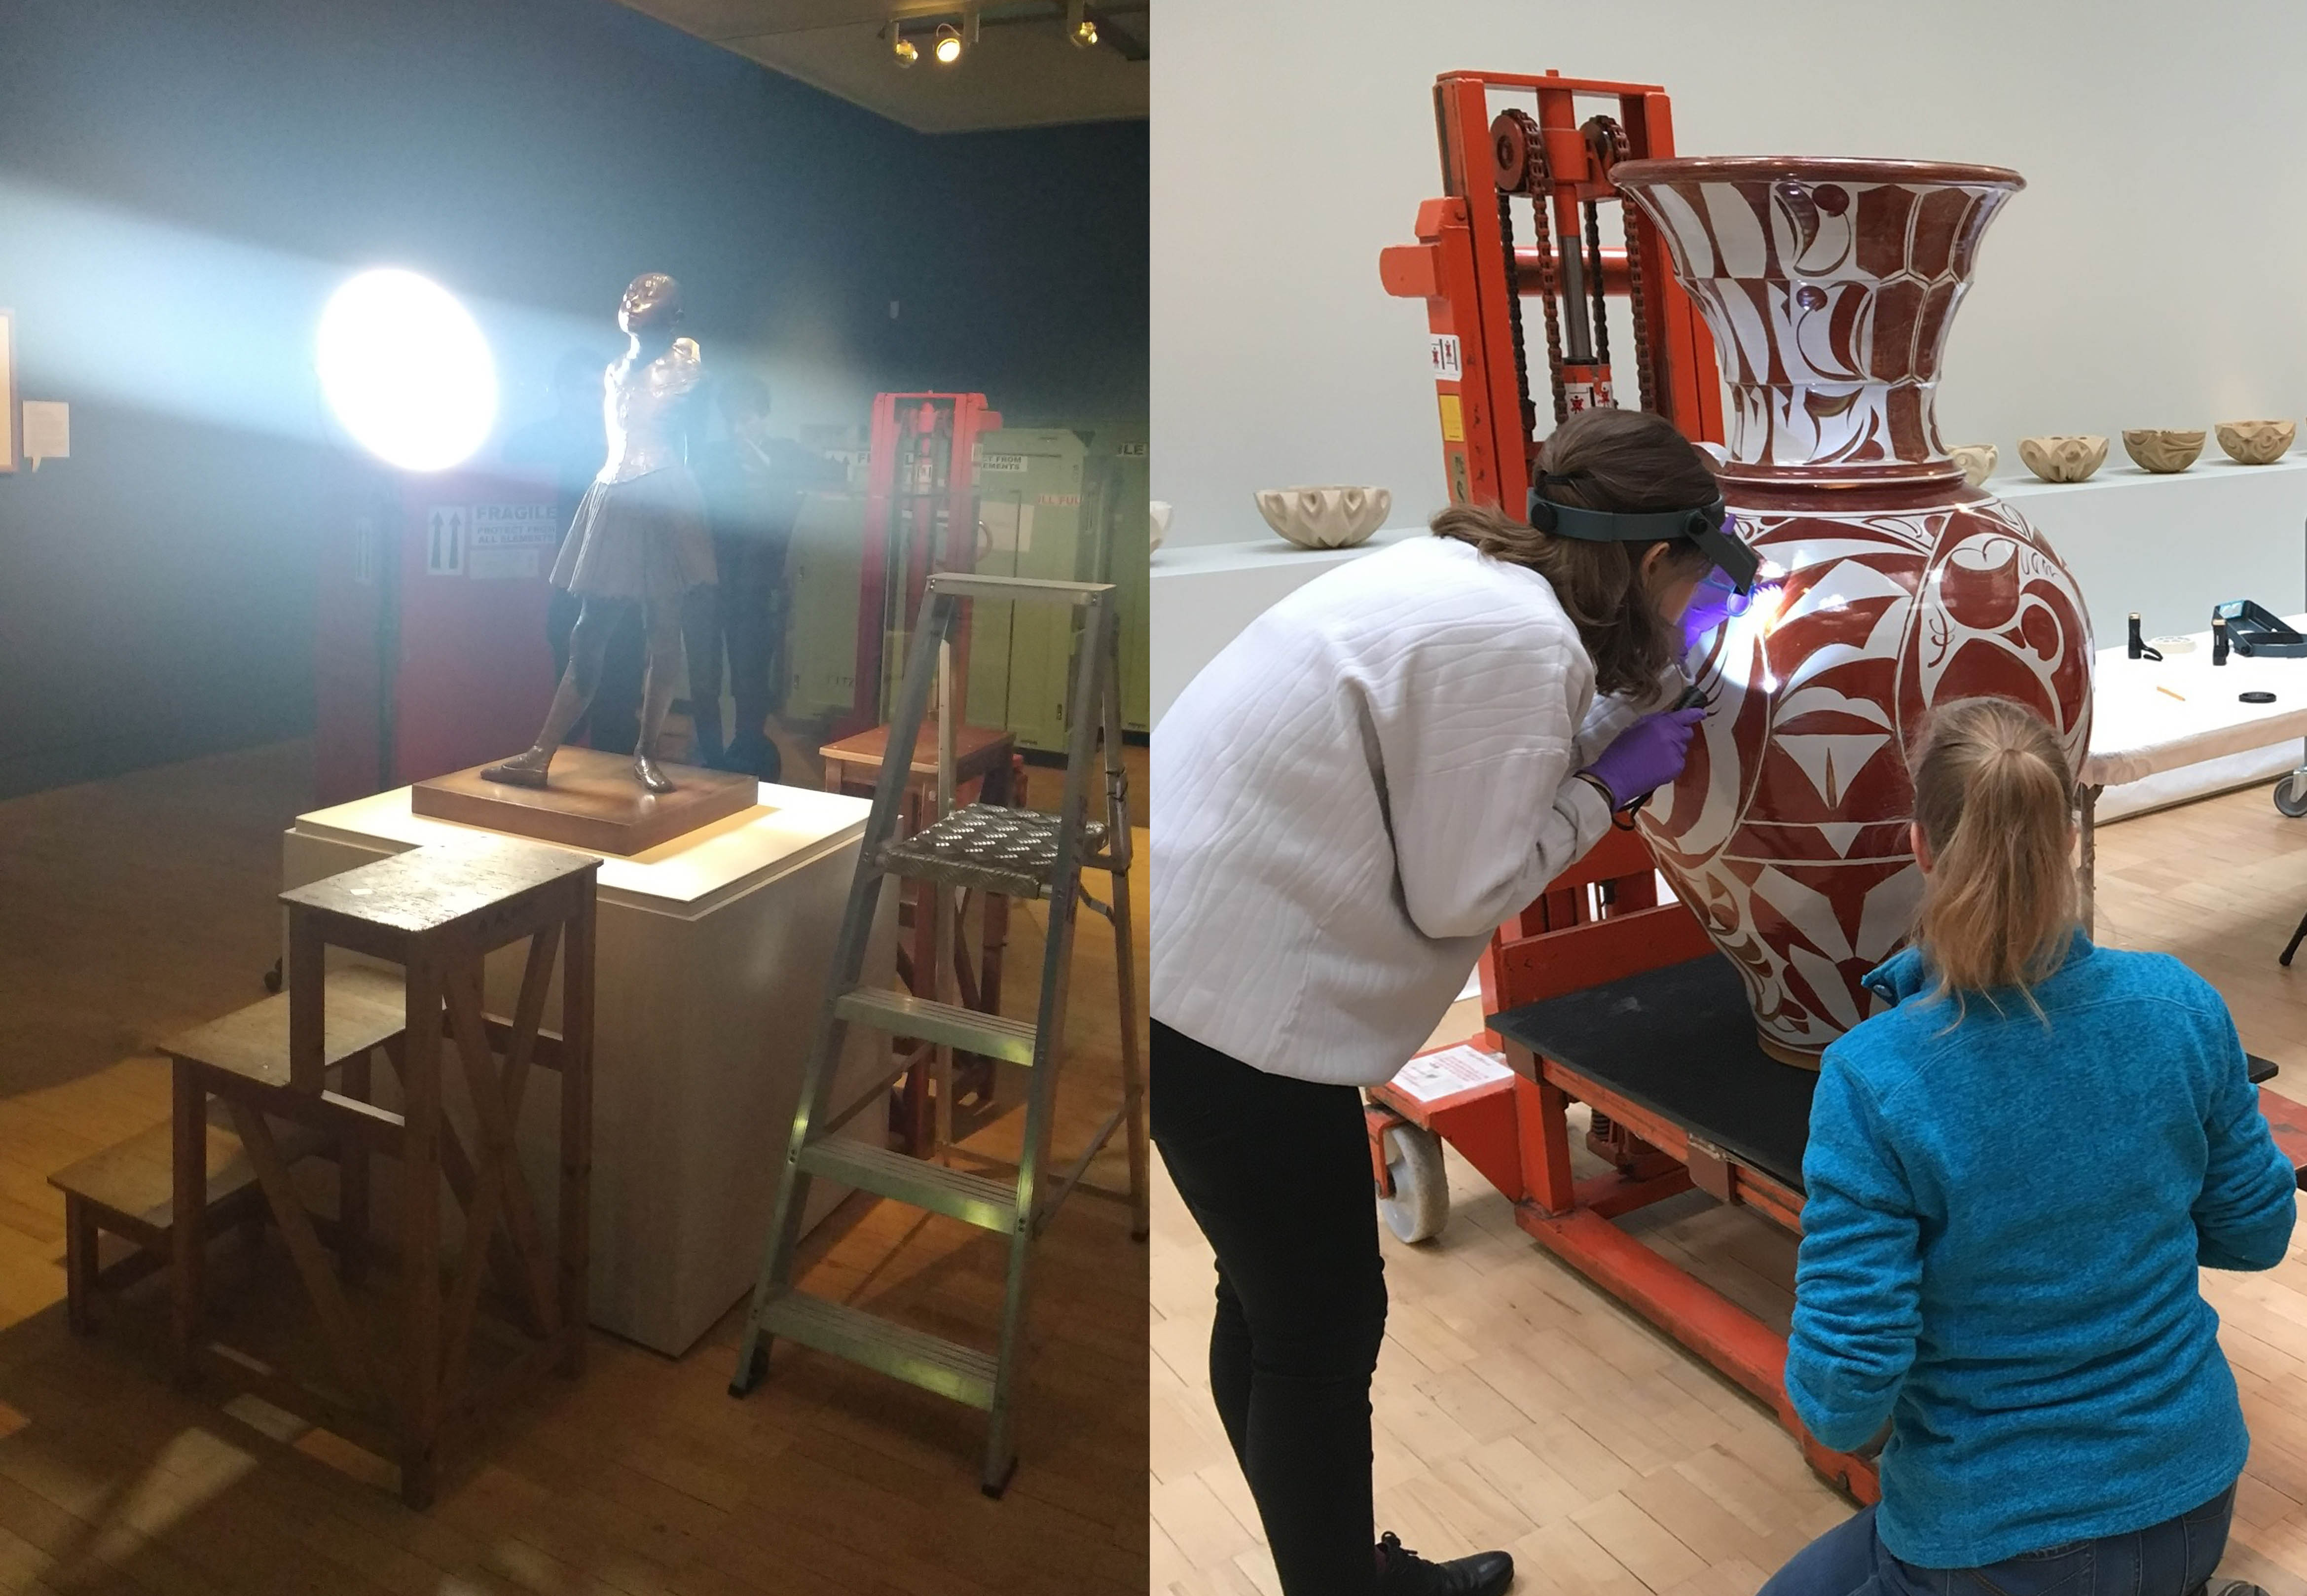
I have recently started a 9-month internship at the Fitzwilliam Museum as part of my MSc in Conservation for Archaeology and Museums at University College London. Working with both the Applied Arts and Antiquities teams I will contribute to the preservation needs of the departments’ collections. Having spent just under 2 months in this placement, I have already learned a great deal, not only about objects and materials but also about general museum practice. My placement supervisor, Antiquities conservator Jennifer Marchant, identified a number of projects for me to work on. They are varied and I get to participate in a range of activities within the Museum, including preventive and remedial conservation, collections care and management, and material analysis using specialized techniques. This work plan is not set in stone and can be modified if necessary, giving me the opportunity to sign up for new projects that may arise down the line.
My first few weeks were mostly spent in becoming acquainted with the collections and members of staff, as well as helping out wherever an extra pair of hands was needed. Conservation work during this time centred on cleaning glass objects for an exhibition in 2019 and assessing the condition of wooden furniture. This was my first direct experience with glass and I was pleased to discover a new interest in it. The objects served as a fitting introduction to the material as they were in excellent condition. To my surprise some of the items were over 200 years old but I never would have suspected this as they had been cared for so well. The experience of working with furniture was enlightening in terms of the signs of damage that appeared and the relationship between their location and the function of the items during their lifetimes. Photographs were required for the reports and this proved a challenging but edifying exercise since the space lacked proper lighting and I had to rely on natural light.
Aside from cleaning a small group of twelfth- and thirteenth-century Korean ceramics that is going on loan to the National Museum of Korea, I have had the chance to treat an ancient ceramic from Cyprus. This earthenware, categorized as a red-polished ware which is specific to the Cypriot Bronze Age, is a ritual vessel with incised decoration that has been inlaid with a white material. The anthropo-zoomorphic symbols of the decoration offer a fascinating glimpse into the beliefs and values of this early community. One of the finials shaped like a bull’s head had broken off and required reattachment. Though this was a straightforward treatment, I found it tremendously gratifying to contribute to the preservation of this ancient ceramic. While investigating the earlier work carried out on this object, I read the conservation file written by the last conservator who had performed an intervention. I could not help feeling a sense of kinship with this colleague, unknown to me, who contributed to the safeguarding of the same artefact over 20 years ago.
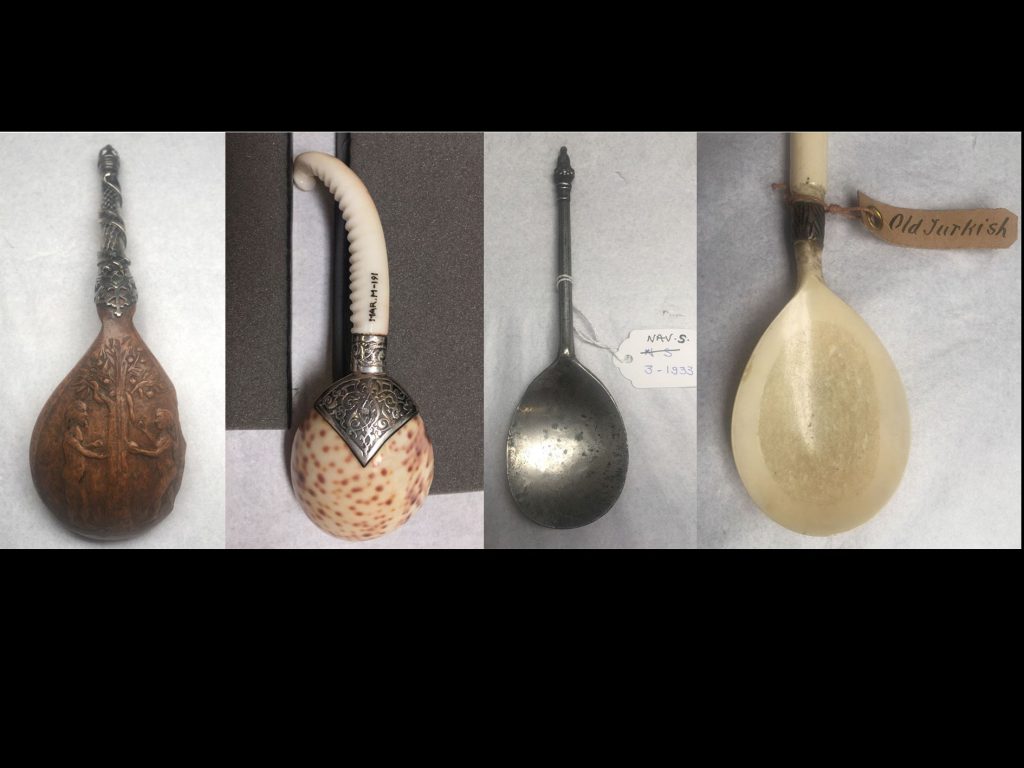
Another memorable project I am working on is also for an upcoming exhibition. This is one of my favourite assignments so far. I was given a collection of spoons that are to be displayed together and tasked with identifying the materials they are made of, as well as choosing appropriate treatments to meet their conservation needs. Some only require light cleaning while others have to be stabilised structurally. In addition to this, I will share recommendations about the display mounts and suitable materials for them. This project is most appealing because it is like a crash course in conservation, requiring me to use a wide range of skills relevant to conservation practice on a variety of materials (ivory/bone, metal, wood, glass, ceramic, and shell).
Two months have not yet passed since I started my internship at the Fitzwilliam and the experience has already proved to be beyond price in terms of educational value. I have been extremely fortunate to be allowed to experience so many different areas of museum practice. My interests within the heritage sector are broad and varied: with this placement, I certainly feel that I am able to explore different roles and diversify my skills.
I must express my gratitude first to my UCL supervisors, who recommended this internship to me, and to my internship supervisor, for taking my requests and interests into consideration when arranging my work plan. I appreciate its flexibility as well, especially considering that as a student I am eager to experience as many areas as possible to further develop my skills and identify new interests. I am also grateful to all the staff who have been so welcoming and have graciously allowed me to join in tours, conferences, and meetings where I have caught a glimpse of the behind-the-scenes work in the Museum. I am fortunate to have been offered this placement and look forward to the work that is to come.
Maria Melendez, UCL conservation intern
Definition of ‘light’: The natural agent that stimulates sight and makes things visible; the key words here being ‘makes things visible’.
Definition of to ‘illuminate’: to enlighten, as with knowledge, to make lucid or clear.
With such a large, diverse and dynamic collection here at the Fitzwilliam1it is hardly surprising that a lot of time is given over to preparing new displays, reviewing items destined for loan and supporting, at times complex in-house exhibitions.
Conservators are required to examine objects extremely closely and quite a lot of their time is spent carefully recording this information. Assessments are made with regard both damage and decay and then to diligently note perceivable change, especially over time. Furthermore, we must be able to establish the construction of an object, the materials that have been used, such as paper and drawing media, and in some instances even the order in which these have been applied.
Although light can be extremely damaging to a wide range of museum objects, its power with regard to illuminating collections can be fascinating and at times, revelatory. As such, both good light and good optics are essential.
Stand alone inspection lamps
To help in these tasks, the museum has recently acquired several stand – alone LED photographic lamps 2. These have replaced older fluorescent lamps which by comparison are somewhat harsh, one directional and at times prone to heating up.
Useful features include: an ability to adjust both the levels of illumination and colour temperature and integrated rechargeable batteries, which offer the unit much greater flexibility of use.

For conservators, the technology is now very much out there and the options available are multiplying all the time. To some extent, the process of selection will be determined by personal preference and in many cases, the cost. Speaking from experience, investing in a good stand (one that is both stable and mobile) will pay dividends. The wheels on ours seem to have a mind of their own and tend to travel in only the one direction!
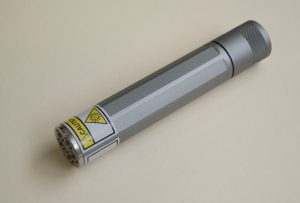
Hand held LED inspection lamps
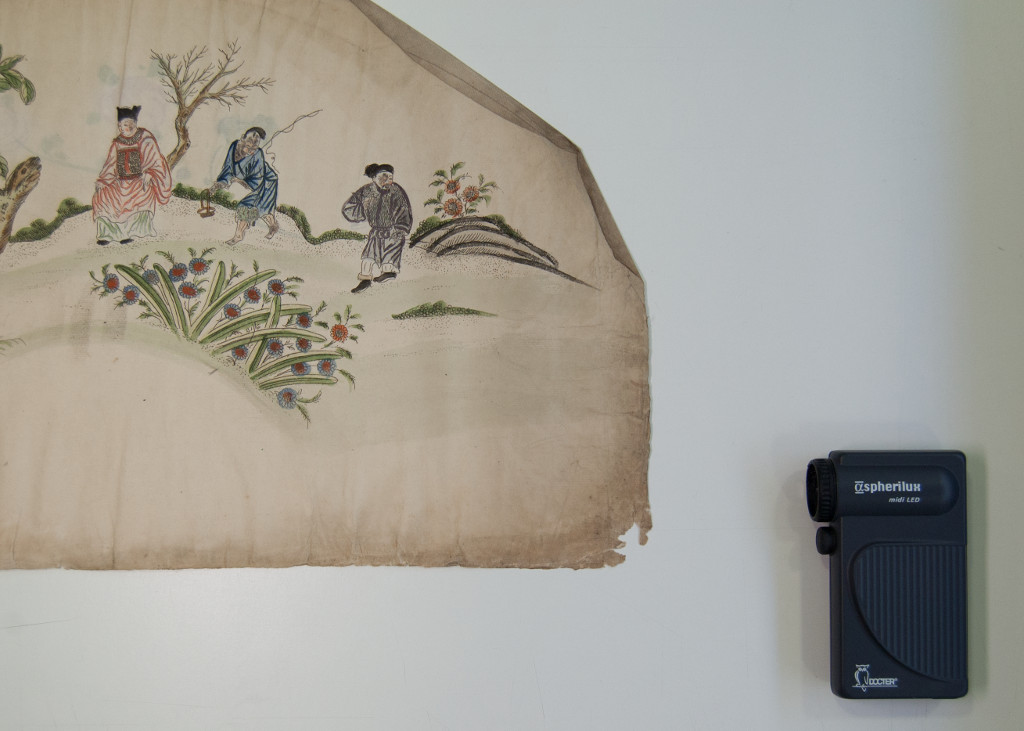
The Docter Aspherilux Midi rechargeable LED Torch 3
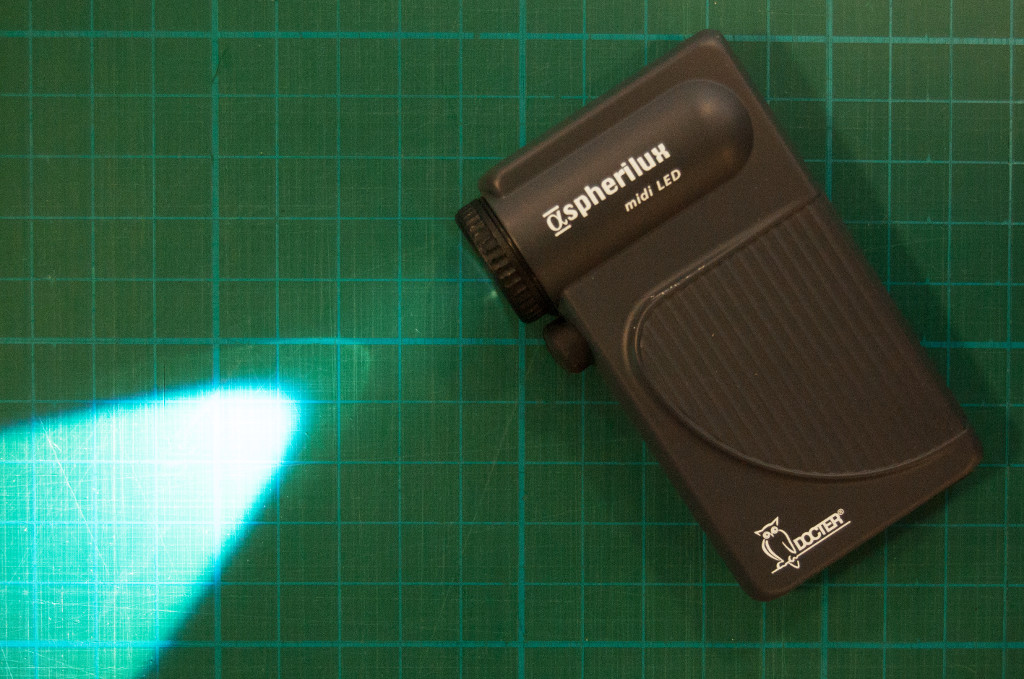 German-made and the quality really shines through.
A compact torch which gives bright, directional light of even intensity. The metal casing is robust, the body is well balanced and the unit contains integrated rechargeable batteries. The only problem you may have with this particular torch is ‘holding onto it’. In our museum, at very least, useful things become popular with others!
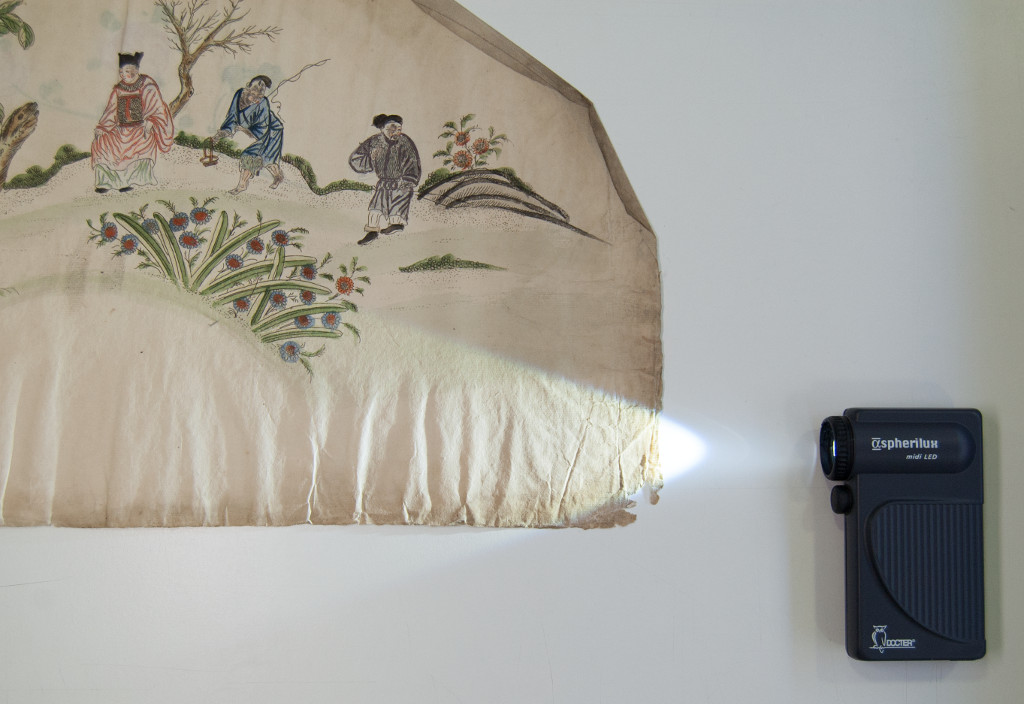
This clearly shows the power of ‘raking light’ in revealing the paper undulations, embedded creases, ingrained dirt and other interesting surface textures. Invaluable!
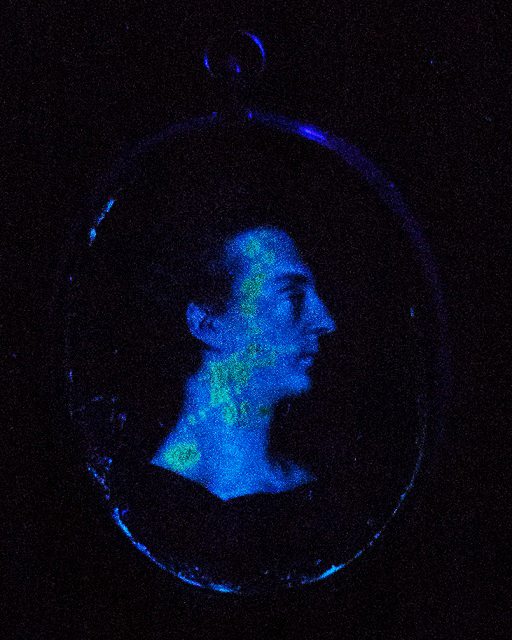
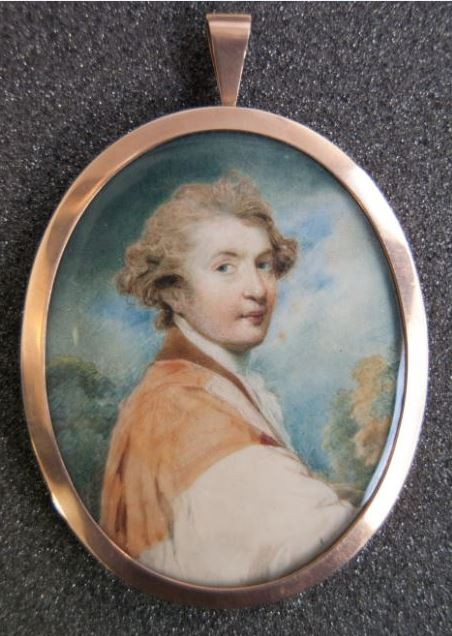
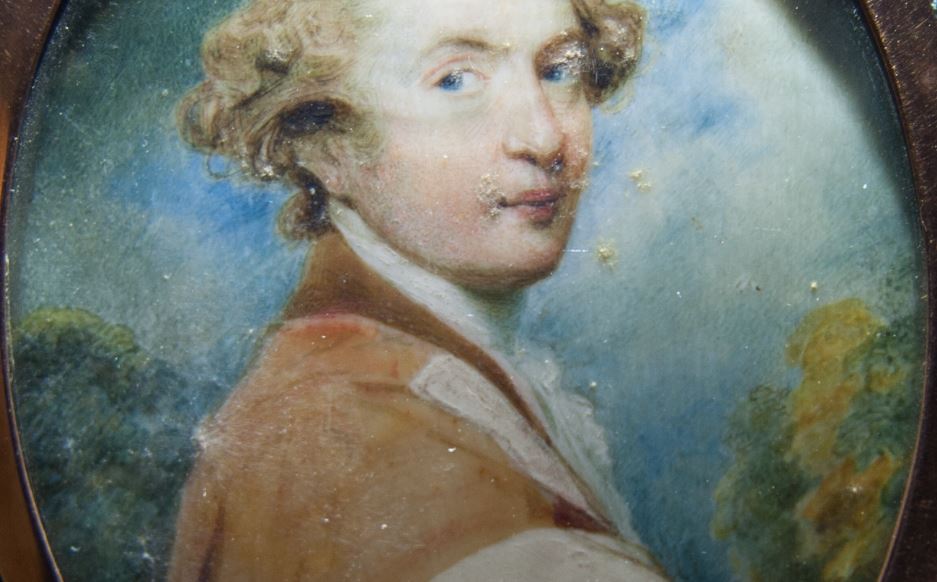
Shown below is a portrait miniature of Charles, 1st Marquis Cornwallis (1738-1805), No 3922. Watercolour on ivory, by John Smart (British artist, 1741-1811) within a decorative gold locket, glazed. Dimensions: 67 x 52 mm.
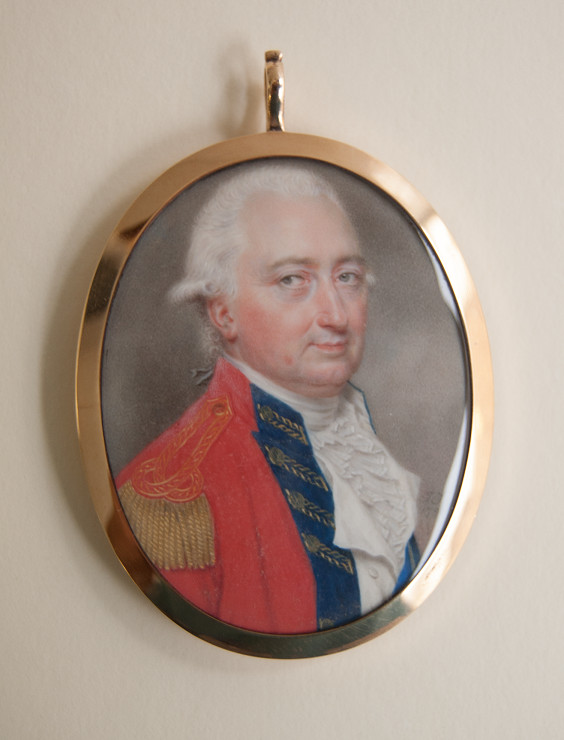

The black arrow above shows a passage of glass clouding and although subtle, this is important, being indicative of the onset of glass disease4. If this condition is left indefinitely, especially in a poor environment, the sequence of deterioration would become very much more dramatic. As such, by having noticed the change and ideally acting accordingly, this is an important first step in any good preservation plan.
Ultra Violet LED lamp5
On occasion, examining an object under Ultra Violet light can be extremely rewarding as illustrated by the 16th century portrait miniature, shown below. In this case the yellowy – green fluorescence indicates passages of loss, earlier damage and discrete later additions. This particular ‘visual marker’ is indicative of a 19th century pigment, Chinese White (zinc oxide)6.
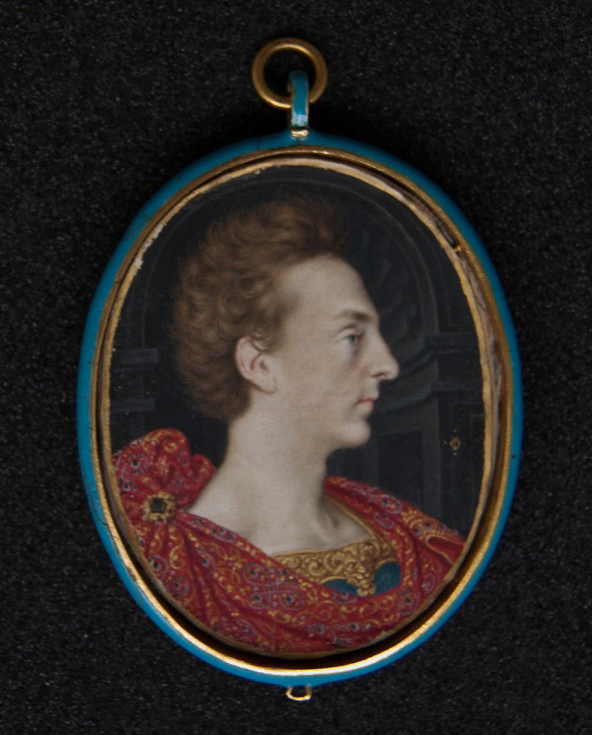
Portrait miniature of Henry Frederick, Prince of Wales by Isaac Oliver (British artist, 1556(?)-1617) 3903. Watercolour on vellum laid to card. Dimensions: 52 x 40 mm.
Magnifiers
An Optivisor is a useful and inexpensive viewing aid, costing approximately £30-50. This is the sort of thing that one often reaches for whilst inspecting an object at close quarters and is commonly used by paintings conservators engaged in detailed image reintegration -restorations.
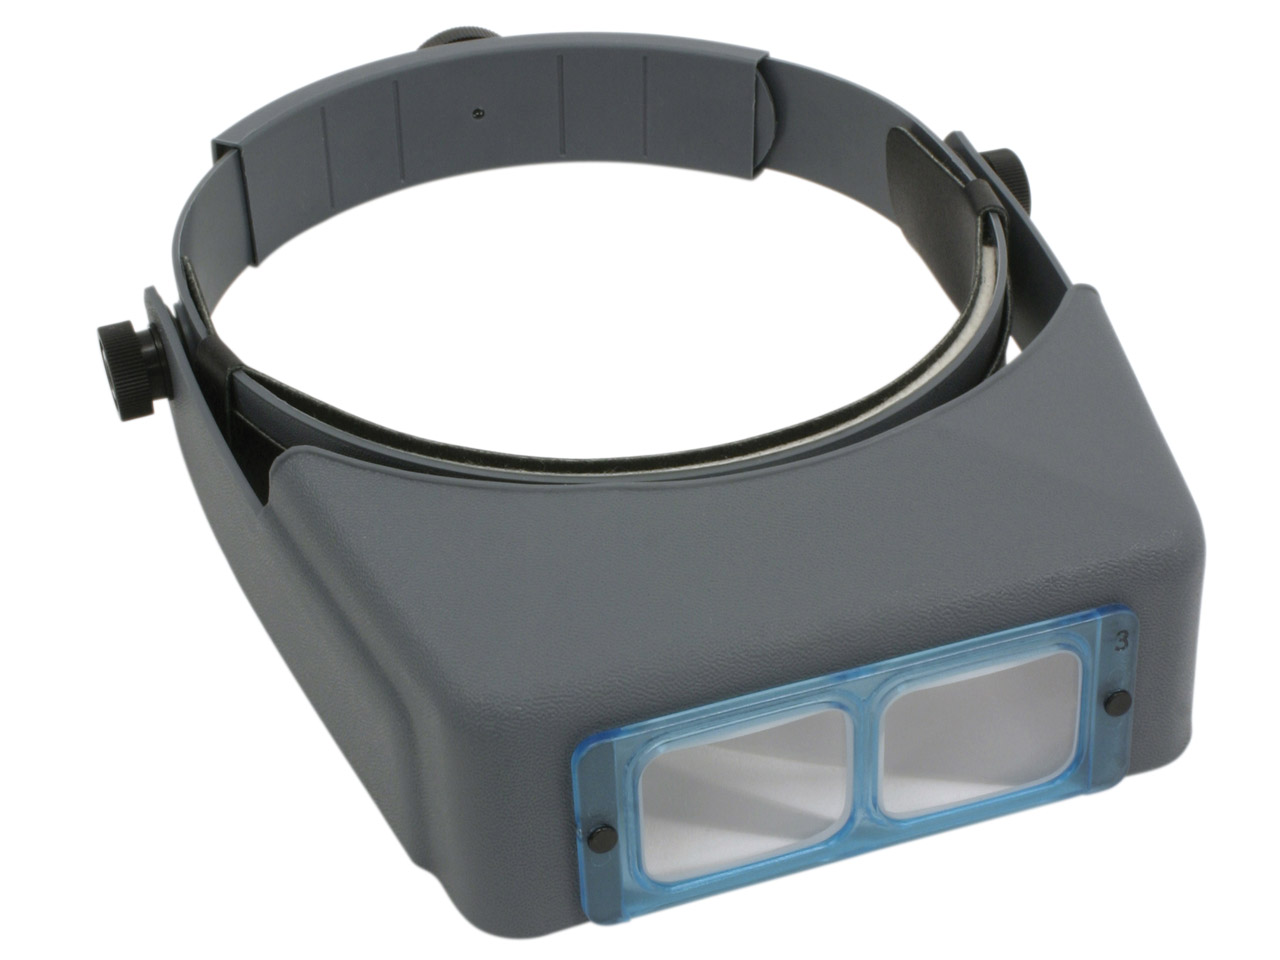
Various lenses are available offering different powers of magnification and are easily interchanged. Personally, I have found x 4 most helpful for some of the more detailed conservation tasks.
In recent months here at the Fitzwilliam we have been taking a closer look at many of our miniature paintings7and for this task, I have found a small hand-held magnifier especially useful8.


Portrait miniature of an unknown man, PD.958-1963. Watercolour on ivory by John Smart (British artist, 1741-1811) within a decorative gold locket, glazed. Dimensions: 38 x 32 mm.
Examining such small works as these under magnification and in good light, helps enormously in their interpretation. Close inspection is invaluable and may reveal all sorts of ‘collection care issues’; such as friable media and/or loss, the onset of glass disease or perhaps even, invasive mould growth (see the detailed image shown below).
Portrait Miniature of Sir Joshua Reynolds by James Nixon, British artist, c.1741(?)-1812, No 3800. Watercolour on ivory, within a locket, glazed. Dimensions: 80 x 64 mm.
Scale in life: 40 x 60 mm (detail)
Under closer scrutiny, surface mould growth is clearly visible. Spotting this type of damage and taking the necessary action (ideally addressing the mould and being especially vigilant with regard ‘storage conditions’) is important, in any progressive collections care plan .
Conservators are naturally inquisitive creatures and often, through necessity, have had to evolve and adapt. The profession is relatively small and sadly, all too often poorly resourced. As such, borrowing ideas from others is especially satisfying and all the more so when this saves a little money.
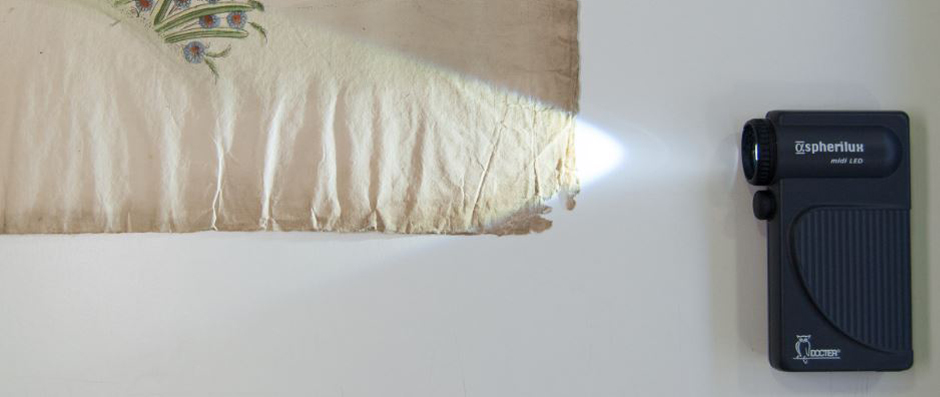
LED Light panel – light box
By way of example our studio recently purchased an LED ceiling light panel9,a chance find at a local electrical outlet. Although most frequently used in schools and hospitals, this even light source has now become our ‘go to’ studio light box.
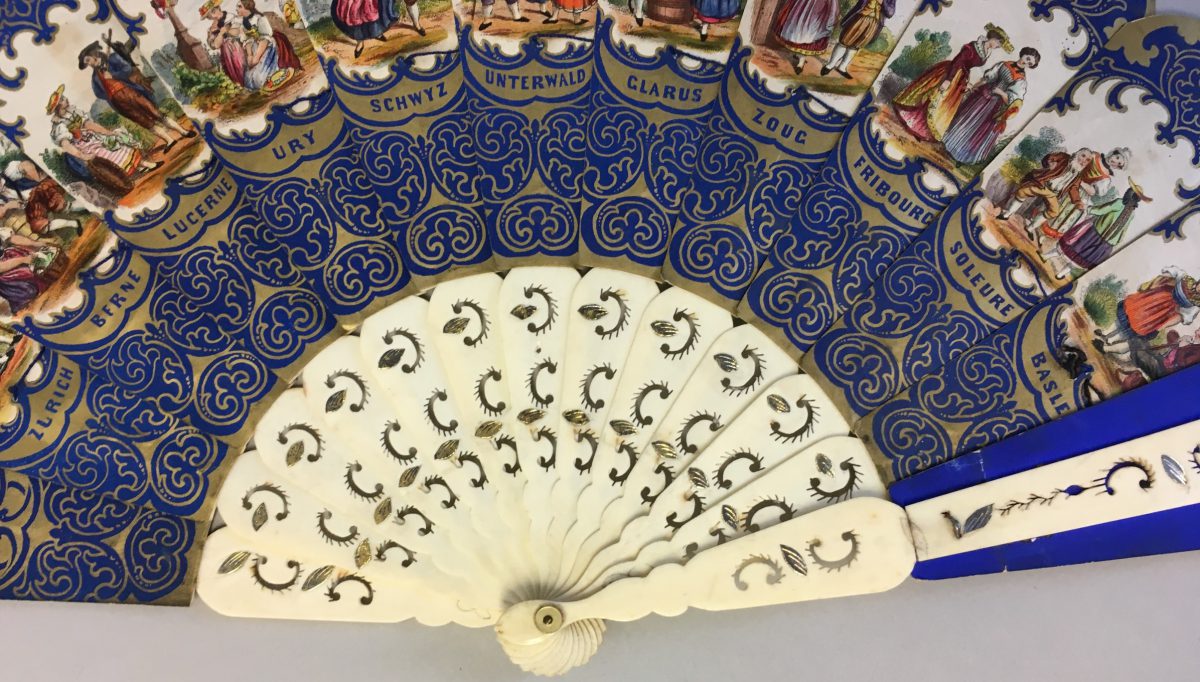
Transmitted light (light shone through a surface, such as a paper) is especially helpful in revealing certain characteristics that otherwise may remained hidden, such as a maker’s watermark or perhaps even, the date of manufacture.

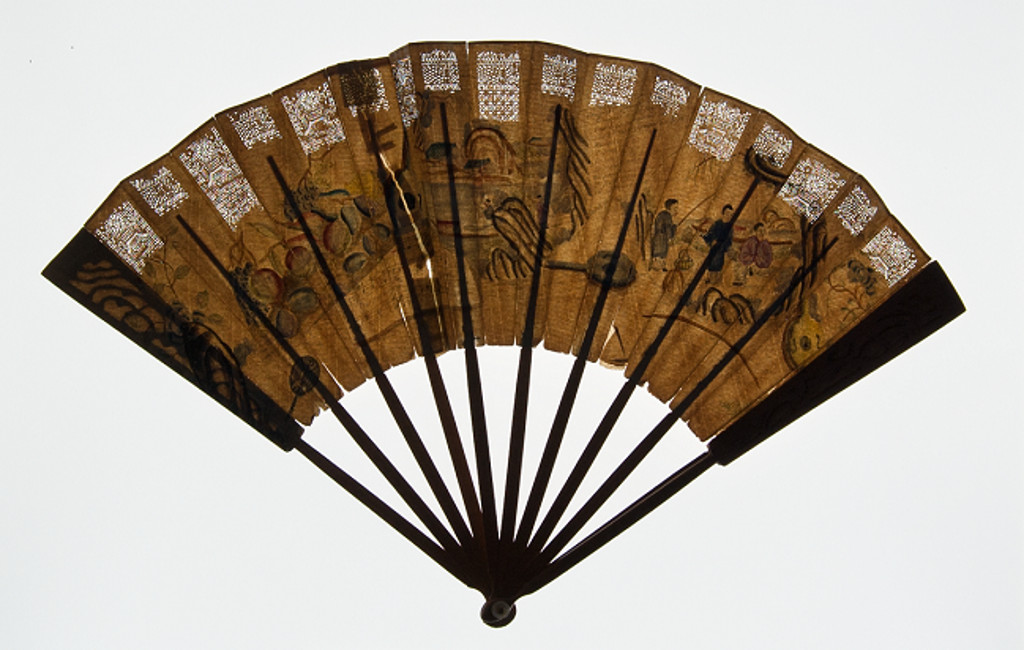

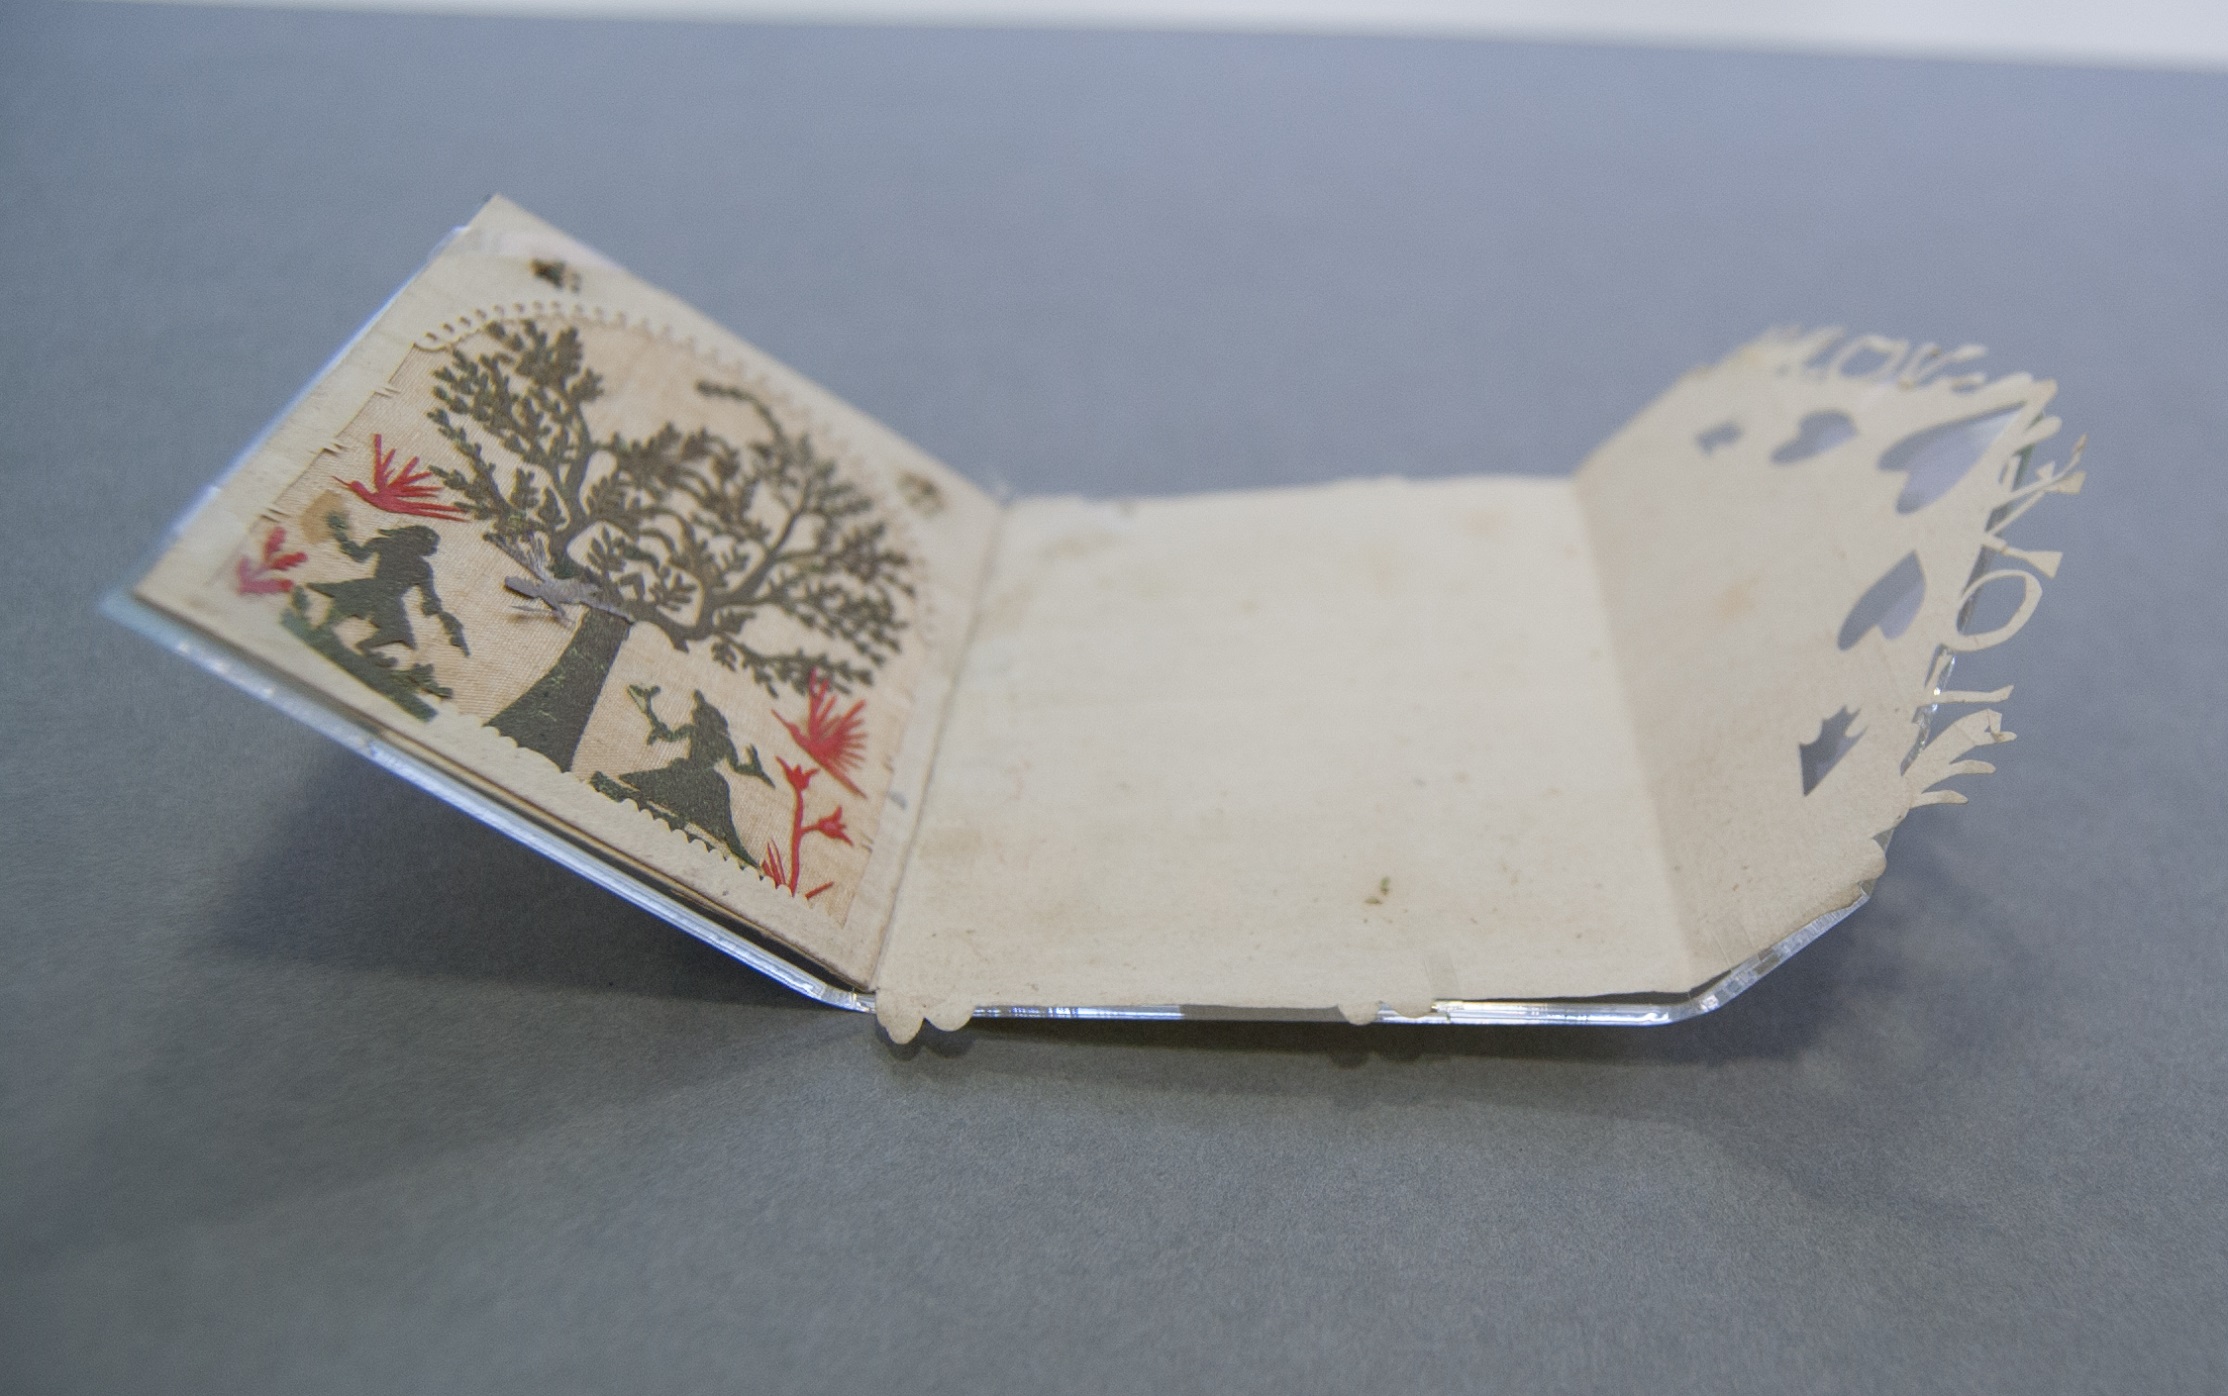
M.219-2015: 18th century Italian chinoiserie fan. One of 600 or so, rich and varied fans recently acquired by the Fitzwilliam (2015)10.
As conservators we look for clues with regard the paper type, the process of manufacture, the probable age and perhaps even, a place of origin. This not only helps in our better understanding an object it may sometimes lead to more precise authentication.
Below is a watercolour by JMW Turner, photographed in day light.

When viewed in transmitted light the paper shown above is clearly wove11 and looking more closely, a maker’s watermark ‘J Whatman 1834’ can be seen, which is both of help and significance. Turner is known to have visited Venice on at least three occasions, in 1819, 1833 and 1840, although recent research has suggested that he was also there between 1835 and 1839. The light shining through the paper reveals an extensive inscription written on the back of the watercolour (possibly in Ruskin’s hand) and also gives useful insight into Turner’s working methods where he has scratched back the paper, creating highlights of both the Venice skyline and turbulence seen in in the sky and breaking waves.
Dated watermarks do not prove the date of production but do provide a reference point of sorts, and it would be reasonable to assume that the work by Turner shown above could not have been produced any earlier. It could, however, have been produced several years later. Some artists are known to have preferred using a seasoned or aged paper, whereas others may have returned some years later to work up an incomplete sketch.
I hope that some of the illustrations presented above are of help and may stimulate others to look more closely and with that all-important ‘questioning eye’.
Acknowledgement: My thanks go to several kind colleagues for reading the text, helping with IT issues and for gently nudging me back on course.
This June I was lucky enough to spend two weeks working with Richard Farleigh, Conservator of Works of Art on Paper, as I undertook my training placement at the Fitzwilliam Museum in Cambridge. I have been living and training in Cornwall as a Books and Archives Conservator for just over a year now, having left my posts at the Fitzwilliam Museum in June 2017. It was a real joy to be able to return to the museum this year in a new guise, with new skills and a fresh perspective.
Carrying out my placement in the Paintings, Drawings and Prints Department (PDP) over a two-week period provided a unique opportunity for me to work alongside the Fitzwilliam’s paper conservators whilst also assisting the Department’s technicians with the installation of a new temporary exhibition. Whilst I cannot include in this blog post all that I have learnt, below I have picked out a few highlights from my time at the Museum. Before I tell my little story, I would like to thank the team for making me feel so welcome. It was a real pleasure to work with colleagues, old and new, and to gain such a breadth of experience through doing so.
My first week was largely spent assisting the Department’s technician team with the exhibition ‘Floral Fantasies’, now on display in the Shiba Gallery until 9th September 2018.
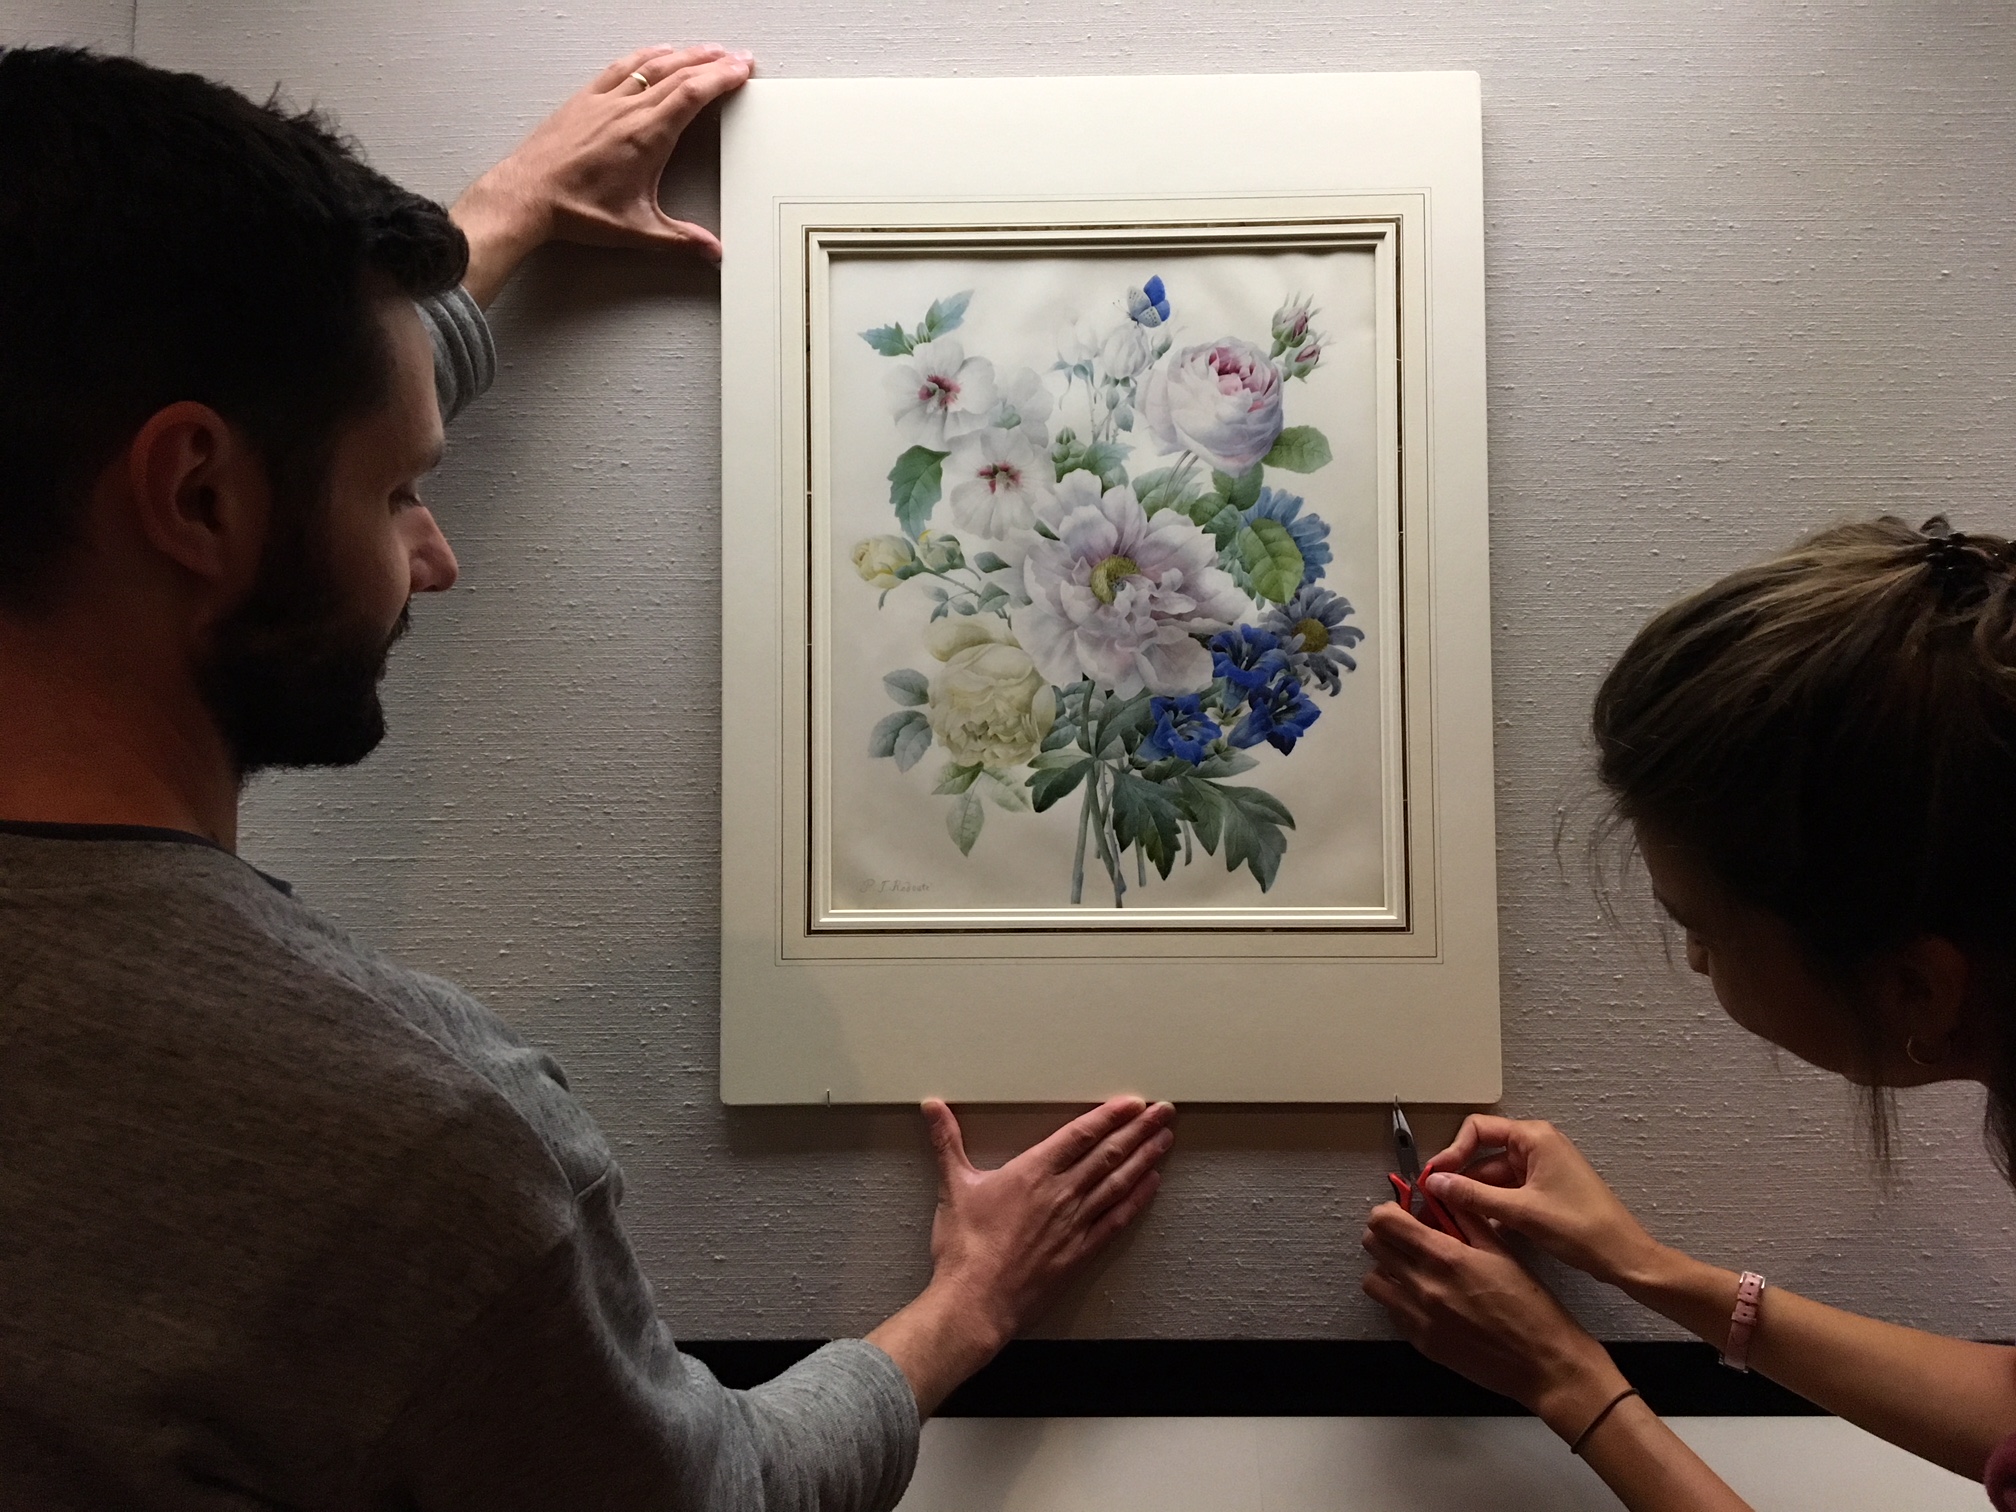
It was hugely valuable for me to work on this installation due to the range of objects and materials involved, each presenting its own challenges for mounting and display. It was exciting to see innovation at work in the Museum, particularly in terms of new mounting techniques and the use of acrylic to create bespoke cradles for the paper-based collection and the museum’s precious miniatures.
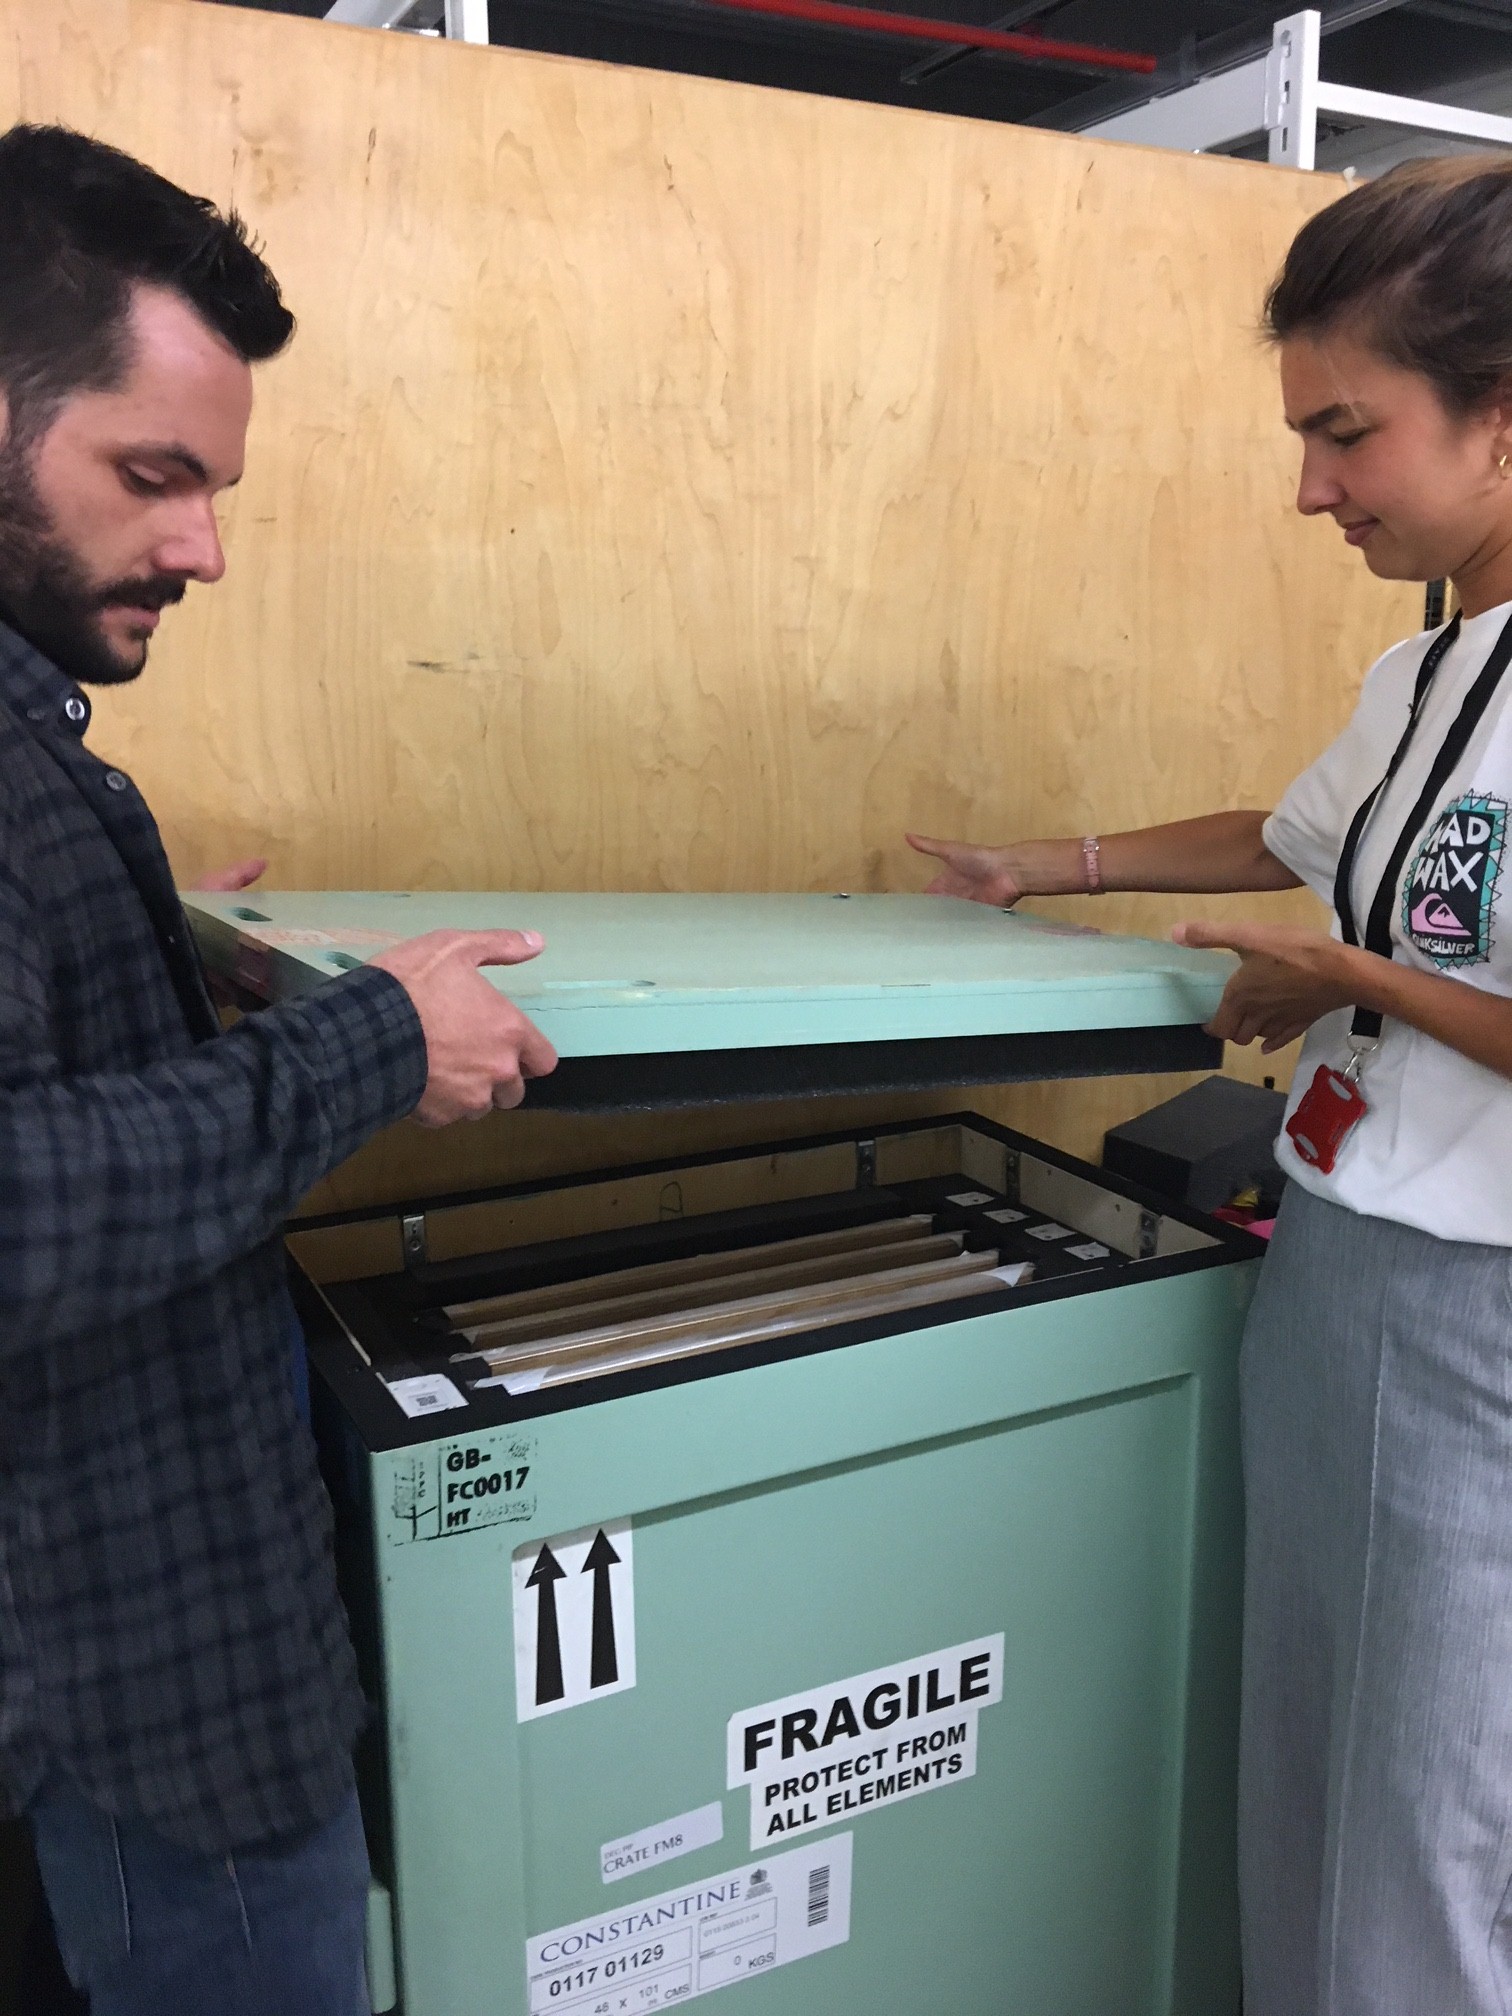
Coincidentally, my placement fell just at the moment a large consignment of some 80 art works, a loan show, Degas: A Passion for Perfection returned from the Denver Art Museum, USA. I assisted with the unloading and then helped the technician team return the full transit crates to one of the Museum’s picture stores.
The Museum had used a number of shock loggers, packed inside selected crates which monitored shock magnitude in real time.

Some of the works, be they pastel drawings or three dimensional sculptures, are inherently fragile. Information from the Shock loggers was relayed to designated recipients who were then able to monitor levels of shock and/or excessive vibration during the long journey.
I also assisted the conservators and technicians in unpacking several of the crates and then helped to condition check a number of Degas drawings.
It was interesting for me to understand how the Museum manages its various loans and to work through the procedures for condition checking. Later in the year in Cornwall I will be delivering a training session regarding best practice for display and will certainly be able to include many of the tips that I picked up whilst working in the PDP Department.
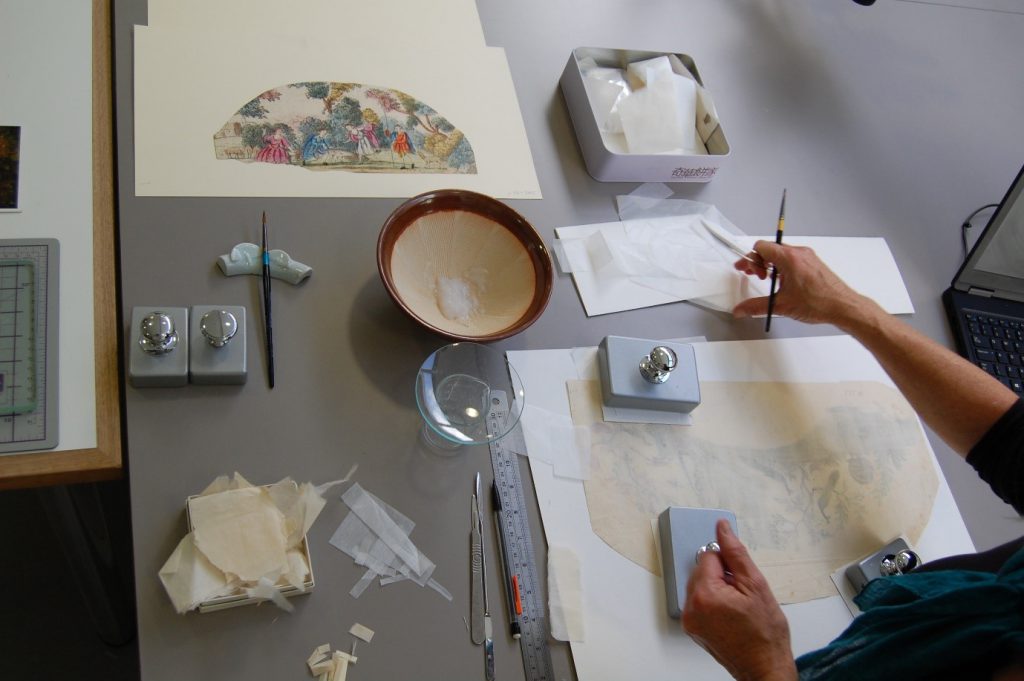
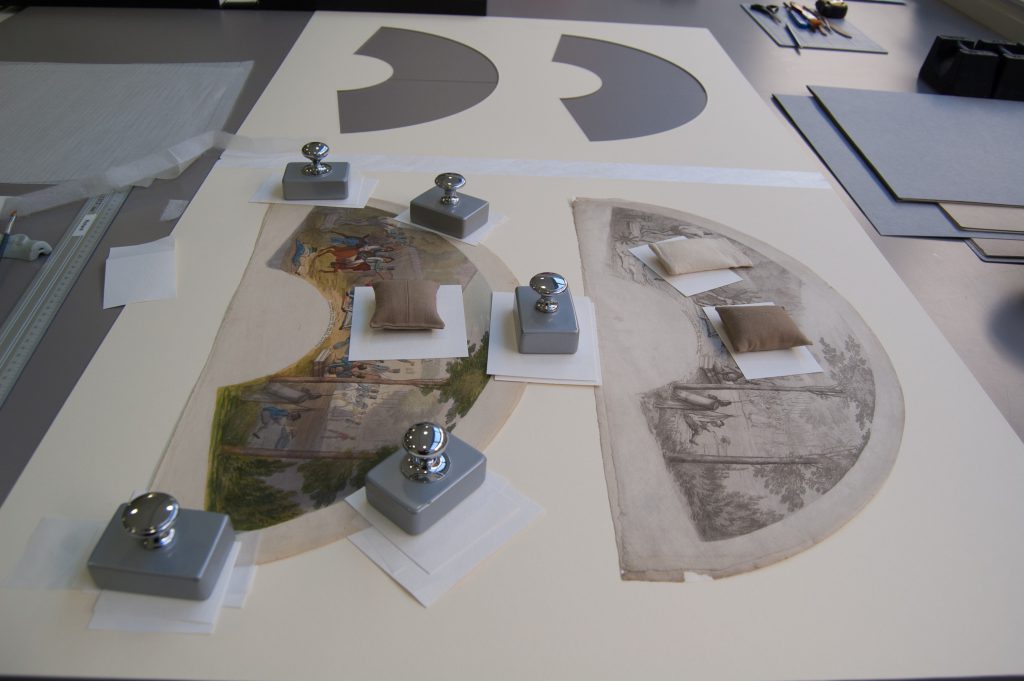
During my second week I was able to spend time at the bench in the conservation studio with both of the PDP paper conservators. With the Conservator of Prints, Harry Metcalf, I tried my hand at inlaying prints from parts of the collection currently not on display.

I also worked with Richard Farleigh on the mount cutter to learn more about the various house-styles for mounting up drawings. I made a mock-up of a mount for my own print and practiced other techniques using Japanese paper hinges. As exhibition preparation falls outside the remit of our conservation studio in Penzance, it was extremely useful for me to exercise my mounting skills. I now understand how to provide safe and lasting housing for paper-based collections, and how to select the most appropriate display methods.
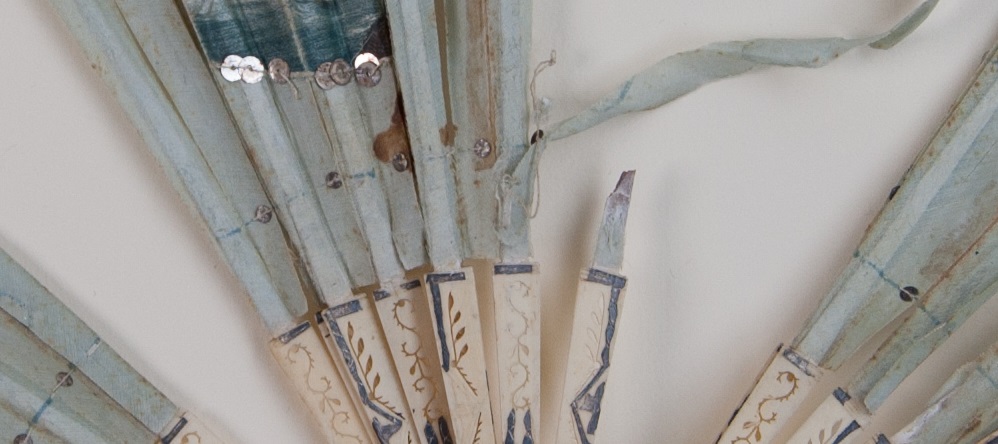
As I came to the end of my placement, it was a real joy to work in the studio with Rosie Macdonald, a contract paper conservator. In collaboration with the Applied Arts conservators, Rosie is conducting a survey of the condition and the conservation needs of the Lennox-Boyd collection of fans, a recent bequest of 435 folding fans, 10 screen fans and 178 single leaf fan designs. I helped with the survey and the cleaning and packing programme. Fans are complex objects often made from a variety of materials including paper, bone, gems, metal leaf and textile. Their conservation and storage needs are challenging, as Rosie explained.
Careful thought has also been given to the method of packing. Each item is wrapped in acid-free tissue, folded (importantly not rolled) in such a way that the fans are still partially visible through a layer of tissue, whilst also being supported by multiple layers of folded tissue underneath, forming a cushion.
My return to the Fitzwilliam, albeit brief, has really allowed me to supplement my training in Cornwall by broadening my skills in both paper conservation and exhibition planning and preparation. I would like to give special and sincere thanks to Richard Farleigh for organising my placement and for taking time out of his busy schedule to pass on his skills and provide opportunities for me to collaborate with colleagues.
Until next time Cambridge….
Hollie Drinkwater
New Starter Trainee
PZ Conservation C.I.C.